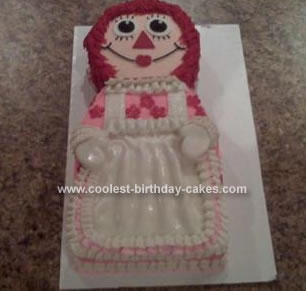
A mother with young children wanted something really special for her daughter’s 1st birthday. She decided upon Raggedy Ann and wanted the cake to be strawberry with strawberry cheesecake ice cream filling.
Since a double layer of ice cream would make the cake heavy, I opted not to make the cake 3-dimensional.
You’ll need a 1/4 sheet cake (9×11) and a 8″ round layer. Split the 1/4 sheet cake through the middle and set aside; split the 8″ round also. Do not trim the 8″ round flat – a little hump will give Raggedy’s face a little dimension and add to her character.
Tip: Chill or freeze the cakes to make splitting easier and reduce crumbs.
Before filling with your favorite ice cream, trim a small triangle off of each side of the 1/4 sheet to resemble the slope of the shoulders.
Next, lay the bottom layers of the 8″ round and 1/4 sheet in place and cut your ice cream in 1″ sections. Lay each section of ice cream across the cake until completely covered. Be careful to leave at least 1/4″ space from the outer edge of the cake to the ice cream layer. You will fill this gap with icing in the next step.
After the ice cream layer is in place, place the top 8″ and 1/4 sheet top layers in place. Quickly fill the gap between the layers with icing to seal in the ice cream. Freeze the filled cake at this point until hard.
Tip: Fill a pastry bag with icing and use it to quickly fill the gap between the cake and the ice cream layer.
While the cake is in the freezer, tint all of the icing you’ll need and fill your pastry bags. Remove the frozen cakes and begin decorating. Depending upon the temperature in your work area, you may need to put the cake in the freezer during decorating.
Face: All the details were hand-drawn and filled in using buttercream icing and liner tips #2, #3 & #4.
Hair: It is easier to use a “grass tip” – it looks like a thimble but has multiple holes. You can also use a #4 or 5 but it will take patience.
Apron & Hands: I chose to use home-made marshmallow fondant for the apron and hands. An apron drawn with buttercream would be just as cute.
Flowers: Again, I chose to use marshmallow fondant and a small cutter to make the red flowers on the dress. These flowers are easy enough to make with a large liner tip.
Hang in there, a home-made ice cream cake decorated especially for your special little one will certainly be worth the extra effort.
Your comment has been sent successfully.