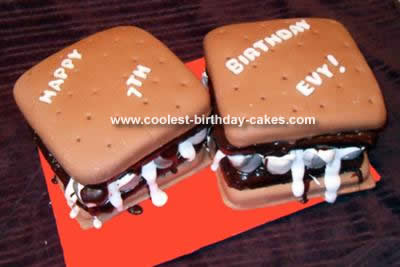
This Homemade S’mores Cake Design was fun because, let’s face it, S’mores are just a fun food. I made this cake for the daughter of a close friend whose party theme was all things “camping”. My biggest challenge was preparing everything in advance and then assembling it on-site since we were traveling four hours away.
To begin, I baked four 8-inch square square cakes: two chocolate and two yellow (vanilla). When I arrived at my destination they were still slightly frozen which was perfect so I could then slice each of those cakes in half, ending up with eight thin cakes. I had also prepared ahead of time: about six cups of chocolate buttercream icing and about 6 lbs of chocolate marshmallow fondant. Plus I had made 32 ‘fake’ marshmallows from rice-krispie treats covered in marshmallow fondant that was marbled to look charred. I brought along fondant remnants from previous cakes ‘just in case’.
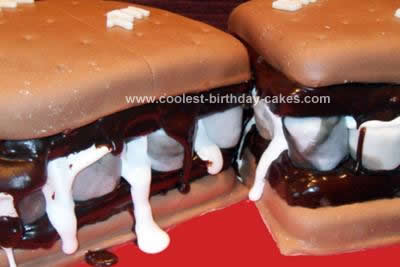
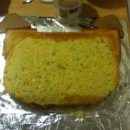
Once I crumb-coated the four yellow cakes in the chocolate buttercream, I covered them in chocolate fondant. These would be the graham crackers. Then I melted 2 cups of milk-chocolate chips and 3/4 cup of heavy cream (next time I’d go even lighter on the cream for thickness), placed the chocolate cakes on a rack over a cookie sheet and poured the melted chocolate over top, reserving about 1/2 to 2/3 cup and put the cakes in the freezer for 20-30 mins so the chocolate would set.
I assembled first one cake and then the second so I could be sure the structure would hold, since this was my first time making a cake of this kind. On a 9”x13” fondant-covered cake board, I placed the first ‘graham’ square cake at a slight angle. Next I put a chocolate cake on, turning it slightly. On top of that I placed 16 ‘fake’ marshmallows (four rows of four) and poured 1/2 jar slightly melted Marshmallow Fluff on the marshmallows to helps them stick together and not slide off the cake. Plus the drips down the side of the cake gave a nice effect. Put another chocolate cake carefully on the marshmallows and poured half of the reserved chocolate on top so it would drip down the sides. Finally I added the top ‘graham’ layer, slightly askew. To finish it off, I used a serrated wheel up the middle of the fondant (the ‘seam’ of the graham cracker) and then with one of my fondant tools (you could use the end of a paint brush) I poked dimples (careful not to go too deep) in the top.
I repeated these steps for the second cake and then cut out white fondant letters for the birthday message. Cutting into the cake was actually much easier than I thought it would be. Each piece was about 2”x2” and had one of the marshmallows in each serving. Perfection. A definite crowd-pleaser.
Your comment has been sent successfully.