Take a look at these cool homemade Rolie Polie Olie cakes shared with us by cake decorators from around the world. Along with the birthday cakes here, you’ll also find loads DIY birthday cake-making ideas and how-to tips to inspire your next birthday cake project. Enjoy!
And don’t forget… if you end up with a cool cake, have great tips to share or pictures of awesome birthday cakes you’ve made in the past, share them here and be a part of our coolest birthday cake community.
Latest Rolie Polie Olie Cakes
- Coolest Rollie Pollie Ollie Cake Photos and Tips 3I made this Rollie Pollie Ollie cake for my daughters 2nd birthday! She loves Ollie and Zoe! I used a … Read more
- Coolest Rollie Pollie Ollie Cake Photos and Tips 4This Rollie Pollie Ollie cake was easy, I basically bought an edible image on eBay with Rollie Pollie Ollie on … Read more
- Coolest Rollie Pollie Ollie Cake Photos and Tips 5This was actually my first birthday cake, and I made it for my sons 1st birthday. He loves the Rollie … Read more
- Coolest Rollie Pollie Ollie Cake Photos and Tips 6My son loves the Disney show, “Rollie Pollie Ollie”. It is a great show so I thought it would be … Read more
- Coolest Rollie Pollie Ollie Cake Photos and Tips 7The theme to my daughters first birthday was Rollie Pollie Ollie.The base of the cake was a large rectangular cake … Read more
- Coolest Rollie Pollie Ollie Cake Photos and Tips 8I baked two different sized round cakes for the head and body (the head should be bigger). I colored fondant … Read more
- Coolest Rollie Pollie Ollie Cake Photos and Tips 9My son wanted a Rollie Pollie Ollie cake this year for his 5th birthday. I wasnt well versed on the … Read more
- Coolest Rollie Pollie Ollie Cake Photos and Tips 10This was my sons first birthday cake, Rollie Pollie Ollie. I made it the length of my dinning room table. … Read more
- Coolest Rollie Pollie Ollie Cake Photos and Tips 11My daughter loves Rollie Pollie Ollie, so I decided to make her this cake for her 2nd birthday. I got … Read more
- Cool Homemade Rolie Polie Olie CakeThis is my first fondant cake. I made this Rolie Polie Olie cake for my father in-law so that I … Read more
- Coolest Rolie Polie Olie CakeThis Rolie Polie Olie Cake was actually an easy cake to make. We used 2 round cake pans, 9inch for … Read more
- Coolest Rollie Pollie Ollie CakeMy sister in law and I came up with this idea of a Rollie Pollie Ollie to have for my … Read more
Featured Cakes
Rolie Polie Olie cake photo by Ashley B., Saskatchewan, Canada
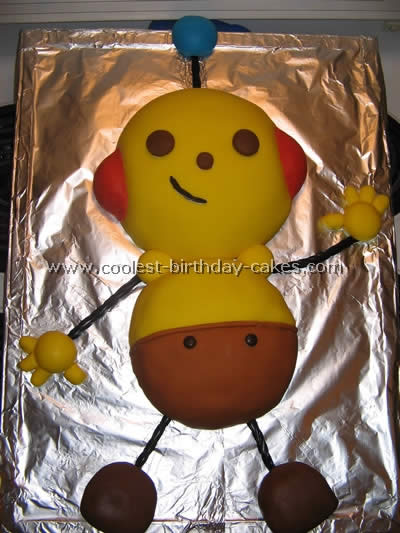
This cake was my first one I’ve ever made. I got the idea from this site. Since my son is two he only knows of a few shows and this is one of them! I rented a Wiltons soccer ball shaped pan and then changed my mind at the last minute and decided to try Rolie.
I used instant cake mixes to make two rounds. I trimmed one down a bit to make the body smaller than the head. I used buttercream and then covered the cakes with fondant that I bought pre made (didn’t realize it was so easy to make until I already bought it). I used black licorice for the arms, legs, antenna smarties for the buttons, two muffins for the feet and fondant for everything else. I attached it all with dabs of buttercream.
Cake photo by Carol M., Clark, New Jersey
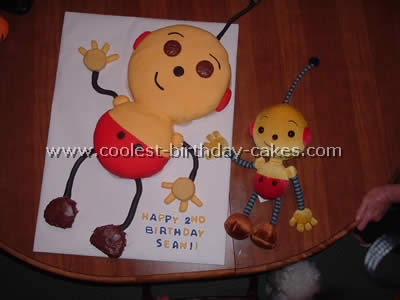
I got this idea for a cake from this site. I took a few of the ones I liked then combined them to make the perfect Olie cake. I have made many cakes and this one has beaten them all.
I used a 12 inch cake pan but trimmed it to about the size of a big dinner plate (head) and an 8 inch (body) cake pan then used cupcakes for the hands and feet. I ran out of room and didn’t have a bigger board so I had to trim the head.
I made basic chocolate box cake and Wilton’s basic butter cream frosting. I left that all white except for some I flavored chocolate for the feet. I used Wilton’s pre made fondant, red was already colored and the yellow I had to color. I also made some black for the mouth, buttons and legs and arms.
The eyes are chocolate covered cookies. For the hands and feet of the Rolie Polie Olie cake I used the bottom part of the cupcake. I just trimmed them until I thought they looked right. I cut out the letters from fondant with cookie cutters. This was my first time really using all fondant on a cake and it was much easier then I expected.
Cake photo by Lacey B., Leominster, MA
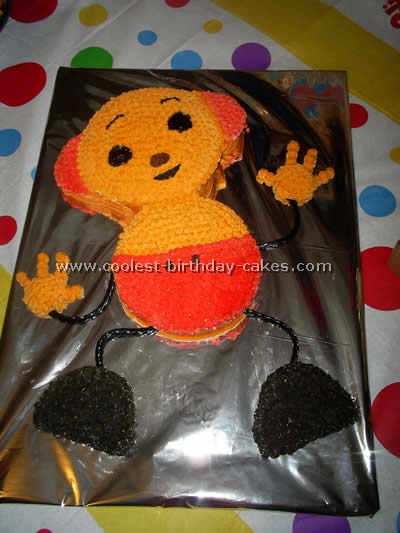
Well I started out by looking for a good picture of Rolie Polie Olie that I wanted to copy. I found one of the cakes on this web site.
I made two round cakes with two cake mixes. I used an oval shaped pan for the feet. I cut the oval shape in half to make them. For the ears I used an oval pan, cut the ovals in half. I used two cupcakes and frosting for the hands.
I used black licorice for the legs and arms. I used the star shaped frosting tips for the whole cake. I used gel for the eyes and mouth.
Cake photo by Christine M., Hawthorne, NJ
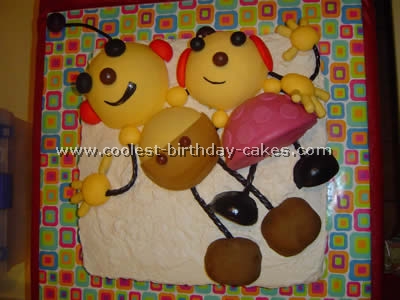
I made this Rolie Polie Olie cake for my daughter’s 2nd birthday! She loves Ollie and Zoe! I used a 16 x 16 base and then used the Wilton ball pan for the body and head. Since I needed some of the round pieces smaller, I didn’t fill the pan up as much as the other to get the difference in size.
I used fondant to cover the bodies and licorice for the legs and antennas. I covered tootsie rolls with the fondant for the fingers and used snowball cakes covered as well for the feet. I used caramel balls for the buttons and jumbo whoppers for their noses.
Cake photo by Eveleen G., Dallas, TX
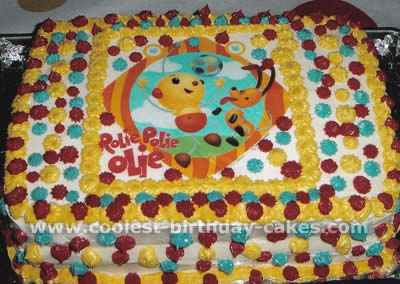
This Rolie Polie Olie cake was easy, I basically bought an edible image on eBay with Rolie Polie Olie on it. I baked two cakes, chocolate flavor, 9×13 sheet cake pans and assembled it by putting Twinkie filling in the middle, (the recipe for Twinkie filling is with my first Rolie Polie Olie cake submission) then top it with the second cake and frost the big two layer sheet cake with white buttercream frosting.
I then piped a border on the edge of the edible image and the edge of the cake in yellow buttercream with a star-tip and I did a little yellow buttercream on the edge of the bottom layer also. I piped randomly blue, red and yellow buttercream frosting all around the cake to match the picture and Rolie Polie Olie partyware.,
Cake photo by Eveleen G., Dallas, TX
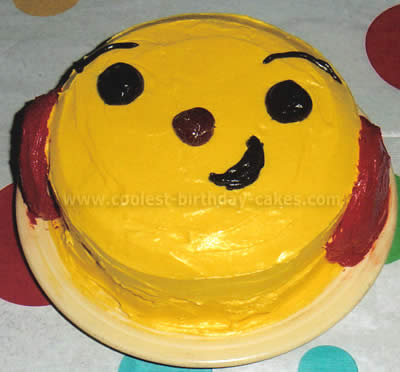
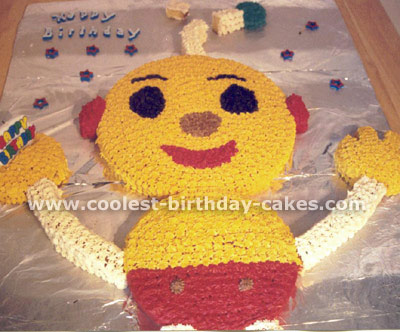
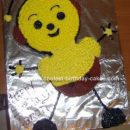
This was actually my first birthday cake, and I made it for my son’s 1st birthday. He loves the Rolie Polie Olie cartoons so much and it is very easy to make.
I baked two layers of yellow cake in separated 9″ round pans, with a filling in the middle. I like to call Twinkie filling, because it is so fluffy when at room temperature and it tastes like cream when used in cold cakes. The frosting is a special buttercream frosting made with heavy cream instead of using milk so it makes it a lot creamier and soft.
I tinted the buttercream with gel colors in yellow and one part in red, 1/4 cup tinted black and a little bit brown just for the nose. After I frosted my cake completely with yellow buttercream, I got two of those cream filled donuts (the ones without a hole in the middle) and placed them on the sides of the yellow frosted cake. I frosted the donuts with red buttercream and made a brown nose with buttercream in the middle of the cake as well as two big black dots for the eyes and the eyebrows.
The last touch is to make the mouth smiling sideways very close to the nose and eye with frosting. The Twinkie filling recipe is: 1 cup butter or margarine (room temperature not spread), 1 cup vegetable shortening, 2 cups sugar, 1 can evaporated milk, 1/2 cup milk, 1 tbsp. vanilla flavor or almond flavor cream butter, and ad shortening and cream to it for 5 min. – beat in sugar and add milk and vanilla (or almond), then add the evaporated milk until fluffy about 5 minutes.
At first it looks messy when you are combining the milks to the butter/shortening/sugar mixture but don’t stop, it will get fluffy when all the liquids are incorporated to the mixture.
Cake photo by Jaynie B., Greenwood, Indiana
My son loves the Disney show, “Rolie Polie Olie”. It is a great show so I thought it would be really neat to make the main character for his birthday cake.
All of his body and shoes are cake, then just decorated with icing. His hands and shoulders are made out of fondant icing. His arms, legs and antenna are black and gray piping from the craft store just intertwined together. On top of the antenna is a pom pom. His eyes and nose are pieces of painted wood (it was a round ball cut in half). The buttons on his shorts are malt balls.
This is one of my cake decorating masterpieces! It was really fun making it and hope it will inspire someone!
Cake photo by Lena G., Clermont, Florida
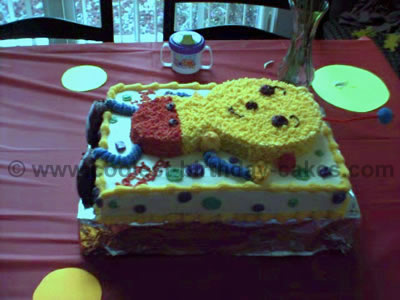
The theme to my daughter’s first birthday was Rolie Polie Olie.
The base of the cake was a large rectangular cake pan. Olie’s body was made with a small round pan (like from the top of a wedding cake). The head was made with two 12in cake pans layered. We piped the frosting on, had the legs hang over and the shoes were just chocolate frosting piped thick.
The finishing touch for the cake decorating was a craft pipe in the top of the head with a fuzzy ball for the antennae.
Cake photo by Heidi R., Oneida, NY
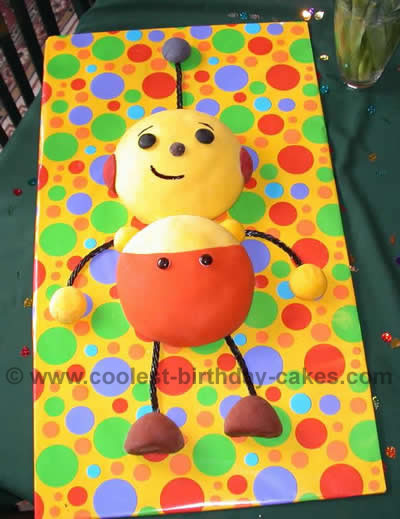
I baked two different sized round cakes for the head and body (the head should be bigger). I colored fondant the proper colors and laid it over the already iced cakes. I used leftover fondant for the hands, ears, buttons and eyes. I used a chocolate candy for both the nose and the buttons. I used black licorice for the arms, legs and antennae. The feet were made using a Wilton pan that makes small mound cakes. I made one mound and cut it in half, then covered it with fondant.
I happened to find the polka dotted wrapping paper at the dollar store! My son still asks me to make him a Rolie Polie Olie cake!!
Rolie Polie Olie cake photo by Krystal G., Lafayette, IN
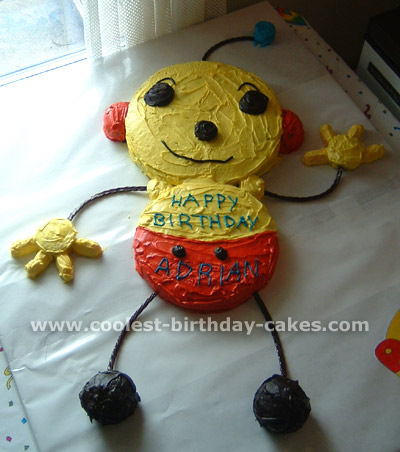
My son wanted a Rolie Polie Olie cake this year for his 5th birthday. I wasn’t well versed on the Rolie Polie Olie world, so I had to do a lot of research on the internet.
This Rolie Polie Olie cake was the biggest challenge in cake making I’ve had thus far. I have to say the inspiration I had to make this Rolie Polie Olie cake came from this website. So, for those who have come before me (to Rolie Polie Olie ville), I thank you!! And good job(s)!
Here are the cake sizes I used for the body parts: 12″ x 2″ round for the head, 10″ x 2″ round for the body, mini cupcake for the nose, 2 stacked mini-cupcakes for the antennae top and shoulders, jumbo cupcakes for the feet and ears, regular cupcake for the hands, circus peanuts for the fingers, chocolate Twizzlers for the arms, legs, and antennae.
I used 3 cake mixes: 2 chocolate, and 1 white. This was a challenge, as I had to figure out which cakes/cupcakes to make with which flavor, so there was enough batter for all the cakes/cupcakes I needed to make. Also, I had to figure out which pans would fit together in the oven on the same shelf, so they could be baked at the same time.
Ok, this is what I did to make this Rolie Polie Olie cake: I made the 2 chocolate cake mixes first, adding two extra eggs for added stability. I used Bake Even Strips on the round cake pans, to ensure even baking and no round hump in the middle. I filled 3 Jumbo Cupcake wells 2/3 full, which left enough batter to fill the 12″ pan about 1/2 full.
I reduced the oven temp to 325F, instead of the recommended 350F (this keeps the cakes from cooking too fast, and becoming too dry, or the edges overcooking and middle of the cake under-cooking).
The 6-well Jumbo Muffin/Cupcake pan fit perfectly next to the 12″ round in my oven. The Jumbo Cupcakes took approx. 25 minutes to bake The 12″ took 45-50 minutes.
To cool the large cakes on the cooling rack, I got creative: I put two cooling racks, side by side, and I tore off two 6″ section of aluminum foil, and folded it lengthwise several times into a 1/2″ strip. I wrapped the strips around the adjoining wires of the cooling racks (and the folding legs) to keep them together. It worked perfectly!!
Next, I made the 1 white cake mix, adding one extra egg for firmness. Since I needed 2 regular cupcakes, 7 mini cupcakes, and one 10″ cake, and couldn’t fit it all in the oven at the same time, I baked the smallest cakes first. Again, I baked the cakes at 325F. One cake mix was exactly enough to fill the 10″ round pan 1/2 full, 2 regular cupcake wells, and 8 mini-cupcakes (1 extra, just in case!).
The mini-cupcakes took about 15-20 minutes to bake. When those came out, I put the 10″ and the regular-size cupcakes in. The regular cupcakes took about 15-20 minutes to bake, and the 10″ took about 40-45 minutes to bake.
Placement for the Rolie Polie Oliecake: I used a folded down cardboard box (a rather large one), and used packing tape to tape the flaps still. Then, I covered the whole thing with freezer paper, shiny side up. I used packing tape to cover the overlapping. It worked great, because the shiny side didn’t absorb the moisture, and I could wipe up any frosting messes with a washcloth without getting the paper soggy!
Frosting the Rolie Polie Olie cake: You’ll need at least 2 boxes of coloring for the frosting. I used 3 tubs of vanilla whipped frosting in the can for easier spreading. I used a whole can of frosting for the yellow. I frosted the head (12″ round) first.
Then, I butted the 10″ cake (Rolie Polie Olie body) up next to the Rolie Polie Olie head; kind of shoving it together, so it didn’t look like his head could roll off. I drew a line in the 10″ cake with a toothpick to guide where the frosting should go, then frosted the top of it with frosting I colored yellow.
Next, I stacked 2 mini-cupcakes together, putting a small amount of frosting in between to hold them together. I frosted 1/2 way around the edges and put that frosted edge in the corner of the Rolie Polie Olie head/body.
Then I frosted the remainder of the shoulder. I stuck a chocolate Twizzler into the edge of the shoulder, and the other end into the side of a regular-size cupcake. I frosted the cupcake (Rolie Polie Oliehand).
To frost the circus peanuts, I inserted a toothpick into the end of each one, and frosted it while I held it like a popsicle. Then I shoved it up next to the “Rolie Polie Olie hand”, and covered any hole left by the toothpick with the frosting.
Rolie Polie Olie antennae: Insert chocolate Twizzler into head for antennae. I colored a small amount of frosting with enough blue food coloring to attain desired color. HINT: Use a small amount of frosting (less than 1/4 cup) because it’s hard to get the blue very dark (mine didn’t get as dark as I would’ve liked).
Stack two mini-cupcakes for the antennae ball, like the shoulders, using frosting in between to hold them. Frost the edges as much as possible while holding them; it’s easier. Insert the other end of the Twizzler into the mini-cupcake stack, and frost the remainder of the antennae ball.
Rolie Polie Olie pants/ears: For the Rolie Polie Olie ears, I cut a Jumbo cupcake in half from top to bottom. I had to cut a little off the bottom of each one, so the ears weren’t taller than the head. I placed the ears next to the Rolie Polie Olie head before I frosted them.
I colored 1/2 a can of frosting with red coloring. I used 2 entire tubes of red gel food coloring. It does take a LOT , but it doesn’t change the flavor of the frosting, so don’t worry (also, it does dry darker). My frosting still looked pink as I frosted the cake, but I had given up (I was pleasantly surprised the next day to see that it did look red instead).
Rolie Polie Olie feet: I used Dark Chocolate canned frosting for the feet. I inserted one end of the chocolate Twizzlers in the “Rolie Polie Olie foot” and one end into the “Rolie Polie Olie pants” for each leg.
Rolie Polie Olie face: I originally intended to use mini York Peppermint Patties for the eyes, but when I put them on the face, they were too small. So, I just piped the chocolate frosting over and around them to increase their size. I piped the eyebrows and smile on, too.
For the Rolie Polie Olie nose, I frosted a mini-cupcake completely while holding it. Then I placed it on the face, and covered any holes left from my finders with the frosting. I piped the buttons on the pants with the chocolate frosting.
I bought a tube of blue decorating frosting that you attach the decorating tips to for writing “Happy Birthday” on the Rolie Polie Olie cake. I could’ve used the same blue frosting I used for the antennae, but I thought the tube would be easier. It wasn’t.
How I do my piping: I place the frosting in a zipper storage bag, and cut one corner off. It squeezes much easier than the tubes of decorator frosting, and tastes better too!! I am by far an amateur, so I hope this Rolie Polie Olie cake recipe can encourage someone!!
Rolie Polie Olie cake photo by Giselle A., La Ceiba, Honduras
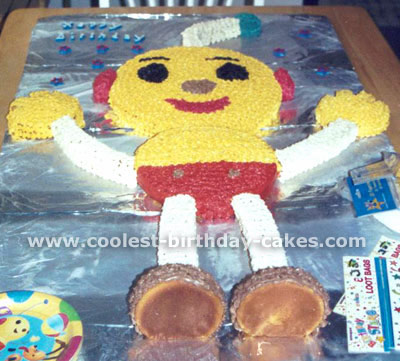
This was my son’s first birthday cake, Rolie Polie Olie. I made it the length of my dinning room table. I made Rolie Polie Olie with round cake pans. The Rolie Polie Olie arms and legs were made with long strips of cake that I made in a rectangular pan.
This cake was a challenge for me and I think it came out pretty good! Everyone gave good compliments about it, the kids had fun and my baby was so happy to have a Rolie Polie Olie cake!
Rolie Polie Olie cake photo by Heather A., Oakland, CA
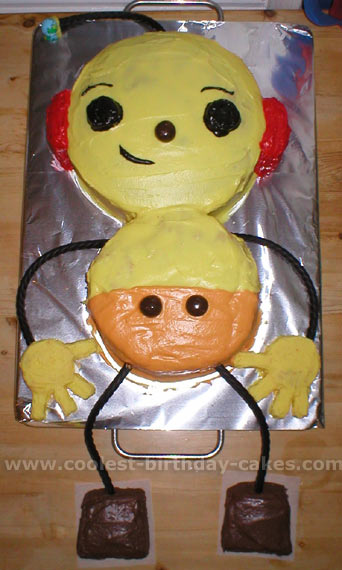
My daughter loves Rolie Polie Olie, so I decided to make her this cake for her 2nd birthday. I got inspiration from other cakes on this website.
I made two angel food cakes in 9-inch spring form pans. After they cooled, I trimmed about 3/4-inch off around one to make the body circle smaller, and used the trimmings to shape the feet, ears and hands. Angel food cake cuts well with scissors!
The Rolie Polie Olie hands were the trickiest to assemble – I cut rounds for the palms and little rectangles for the fingers, which where then glued together with frosting, put in the freezer for a couple minutes to firm up, then frosted with warm (soft) frosting, and chilled again before transferring to the body.
I used licorice vines for the arms/legs/antenna, malt balls and black frosting for the rest. His antenna ball is a candy covered with blue foil. I put the Rolie Polie Olie cake on a turkey carving board, and the feet hung off on little waxed paper squares.
Cake: Wash everything well so no oil comes in contact with cake before it’s baked. Combine 1-3/4 cup warm water with 1/2 cup plus 4 tsp. of Just Whites and let sit (equivalent of 14 egg whites). Sift 7 oz cake flour with 6 oz superfine sugar five times and set aside. Using whisk attachment, mix egg whites, 2 tsp. cream of tartar and 1/2 tsp. salt until frothy. Add 8 oz superfine sugar to the egg whites and continue to whisk on medium speed until medium firm peaks form (5-10 minutes).
Gently fold in sifted flour/sugar mixture using rubber spatula. Lastly, fold in 2 tsp. vanilla extract. Pour into two un-greased spring form pans. Bake at 400 degrees for 10 minutes, 350 degrees for 15 minutes, then 300 degrees until springy and cracks appear dry (more or less 15 minutes). Remove from oven and place upside down with the rim resting on four glasses or ramekins. When cool, remove from pan.
Frosting: 1 cup butter and 8 cups powdered sugar. Add milk until proper consistency and vanilla extract or other flavoring. Mix small batch of brown (shoes), red (ears) and orange (shorts). Make rest yellow. There was enough cake for 24 people.
Your comment has been sent successfully.