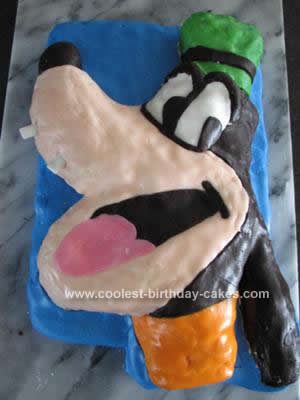
Goofy is sculpted out of Rice Krispie cake. I took a colouring book picture of Goofy’s face and a stuffed Goofy, then sculpted the still-warm cake into the Goofy shape, using the picture for the outline and the stuffed animal for depth, then froze the finished cake sculpture.
The square base is just a 9 X 13 cake, leveled flat. I used the scraps from leveling to build up underneath the neck as I made the sculpture just a bit too long.
I froze the bottom cake, then covered it in a thin crumb coat of buttercream icing. The Rice Krispie cake sat on top, held on by the buttercream. I covered the rice krispie cake with buttercream, making sure that all the bumps and hollows were still delineated. The buttercream needed to be thicker as some of the texture from the cereal came through the fondant.
I applied a rolled fondant piece tinted with Wilton skin tone for Goofy’s muzzle. Next, I added the whites of the eyes, then the black parts. My black wasn’t a true black, but was fondant with cocoa powder and an assortment of dark gel colours to get as close as I could. The nose stood up from the base cake, so I was able to wrap the black all the way around to give it a little extra depth.
Next, I shaped the pink tinted tongue, the orange tinted neck, and the green tinted hat. After Goofy was covered, I pieced in the base in blue, but it was difficult to smooth the seams that way. It might work better to cover the whole base cake before putting the sculpted rice krispie part on top. Finally, I added two pieces of gum for the teeth.
The fondant work is sloppy, but it was my first time working with it. I used a homemade rolled buttercream fondant, which tasted quite good (more flavour than the Wilton stuff, which seems to taste a bit like play dough).
1 Cup Light (white) corn syrup
1 Cup Shortening
1/2 tsp Salt
1 tsp vanilla Extract (Clear if you can find it)
1 kg (a little more than 2 lbs) icing sugar, sifted
In a large bowl, stir together shortening and corn syrup. Mix in the salt and vanilla, then gradually mix in the confectioner’s sugar until it is a stiff dough. If you are using a stand mixer, use the dough hooks. Otherwise, knead by hand. If the dough is sticky, knead in more confectioner’s sugar until it is smooth. Store in an air tight container at room temperature or in a refrigerator.
Related cakes:
 12+ Coolest Mickey Mouse Cake Ideas
  12+ Coolest Frozen Birthday Cake Ideas for the Ultimate Frozen Theme Party
  Coolest Goofy Birthday Cake
  Coolest Kai Lan 1st Birthday Homemade Fondant Cake
  12+ Coolest Minnie Mouse Cake Ideas
  Coolest Ever Avengers Birthday Cake
  12+ Coolest Peppa Pig Cake Ideas
  Coolest Mickey Mouse Clubhouse Birthday Cake
Your comment has been sent successfully.