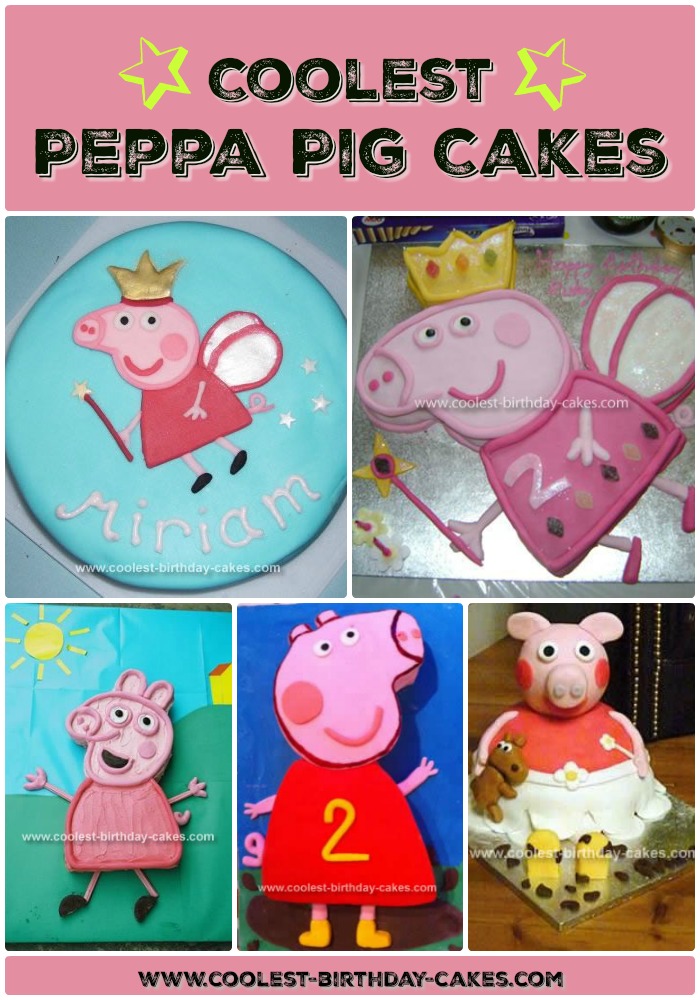
This cool collection of Peppa Pig cake ideas and designs is sure to provide you with inspiration as you set off to create the coolest Peppa Pig cake ever. Good luck!
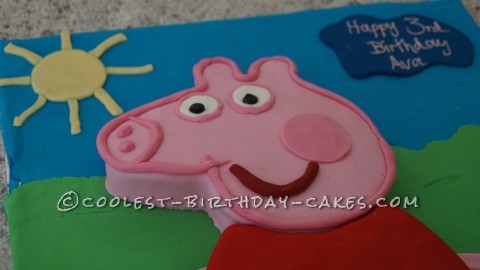
Cute Peppa Pig Cake
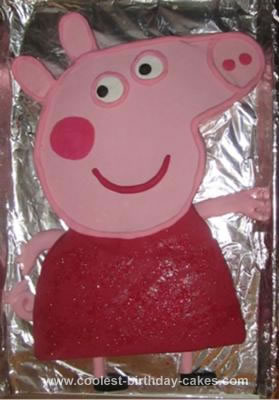
Peppa Pig cake submitted by Rebecca R.
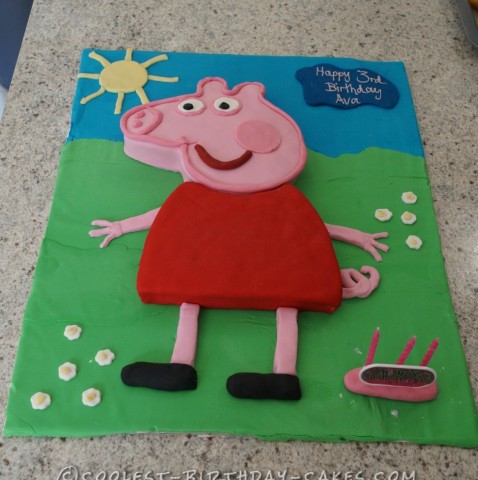
My daughter is crazy about Peppa Pig, so she asked me to make her a Peppa cake for her 3rd birthday!
The cake was quite simple, I made a sheet butter cake and cut out the outline for the face and body. After covering in icing I used colored fondant to cover over the shapes of the head and red dress. The rest of cake such as eyes, tail, arms etc I just shaped out of colored fondant and attached. The head and body were joined together using wooden skewers.
I used blue and green fondant rolled very thinly to cover the board for the background, but if I was to do this cake again I would just make a background out of colored paper! The fondant is very hard to roll that thin without breaking and did dry and crack a bit around the edges of the board because of it.
I don’t think anyone noticed though – everybody said they loved the cake!! (especially my little daughter xx)

Peppa Pig Cake
Peppa Pig cake submitted by Caroline H.
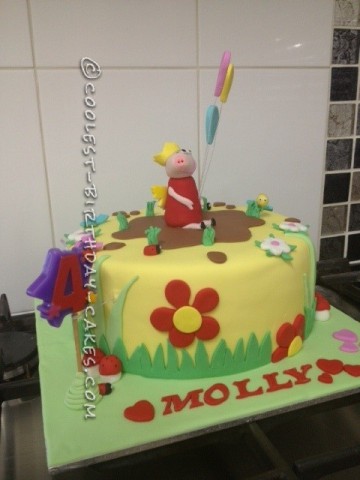
Well this Peppa Pig cake was the 4th cake I had ever made from scratch so I was really happy with how it turned out. And so was my daughter Molly-Rose. It was a 9″ round chocolate mud cake (2 layers) filled and covered with white chocolate ganache.
I did some google research on making a fondant Peppa Pig, both Molly and I thought she turned out pretty good. And the balloons were a nice touch as suggested by Molly.
Once I got started with covering the cake in yellow fondant, it was like I was in a world of my own and after a few hours I was finished. We had so many people asking where we got her cake from and I was so happy to say that I had made it myself.
The best part, everyone said that it tasted even better than it looked, even Molly who doesn’t normally eat cake, just loved it.
Peppa Pig Fairy Birthday Cake
Peppa Pig cake submitted by Busy M.
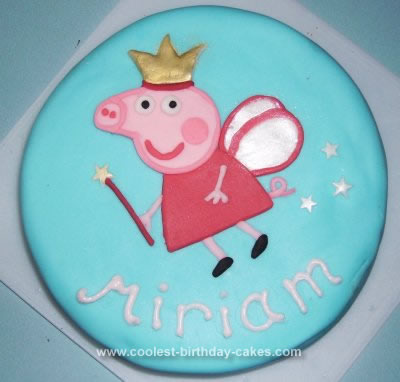
This Peppa Pig Fairy Birthday Cake was made for my 3 year old daughter who is obsessed with Peppa Pig and likes fairies. It is a blue fondant covered Madeira cake with cut out fondant of Peppa on top of it.
To make the base cake:
I baked a vanilla Madeira cake using 6 oz each of butter, sugar, self raising flour. 3 oz of plain flour, 3 eggs and half a teaspoon of vanilla extract in a 7″ round tin at gas mark 3 for about 50 minutes. I left the cake to cool before cutting off the dome for a smooth surface.
The cake was then covered with a thin layer of vanilla butter icing made from 2 1/2 oz of butter, 5 oz of icing sugar and about a tablespoon of milk. I then covered the cake with the blue sugar paste made from Dr Oetker regal ice dyed with Sugarflair blue paste.
To make Peppa:
I traced Peppa from one of my daughter’s sticker books and then cut out the head, crown, dress, wings and limbs and used these as templates.
Then I coloured some Dr Oetker regalice fondant with pale pink colour and cut out Peppa’s head. arms and legs from this.
I added some more colouring to the icing to get the pink for the outline and her dimple. To outline her head, I used a clay extruder to get a “sausage” of dark pink icing and then using a knife, arranged it around her head before pressing it into place. The eyes were done using a small blob of regalice fondant and then dotted with even smaller blobs of black regalice fondant. I didn’t bother to outline her eyes as it became too fiddly at this point!
I coloured some more regalice fondant using more red for her dress, lips, wand and the outline of her wings. Then I cut out the dress shape and arranged it under Peppa’s head.
I attached the white wings in position then extruded a dark pink sausage and positioned it on the wings. The limbs, tail and wand were added in a similar way. Finally, I rubbed some plain white fondant with gold lustre and cut out the crown and the star for the wand. The stars were made using a plunger cutter on some “snowflake” dusted fondant.
I then piped my daughter’s name at the bottom using some fondant softened with boiled water.
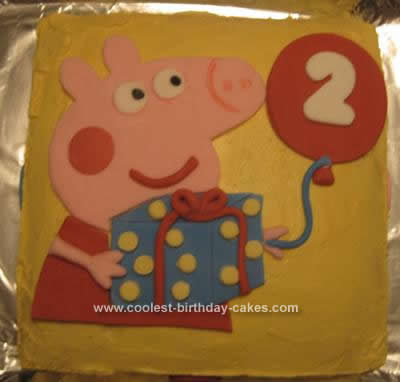
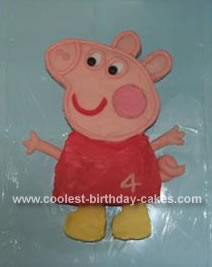
Coolest Peppa Pig Cake
Peppa Pig cake submitted by Natalie M.
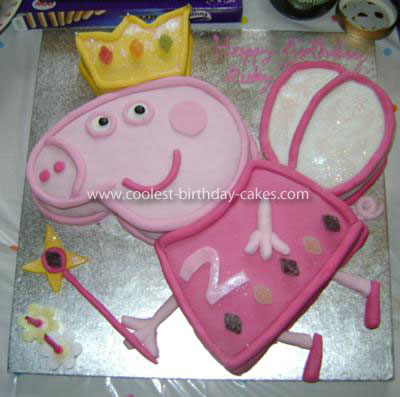
I decided to make a Peppa Pig cake for my daughter’s 2nd birthday as she is obsessed with anything Peppa Pig related! In the past I had baked sponges but had never iced a cake before! I really wanted to make her a cake and got my ideas and advice from this website mainly along with others for technical advice (as I didn’t even know what type of icing to use for what or how to apply the icing!). I was a complete novice and did wonder if I was taking on too much! But in the end it wasn’t as hard as I thought it would be and I actually quite enjoyed making it.
I baked 2 x 12 inch square Victoria sponges, so I wouldn’t have to cut it in half to put the filling in. I read Madeira is a better choice as it’s stronger to withstand the weight of the icing, but made a Victoria anyway and it was fine. As I knew time would be an issue with a toddler and a 3 month old, I made the sponge the weekend before and froze it. The day before the party I took the cake out and pinned on a template of Peppa using cocktail sticks. My template was just a picture of Peppa pig from the Internet printed and enlarged. I cut the templates into parts to get more out of the cake. I had 4 parts – head, body, crown and wings. Next I cut around the templates while it was semi thawed.
Next I sandwiched the cake together with strawberry jam and buttercream. Then I used regal ice (ready coloured fondant) for the crown and the eyes so I didn’t have to make up black or yellow myself. I used Dr Oetker’s ready to roll White icing for the wings and eyes, I also used it for Peppa’s head, body, arms, legs and wand and coloured it myself with a claret colour paste. With this colour you can mix up all the shades of pink you need. For quickness you could buy the colours already done for you.
In total I had to make 4 pinks. Lightest pink for the skin colour, next shade of pink to line the edge of the face, eyes and nose (fondant rolled into sausages) and used this colour for the cheek.the 3rd shade was for the dress, smile and nostrils and the darkest to line the dress. All rolled out icing was attached to the sponge by first brushing cooled boiled jam to keep the icing from slipping. The icing, such as the edges, eyes, cheek etc I attached just by wetting the icing with a little water.
Finally I Fixed the section together with a stiff glace icing mixture. I decorated the crown with jelly diamonds and silver balls. Then I used a jelly diamond on the wand and used baby pink edible glitter on the wings, wand and crown. I later cut out a number 2 and attached to the dress and used the colour paste to colour some icing to pipe out happy birthday.
My daughter loved it and everyone at the party commented on it too! Definitely worth the effort and it tasted great!
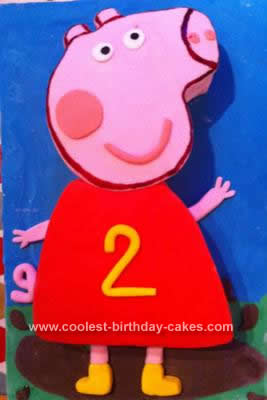
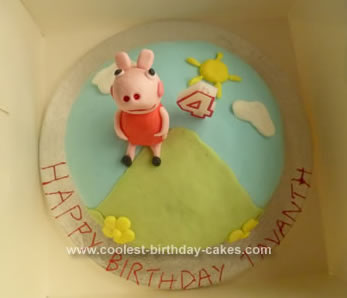
Peppa Pig Birthday Cake
Peppa Pig cake submitted by Emma K.
I started looking at all the cakes that were listed for a Peppa Pig Birthday Cake on this site, and wasn’t sure I could copy them, freehand. So I chose a picture from a Peppa Pig Book, and printed it to fit on a 9×9 Square Cake. I then cut out each piece that required a specific colour, and coloured the fondant to match. Then used each piece as a template to trace around using a sharp knife, and then added the detail once I had the basic shape.
My daughter LOVED the cake.
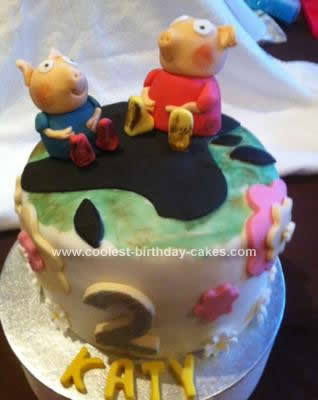
Peppa Pig in Mud Cake
Peppa Pig cake submitted by Linda
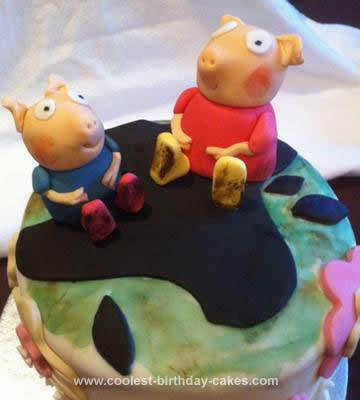
I started this Peppa Pig in mud cake by making the pigs. I made a large cone shape for Peppa pig’s body in red fondant and then did the same with some blue fondant for George pig. Then I colored some fondant enough to make the pig’s heads, arms and tails. I molded their heads and attached them to the body using a cocktail stick to keep the head on.
Then I made the arms and attached these, then I made the ears and the tails and attached these, using some white fondant. I made the eyes marking the pupil in black color paste. Made two tiny holes in the fondant on the snout and put smiles on the pigs faces. I then colored enough fondant in yellow for Peppa pig’s boots and some in red for George pigs boots.
I then cut out some white flowers and colored the center in yellow to attach to the bottom of the cake later. The pigs and flowers were left for a few days to harden.
I then baked 3 parts to a 8 inch cake and this was left to go cold. I then filled one part with butter cream and the other part with jam and covered the whole cake in butter cream. This was then placed in a fridge to chill. Then I covered the whole cake in white roll our fondant and then left it overnight to harden slightly.
The next day I decorated the cake. I started by coloring some fondant for the puddle of mud. I cut this out and attached it to the cake using a little water. Then I placed the pigs in place using some royal icing. I then attached the white flowers I made earlier to the base of the cake.
Using some pastry cutters I cut out some flower shapes in different colors and sizes and attached them to the cake. I cut out the number 2 and covered it in glitter and when it dried I attached it to the front of the cake. I then colored the green grass around the mud puddle on the top of the cake. Finally, attached the name to the cake board.
Fun in the Sun Peppa Pig Cake
Peppa Pig cake submitted by Sarah
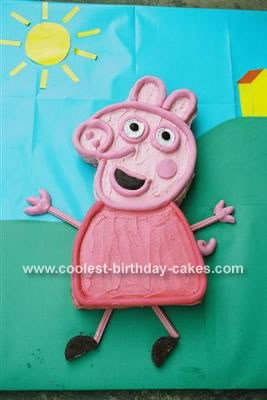
I made this Peppa Pig cake for my daughter’s 1st birthday party seeing that she is slightly obsessed with Peppa Pig and can watch a whole DVD in one sitting (and she’s only 1!!)
I made two basic butter cakes and cooked them in 2 round pans. Also, I saved a small amount of cake batter and cooked it in the smallest tin I had (to use for Peppa’s ears). I then froze all the cakes overnight to make them easier to cut the next day.
Then next day, I used a photo of Peppa and cut her basic head shape from the 1st round cake with a sharp knife. I cut her dress out of the 2nd round cake and cut her ears from the little cake I had made. I joined them together with wooden skewers. Then I iced the tops and sides with light and dark pink butter cream frosting. Then, I outlined the cake with ready to roll icing, that I had coloured in pink and dark pink the night before (when I made the cakes).
Peppa’s arms and legs are made from musk sticks. Her shoes are a large wagon wheel biscuit cut in half and her eyes are a large marshmallow cut in half and her pupils are 2 brown smarties. Her tail is also ready to roll icing.
I decorated the board to match the picture I used from a DVD we have. I had lots of fun making this Peppa Pig cake!
Original Peppa Pig Birthday Cake
Peppa Pig cake submitted by S. Breslin
I used a large roasting tin to make a big cake, 15′ 12′. Then I drew a template of Peppa and placed this onto the baked cooled cake. Then I scored around my cut out template and that gave me the shape. I then used ready to roll icing to ice the Peppa Pig Birthday Cake.
3-D Peppa Pig Birthday Cake
Peppa Pig cake submitted by Lisa
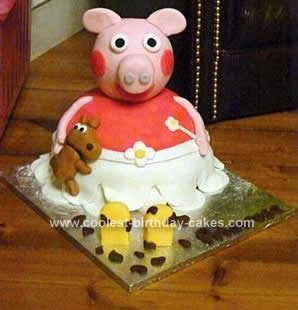
I am a novice – this Peppa Pig Birthday Cake is the first cake I have ever tried to make other than fairy cakes or sponge cakes (basic ones) but my daughter asked for one for her birthday and I thought I would give it a go after seeing a picture online.
I did have a trial run a month before her birthday just to see if I could do it – I am a control freak!
1. Firstly I tried making a pudding bowl cake but all of mine turned out really hard ( I think this is because I use an AGA!)
2. So instead I made three sponges – two large and one small for the body and layered them with jam and vanilla fondant before covering in regal icing.
3. The head I made a few weeks before I made the cakes and this is just a polystyrene ball from an eBay model shop (£3) covered in regal icing. The nose, teddy, ears were all held on by tooth picks and for the skirt I also used edible glue. I had never used regal icing before so there is probably a really simple way of getting things to stick, but as I mentioned I’d never even opened a pack of regal icing before.
Good luck!
Simple Peppa Pig Cake
Peppa Pig cake submitted by Karina
After seeing another Coolest Peppa Pig cake on this website I had a go myself for our daughter’s third birthday party. I started with two large round butter cakes (each made with two packets). I refrigerated them overnight and printed a picture of Peppa Pig at 200% (over 4 A4 pages which I stuck together with tape).
Next, I cut out the shape of her head and body without ears and laid it over the first cake and cut as much of the head as possible, then laid it over the second cake and cut the rest. With the left overs I had to cut a bit more for the snout and ears. I had to cut some slivers off the height of the nose piece and ears to make it all level. I needed a couple of slivers under one cake at the join to level them at the neck area.
The measurements for icing was perfect from the other recipe – from 1kg, (I saved a small ball of white just for the whites of the eyes), 1/4 red, the rest pink. 1/2 the pink for covering head, and ears, the rest for arms, legs, tails, and details around face and ears. I went a shade darker by adding a bit more pink for the edging, and a little more red color to the pink for the cheek and nostrils and more again for the mouth.
We used licorice for the eye balls and shoes and finished her off with some red glitter on her dress. We had some trouble making the edging and other facial details stick – a little “writing icing” seemed to make an easy glue.
I’m proud as punch of this effort and this was my first time using fondant too. My tips are use plenty of corn flour for keeping it all from sticking. Roll out large sheets on baking paper and lift it rolled loosely on your large rolling pin. Wear latex gloves for red color tinting – it stains hands badly!! Do not get fondant too wet (a little water can help glitter stick) – and DO NOT REFRIGERATE. Good Luck!
Easy Peppa Pig Cake
Peppa Pig cake submitted by Vineetha
This Peppa Pig cake is a chocolate mocha cake with chocolate butter cream icing as filling and on the top. I covered the cake with store bought fondant and made the Peppa with fondant too.
I bought just white fondant and then colored it with paste colors. Then I used red, blue, green, yellow and black paste colors and pink food color. I made Peppa’s face by adding a very tiny bit of red paste to white fondant and then a pinch of Cmc to it to make the figure a bit sturdy. The fondant figures are soft and edible unlike the sugar paste ones so the kids at the party enjoyed eating their favorite pig.
I made Peppa’s nose by pressing it gently with a chopstick kind of a thing and then used a little bit of pink food coloring with water to paint the nose and mouth. I made the mouth by pressing with a icing tip. Fondants will stick together with water so I stuck Peppa’s body by using just water and since Peppa is sitting there is no need of any toothpick or sticks to support the figure.
Since I personally don’t like a thick layer of fondant I used a very thin layer of it so the cake was not very sweet and tasted great. I made this cake in an 8 inch round tin so it was small cake for a small party. If you are planning to bake a big one you can add more things to the cake like Peppa’s house.
I got the idea of the background from Peppa Pig’s book. Peppa’s house is on the top of a mountain, but since my cake was small I didn’t get enough space to make Peppa’s house.
This was my first attempt on a fondant cake and I’m pretty happy the way it turned out.
Peppa Pig Birthday Cake
Peppa Pig cake submitted by Sussan
I made this Peppa Pig Birthday Cake for my daughter’s 4th birthday. I found a picture of Peppa Pig on the ABC website and blew it up. Then I made a rectangular butter cake and by accident a much thinner mud cake. I used the mud cake for the ears and boots and used the butter cake for the body.
I made a large quantity of butter cream icing and tinted it with one drop of pink food colouring for the face, tail, arms and ears. Next I added another drop of colouring for the piping around the face. I tinted it slightly again and iced around a ‘tic tac’ biscuit for the spot on her cheek. I then added more colouring to turn her dress a raspberry colour and piped her mouth.
Her eyes are white icing with a M&M for each pupil. Finally I tinted another smaller quantity of icing yellow for her boots. I found it easier to cut out the ears and boots separately from the mud cake mixture.
For even more Peppa Pig cake ideas check out our main Peppa Pig cake section…
Related cakes:
 Coolest Peppa Pig Birthday Cake for a Special Girl
  12+ Pretty Homemade Princess Cakes
  15+ Cool DIY Monkey Cake Designs for the Birthday Cake Enthusiast
  12+ Coolest Disney Princess Cake Ideas – Awesome DIY Cake Decorating!
  12+ Inspiring Homemade Princess Birthday Cake Ideas
  12+ Coolest Minnie Mouse Cake Ideas
  12+ Coolest Mickey Mouse Cake Ideas
  12+ Coolest Castle Cake Ideas – Awesome Homemade Castle Cake Designs!
Your comment has been sent successfully.