Are dinosaurs extinct? No way! We’ve spotted them among these cool dinosaur cake ideas.
Kids are fascinated with dinosaurs and often request birthday party themes based on them. Don’t be intimidated if your children asks for a stegosaurus, triceratops, or t-rex cake. You can make it happen.
Jurassic Park awakened these prehistoric creatures with some DNA and splicing, so why can’t you? Simply clone them with some baking supplies, incubate them in the oven, and bring them to life with colored frosting and fondant like these five cake makers did.
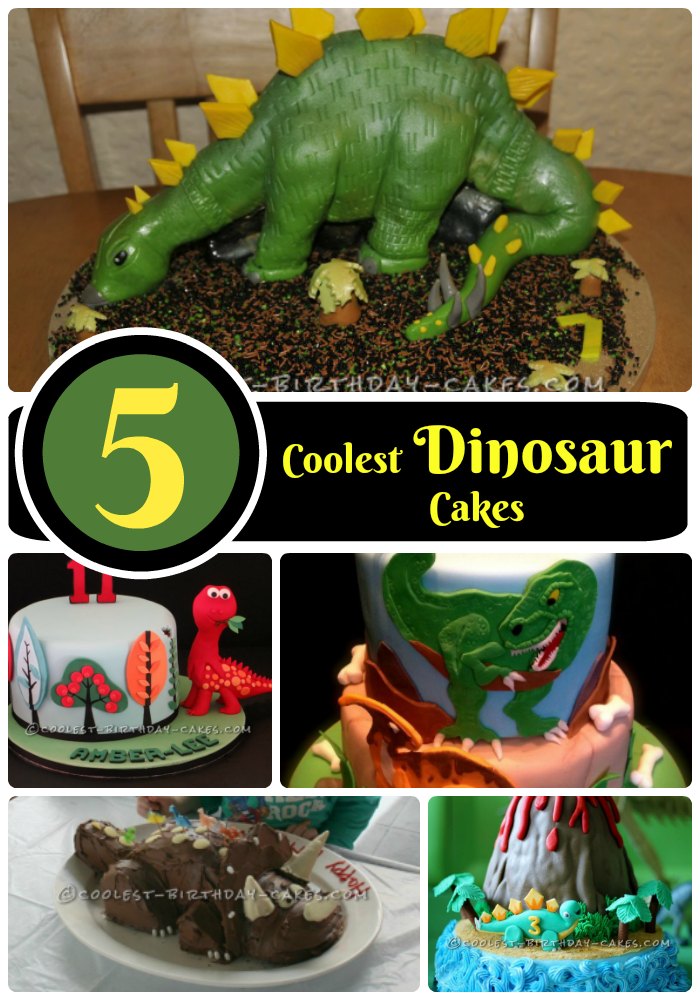
1. 3D Stegosaurus Cake
Dinosaur cake ideas submitted by Jodi P.

My little boy cannot eat dairy so this Stegosaurus cake is a totally dairy free carrot cake – with dairy free ‘butter’ cream filling. The cake is just one large rectangular carrot cake, which I then cut it into three and sandwiched together to get the height. Then I sculpted the cake into the right shape.
I was quite pleased with the result – especially as right up until I started to bake the cake (the day before his birthday) he had wanted a snake cake. To be precise he wanted a ‘white-lipped pit viper on a branch’ cake. As you can imagine, this had taken a lot of thought, planning and not inconsiderable stress! Then, just as I was about to start, he says – actually I want a dinosaur cake! He was absolutely adamant. So, we did a quick run through the various possibilities and he settled on a stegosaurus. Last minute change of plan aside, I must admit I was quite relieved! The snake on a branch was not going to be easy…!
So I made and sculpted the cake and covered it in icing which I rolled with a textured rolling pin. The head, spines and tail are also made of icing, so the whole thing is edible. Even the little ‘Jurassic’ trees are made of icing, and the ‘dirt’ is a mixture of edible sprinkles.
He loved it and his friends thought it was very ‘cool’ – for some reason they all wanted either part of the head or the thagomizers!

2. 5th Birthday Triceratops Cake
Dinosaur cake ideas submitted by Bronwyn H.
As many soon to be 5 year olds do, dinosaurs become a huge focus of interest. My son is on the Autism Spectrum so his focus has been pretty intense. A little trouble with his speech meant he could not pronounce Triceratops very well so 3 horns become the description. I scoured many websites until I found this Triceratops cake and borrowed many ideas. In the end this cake was relatively simple. What wasn’t so simple was pasting back into precious books the pictures that my big boy cut out with his scissors for inspiration. I found them all one morning very nicely laid out on the kitchen bench to help me.
I made 2 large round cake tins of chocolate cake then popped them in the freezer. I also baked one pudding dish or Dolly Varden tin of cake to use for his head. I cut one cake in two and put some frosting together for the main body then cut another in half. I graduated the size for the legs and used skewers to put them all together through the body of the cake. I cut a strip for the tail also using a skewer.
I cut cut the pudding shape to suit and attached it to the main body cutting a small slit for the mouth. Using a paper plate I cut the bottom off it and shaped the collar placing it behind the head again using a skewer to secure it all. I frosted it all. I used Tic Tac’s for claws, milk buttons for spots and cut in half for spies on the tail. Tee horns were ice cream cones dipped in chocolate and cut in half resting on toothpicks. 2 milk buttons for eyes. It was delicious and my son literally shook with excitement when he saw his mighty 3 horn.
3. Dino-Mite Two Tier Dinosaur Cake
Dinosaur cake ideas submitted by Melanie G.

I am a huge fan of dinosaurs. For this cake I was given choices. The little boy likes dinosaurs, cars, and Elmo. In all honesty, I didn’t hear anything beyond dinosaurs when his mother was giving me the list. When given creative freedom for boys, they get dinosaurs…period. I love them!
For this cake I printed a couple images from the internet. I had to find 2 dinosaurs, one facing in each direction so it looks like predator and prey. I printed them, then enlarged and shrunk them on a photo copier until I got the sizes I needed.
When I make fondant / gum paste figures like this I cut the outline of the entire dinosaur, then I cut out features I wanted to stand out from the picture. I cut those pieces out of another piece of fondant and lay them on the piece I cut from the outline. I did this for arms, legs, and T- Rex’s head. To texturize the T Rex I used a cocktail straw to make imprints.
The moon is gum paste and fondant that had 3 days to dry , the pterodactyls are gum paste and fondant with a floral wire inserted. I cut the pterodactyls using a template I made from a photo I found on the internet. The rocks are black, and white fondant mixed to look like stones. The bones are gum paste. I roll a log of gum paste, cut it into random sized pieces. Slit the end of each piece and round the ends to look like bones. Everything is attached to the cake with white chocolate.
The mother had never seen any of my work and was expecting grocery store work, edible images, plastic accents, butter cream etc. It’s a good thing her son wasn’t with her when she came to pick up the cake because she was so excited when she saw it that she was using some very flowery language.
Fun cake!
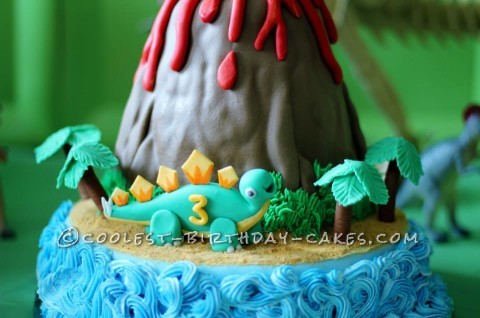
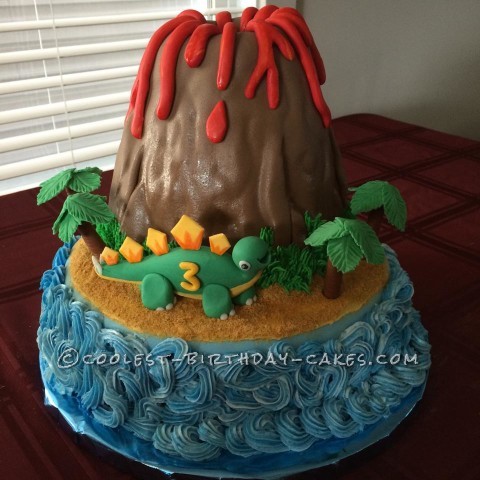
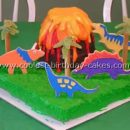
4. Jurassic Park Erupting Volcano Dinosaur Cake
Dinosaur cake ideas submitted by Crystal G.
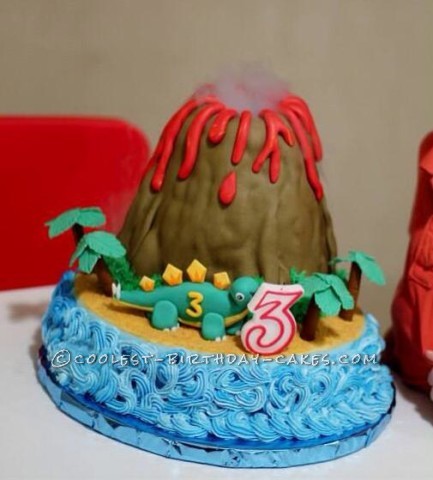
For the past three years I have had the pleasure of making birthday cakes for the same little guy. The first birthday was Dr.Seuss themed, the next year was “Planes, Trains and Automobiles”. This year for his 3rd birthday, it was Dinosaur themed cake. This cake was not to be just a any dinosaur cake, it was going to be a cake with a dinosaur and an erupting volcano! This was definitely a new challenge that I was excited to tackle.
I did some research with the birthday boy’s mom and we decided that the coolest effect for the volcano would be to use dry ice. It took a bit of digging to find out where to buy dry ice, but in the end, it was definitely worth the extra effort!
When making the cake, it took quite a bit of time to sculpt the volcano, using four 6 in. rounds, and to carefully fit an empty water bottle down the centre. I also used cake crumbs mixed with icing to build the base and make it more volcano-ish. I gently draped fondant over the volcano and let the bumps and lumps stay since they gave it more character. The volcano was then placed on top of a 10 in. round for the island/ocean base. At this point it looked pretty good, but I knew that it was going to be the finishing touches that would really make this cake stand out. I sculpted a Stegosaurus (specifically requested by the birthday boy) using fondant and gum paste and I also made palm trees using the same mixture. I couldn’t forget the lava, so I rolled red/orange fondant for streams of lava oozing out of the volcano. Some graham cracker crumbs for sand, and two toned buttercream icing for the ocean made it all come together. The late late night, I pulled to finish the cake was worth it! I was looking forward to seeing the little guy’s reaction and to seeing photos of the eruption once the dry ice was added at the party.
When I delivered the cake, the family’s reaction was awesome! The little guy’s eyes widened as he happily exclaimed, “That’s my cake!” It’s so fun now that he is more aware of his birthday and all the little details. I found out later that they kept the cake after the party so they could have fun and make it erupt over and over. I loved that!
I love creating cakes and taking the time to do my best, for my own satisfaction, but the reactions I receive from all my hard work, are my favourite part!
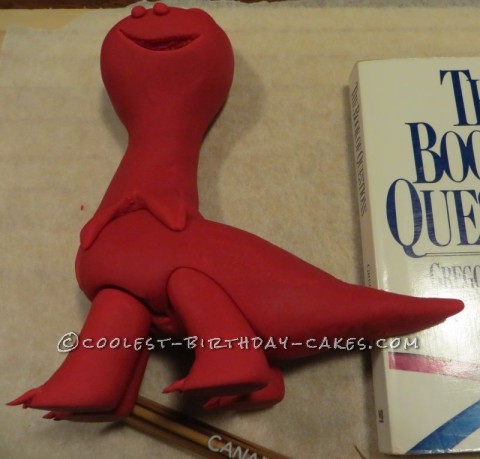
5. Funky 11th Birthday Dinosaur Cake
Dinosaur cake ideas submitted by Heather W.
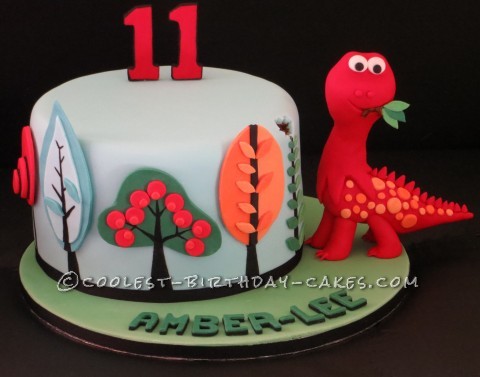
My gorgeous niece wants to be a palaeontologist when she grows up, she’s seriously nearly one already, with all her knowledge on the subject! Anyway, she loves dinosaurs in particular. I thought she might be a little old now for a dinosaur birthday cake but when asked she REALLY wanted one, so I thought this one would be pretty cool. I got my inspiration online, I ‘think’ the original might have been from a place called Sweet Love.
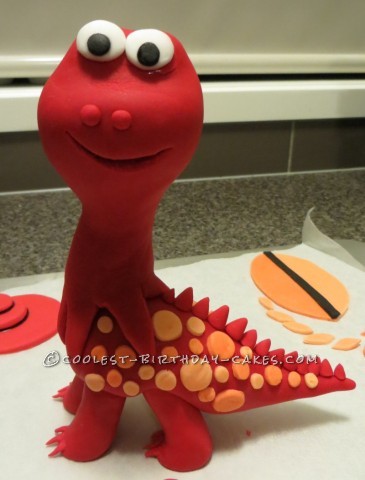
I like to do as much of the decorations as possible beforehand, to save time. I started with the dinosaur first so it could dry in parts and be good and solid and sturdy by the party. I made the legs first and attached the claws. I used red fondant (making red from white fondant and dye is time consuming and it gets quite wet). I also added a little Tylose powder to the fondant to make it a little firmer. It needs to nearly be the consistency of Play dough or things start to change shape too easily.
I inserted a toothpick in each leg so that the body had something to stick to once the legs were dry. I left them for 2 nights before making the body. I inserted a wooden kebab skewer in to the body where the neck and head would eventually go, to give support. All of this I left to dry on waxed baking paper so it wouldn’t stick to the board. I used a slim book, just the right height, so that the tail had something to support it while it dried. I left this 5 nights to really firm up, before making the head.
I obviously didn’t make the fondant thick enough with Tylose for the head/ neck. It can be tricky getting the amounts right, as if you use too much, it can dry and crack and wrinkle. I usually add a little, leave it a bit, then feel it’s firmness, add more if needed. I was in a rush and ended up having to lie the while dinosaur down, after the head was added, otherwise the weight of it made the skewer stick out his head!! So he had a flat head at the back (not that anyone minded). I made the mouth and nostrils at this point before it set. I used a pen to support one leg so it didn’t add weight to it leaving it hanging while the dinosaur lay down to fully dry. I used sugared water to attach all parts together as “glue”. You just use a teaspoon of sugar and boiling water and stir/mash it in til it’s almost all dissolved.
Next, I made him some eyes with a circle cutter (I actually just used one that was made for the center of number cookie cutters). The black pupils were made with a straw (just the perfect size) as a cutter. I used sugared water to stick these together and on to the dinosaur.
I made the orange tree next on the same night as I made the spots for the dinosaur, this saves time and money on mixing up colors. I used a straw for some circles, took apart a pen to use the circle part of it for others (after washing it!!) and the circle cutter I had. I applied them all with sugar water and made some spikes for his back and attached these with royal icing (which sets VERY hard like super glue).
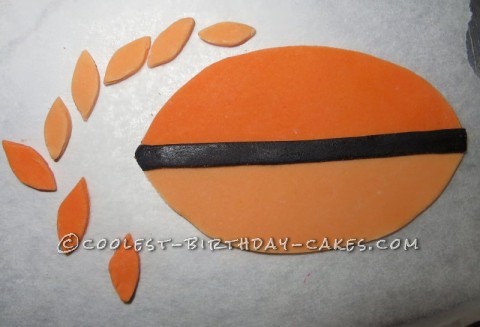
For the orange tree, I cut out with a sharp knife, leaves that were all pretty much the same size, 3 dark ones, 5 light ones and then 2 sides of the tree. I used black fondant to cover the join and applied with sugar water. It’s easier to apply the leaves to the tree on the same night so they’re soft enough to mold in over the black strip.
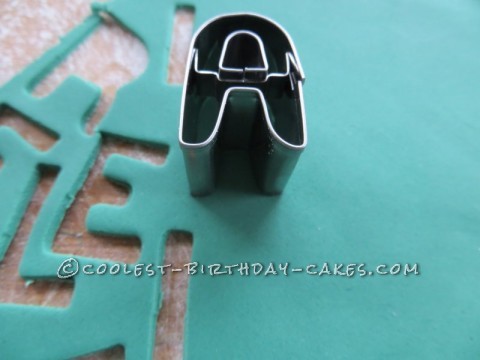
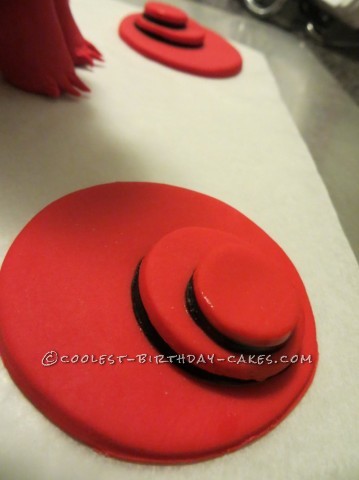
I made the red tree next and the age “11”. To make the numbers, you need to insert toothpicks in the base of the numbers before they dry so you have some way of attaching to the cake later. I just used a cookie cutter number 1. I used Tylose to firm up the fondant and once dry, I painted the outside edges with black dye and a special thin paintbrush I keep aside just for cakes. For the tree, see the picture below, just use 3 different circle cutters or make your own template from baking paper and use a sharp knife. I cut 2 black circles as well (see pic), but in hindsight, I’d actually just paint with black dye so they weren’t too chunky and heavy, around the edges of the 2 smaller circles.
The other trees are self-explanatory if you use the pics as a guide. I used black dye to paint the twigs and trunks once they were DRY. With the green tree, you need to make leaves of differing sizes, starting with large at the bottom and going to small at the top of the tree. This was the last tree to go on the cake, I made the leaves in advance and left to dry and attached them once I’d painted a trunk directly on the cake with black food dye. I made the twig in the Dino’s mouth in advance and left to dry once I knew it would fit in his mouth. I used dark brown dyed fondant for the twig, it looked better than black.
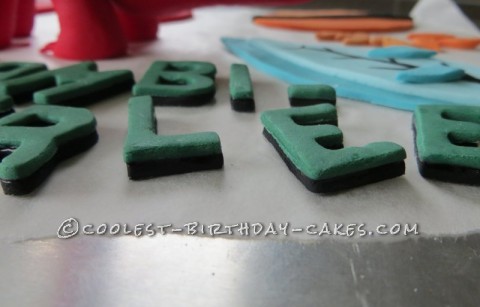
When I made the green tree, I took the opportunity to make the 2 greens and I stored them in tight plastic food wrap inside an airtight container, I made quite a bit so it didn’t dry out. I used a letter cutter to cut out the name, first in green, then in black, then placed the green carefully on top of the black with sugar water.
I used a great chocolate cake recipe which is so moist and lovely and chocolaty but still firm enough to hold all that fondant. I made 3 cakes to get the height (the night before the party) and used ganache as a yummy filling on the day.
I got the board prepared first with the pale green icing. I had to microwave it slightly to soften it up since I made it in advance, it worked well. You just roll it out and apply like you would to a cake (after using a little ganache or sugar water to help it adhere to the board). Use a sharp knife to trim to the board shape. I crumb coated the cake (lots of tutorials online for this) and I then applied the pale blue fondant to the cake. It’s best to watch a YouTube tutorial on how to apply fondant. I use a pizza wheel to trim around the excess fondant. After smoothing fondant down with a smoother, I carefully picked the cake up and applied to the covered cake board.
I attached the middle green tree first as a starting point and then the orange and then the green one on the side. You need to work quickly so you can remove the little bite the Dino has taken from the cake above the green tree, before the blue fondant sets. Add all other trees and paint on their trunks with black food dye. Leave to dry for a few hrs before attaching a ribbon around base of cake (I use a clean pin to attach at the back and tell the host it’s there). Add the Dino to the covered cake board (you need to ensure he won’t fall over during transportation – royal icing is best) and attach the name with sugar water or royal icing (just a little so the white icing glue doesn’t show). Put a ribbon around the cake board, I used double sided tape for this.
The cake was the BIGGEST hit! Some of the adults wanted one for their own birthdays (ha!) and the cake was obviously pretty yummy since it was demolished within 20 minutes!! Some kids went back for a 5th serving! The look on my niece’s face made it ALL worth it, she grinned from ear to ear and it melted my heart. This is why I love doing cakes!


There are lots more dinosaur cakes here…
Related cakes:
 Coolest Dinosaur Birthday Cake Ideas
  10 Coolest Dinosaur Cakes We’ve Ever Seen!
  Coolest Homemade Volcano Cake Ideas and Decorating Tips
 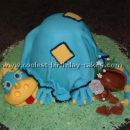 Coolest Dinosaur Picture Cake Ideas
 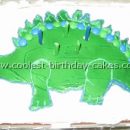 Coolest Dinosaur Cake Ideas and Decorating Tips
 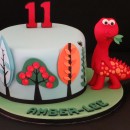 Awesome Funky Dinosaur Tree Birthday Cake
 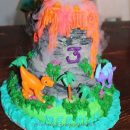 Coolest Smoking Volcano Cake Ever!
 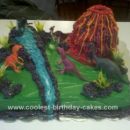 Coolest 4th Birthday Dinosaur and Volcano Cake