
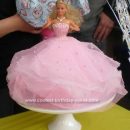
My daughter had set her heart on a fairy princess cake for her 4th birthday and I was surprised at how easy this one was. I took photos of a few professionally made ones I saw at other children’s parties, looked at some photos in books, put together the best and most practical bits and added a few bits of my own.
The cake was made in a pudding bowl (I coloured it with pink food colouring and used pink butter icing to fill and coat it – yeuch!) and I sat a bagel on top to give it more height. Roll out white icing in a large circle (2″ wider than needed – I measured the height and width of the cake using a ruler!). Drape it over and trim the edges – it doesn’t even matter if it’s a circle, nobody will notice! The hardest part was getting the skirt to sit right, but with a little messing it seemed OK and I sat it so the best part was at the front.
I bought some edible glue and glitter from a cake decorating shop and painted this over, then added shop-bought fondant flowers round the bottom.
Next roll out a smaller circle of coloured icing and cut it in half with a fluted pastry cutter. Drape each half round the cake making sure it goes as far into the middle of the cake/bagel as possible (stick with water, butter icing or edible glue).
I bought the top half of a doll from a specialist shop but you can use the top half of a barbie (cover the bottom in clingfilm so it can be re-used). Roll out coloured icing and cut into a strip roughly the size of the body. Place it round then trim roughly to fit and smooth out.
The next hardest bit was getting the bodice trim to look right – make sure you lie it over the shoulders. Glue on coloured balls for buttons and stick the body into the cake (the baguel actually helped here – it supported the body).
There was a gap so I rolled some white icing and wrapped it round like a ribbon/belt, leaving the ends hanging at the back. I stuck another fondant flower over the ribbon join at the back to make it look a bit like a bow.
My daughter and her friends were delighted with the result and it didn’t last long!


Your comment has been sent successfully.