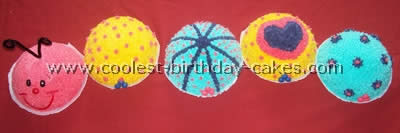
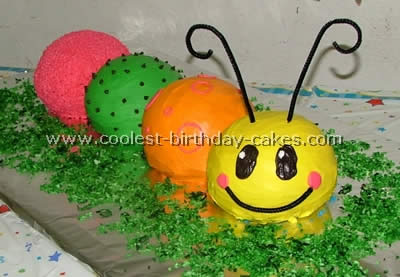
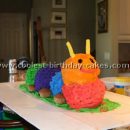
I decided I wanted to make my daughter’s first birthday cake. I chose her party colors and wanted a cute idea for a cake. I saw a fuzzy caterpillar cake in a cookbook but wanted more of a 3D cake. I searched the internet and found this website where I got an idea for a childrens birthday cake.
I used the Wilton Sports Ball cake pan; fill the pans about 1/2 inch from the top of each pan. I have different cakes of strawberry, white and yellow alternating throughout. You can bake two at the time. Please be sure to wash the pans each time after you take the cakes out and spray with Pam. This makes getting out to the cooling rack much easier. I allowed each cake to cool.
For the icing we used the Wilton whipped prepared icing. We took the Wilton color pastes and mixed in with icing to desired color. We began to decorate. We used only Wilton #2 & Wilton #16 tips. For feet we used gumdrops and chocolate chips. The face cake had fake eyelashes, gumdrop nose and Twizzlers Pull & peel in cherry. Overall this cake was easier to make than I anticipated and is far cuter than I could have ever expected.
More Caterpillar and Children’s Birthday Cake Ideas
Cake by Nichole Z., Buena Park, CA

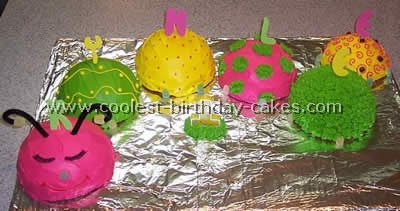
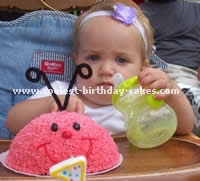
It was my daughter’s first birthday and I liked the idea of bugs and butterflies for the theme. So I came to this website and saw the cute caterpillar cakes and decided that’s the childrens birthday cake I wanted to do. It was my best cake yet and the easiest.
You just use a dome pan or bowl for the body. I bought two or three cans of white frosting and colored them all different colors. I made each body a different color and then used simple tips and made designs on each one. I used googly eyes and a pipe cleaner for the antennae and red shoelace licorice for the mouth. I got the idea from this website to get wooden letters and painted them to match the cake. I also added the sun and butterfly for extra effect. I got compliments all day long on this cake.
Cake by Michelle W., Alberta, Canada
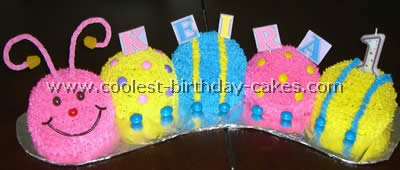
I got the idea for my daughter’s first birthday cake from the Wilton website and also this website. Thanks to everyone for posting their childrens birthday cake pictures! I couldn’t find the cake pan required for the round cakes and wanted it a little smaller so I found a small glass bowl at a kitchen supply store. I used two boxes of cake mix to make the five cake sections. I put them in the freezer before decorating.
I used a piece of cardboard and cut it in a slightly rounded shape and covered it in tinfoil for the cake tray. I set the cake pieces in position still frozen before I decorated. I made Wilton’s recipe for buttercream icing and used Wilton’s icing dyes in the colors they recommended (rose, royal blue and lemon yellow)because I liked the way it looked. I iced the cakes with a #16 Wilton tip. it didn’t take as long as I thought! The recipe made almost the exact amount of icing I needed. Then I decorated with pink, purple and yellow Smarties on two sections, blue peanut M&M’s for the feet, chocolate covered peanuts for eyes, shoestring licorice, mouth heart-shaped candy for nose and pink pipe cleaners with yellow jujubes on the ends for the antennas!
I was so happy with how it turned out and it wasn’t as difficult as I expected! Everyone including the birthday girl loved the cake!
Cake by Rebecca L., Elizabeth City, NC
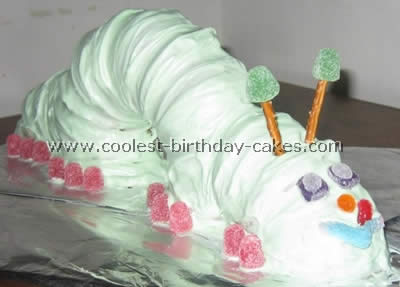
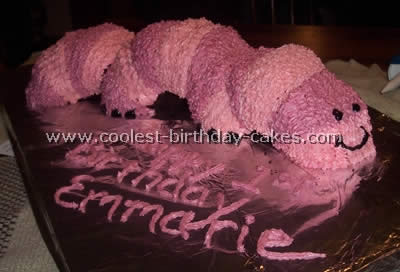
I saw a similar picture of this childrens birthday cake on the internet and decided that would be my two year daughter’s birthday cake. I used a white boxed cake mix and two cream cheese store bought frostings. I baked it in a bunt pan and sliced off 1/3 of the cake then took the smaller piece and cut that in half. I put frosting down on the platter to serve as glue for the worm body and it held really well then I added the head and tail also using frosting on the platter to serve as glue.
I added green dye to the frosting until it turned the color I was looking for. Frosting it was easier than I thought it would be. I thought it would be hard to frost the under side of the worm. Once I got it covered in frosting I went back and used my rubber spatula to highlight the groves from the bunt pan that were already there and it really made it look like worm wrinkles. I used gum drops for the feet and face. The mouth and eyes are sliced up gum drops. The antenna is pretzels. The back side is not quite as nice as the front side but once I used the rubber spatula to add the appearance of grooves for worm wrinkles it help a lot.
My little girl loved her childrens birthday cake and gets so excited every time she sees a picture of her cake.
Cake by Tiffany M., Graham, NC
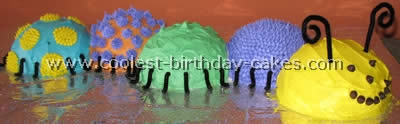
This cake I came up with after looking at another childrens birthday cake on this site. Like the others I used the Wilton’s sports ball pan to make the half circles. I wanted different textures like you would have on a real caterpillar so that is what you see with all the “spikey’s.” I placed the cakes down before I iced them so it would not be a problem. The legs are pipe cleaners cut and formed. The cake was a box mix, nothing special. The icing I didn’t have time to make so I bought the Wilton’s ready made icing.
This was for my sons first birthday and he could have cared less. The mini cake was a left over circle that was iced just for him. All in all the hardest part was just deciding how I would decorate them and color combinations.
Cake by Becky B., Milwaukee, WI
 ,
, 
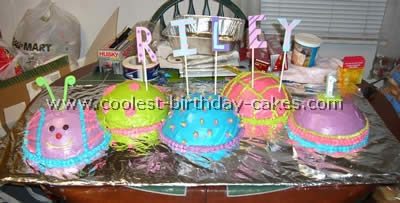
I got the ideas for a childrens birthday cake from the website. My sister and I just chose a color scheme and “starred” each half ball pan. I used pipe cleaner wrapped in foil at the tip for the antenna, “runt” candies for the nose and feet and red tear apart licorice for the mouth.
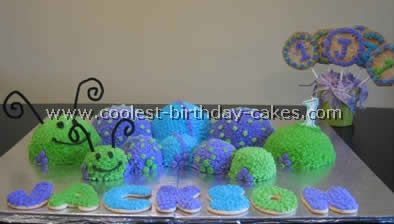
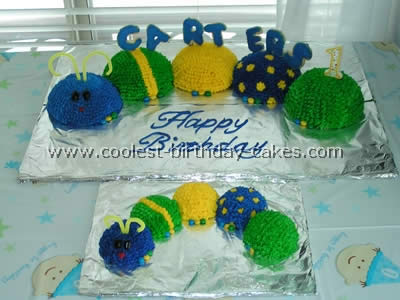
After browsing through hundreds of beautiful childrens birthday cake ideas on this site I decided on the caterpillar for my grandson’s first birthday party. I used the Wilton Sports Ball cake pan for the large caterpillar. I couldn’t find the mini-ball cake so for the smaller caterpillar (‘smash cake’ as someone else called it) I used a tin-foil muffin pan that we rounded out by hand. (Trust me try to find the mini ball pan!)
I used three cake mixes – one chocolate, one French vanilla and one yellow butter cake. I made three batches of the Wilton recipe Buttercream icing tinted with Wilton colors. I was unable to find a cake board large enough so I taped two together and luckily I was able to build it on-site and not have to transport it.
I used a #16 star tip all over with black tube icing for the eyes and mouth. Pipe cleaners were used for the antennae. I baked and iced sugar cookies for the name. All in all the decorating probably took four or more hours (including the cookie bouquet) in the back right. Well worth it and I’d do it again in a heartbeat!
Cake by Maria T., Cadar Rapids, IA
I made this childrens birthday cake for my little daycare girl’s first birthday. It is made using a bunt cake. You cut the cake in half and then the one half into fourths. You stand the cake up on its ends and add one fourth on each side. It looks best frosted in stripes. You can frost on the eyes and feet and antenna. I used candy and pipe cleaners.
Cake by Anissa B., Grenada, MS
I made this childrens birthday cake for my two year old daughter and three year old son’s birthday party. I used a store-bought cake mix and baked them in the Wilton ball pan.
I used a different flavor for each “ball” – chocolate, white, strawberry etc. The decorating was the time consuming part. I just tinted my buttercream with different bright colors and some sections I piped with a star tip, other sections I iced smooth. One section I decorated with mini chocolate chips to look like little “spikes”. I just tried to keep it fun and playful.
I made the eyes and mouth with black decorating gel and used two pipe cleaners for the antenna. I mixed coconut flakes with green food coloring to make the “grass”. The kids loved the cake and all of my friends were amazed. I didn’t bother to tell them how easy it was to make!
Cake by Charlene V., Melbourne, Australia
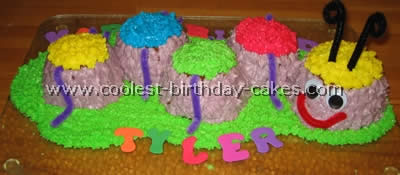
I made this childrens birthday cake for my son Tyler’s second birthday. I used four small oven proof glass bowls and a slightly bigger one for the head. The cake mixture was just your average butter cake pre-mixed packet from the supermarket.
When the cakes were cooked – I sliced the raised top of each cake so they would sit flat. I then iced each cake with a purple theme and then a different colour on top. Icing was piped with butter cream icing. Legs were made from pipe cleaners and so were the antlers. I brought some plastic eyes to give it more dimension and character.
I also thought it would be cute to add some grass – so I piped green icing all around directly onto the serving plate. I then brought some cute little foam letters that I placed around the cake to say “happy birthday Tyler”. My son and his friends loved it.
Cake by Melanie H., Dickson City, PA
I got this childrens birthday cake idea from the gallery. For the body I used the Betty Crocker bake and fill dome pan. Then iced it the way I wanted. For the name I used lollipop sticks and cut the letters out from craft foam sheets. This cake was very simple to do. Thank you everyone for your wonderful ideas.
Cake by Jenny Smith, Queen Creek, AZ
This was the first childrens birthday cake I have ever made. It was for my son’s first birthday. I love the Caterpillar cakes and took ideas from a few different ones.
I used the Wilton sport ball pan for the large cake and a small glass bowl for his smash cake. The cake alternates White and Chocolate. I made my own butter cream and colored it with the Wilton paste.
Then I made sugar cookies and cut letters out of them. I frosted them and attached a lollypop sticks to each one. I was really nervous about making it because I had no idea how it would turn out. It took five and a half hours to make but was so worth it. It was very tasty and my son ate his entire cake. For all you first timers I say go for it you will be happy you did.
Related cakes:
 Coolest Caterpillar Birthday Cake Gallery
  Coolest Ladybug Birthday Cakes
  Coolest Ladybug Birthday Cake Ideas
  Cute Homemade Caterpillar Birthday Cake for my Daughter’s 2nd Birthday
 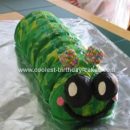 Coolest Caterpillar Cake
  Coolest Spider Cake Designs for Kids Birthdays
 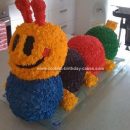 Coolest 3D Baby Einstein Caterpillar Cake
 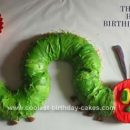 Coolest Hungry Caterpillar 1st Birthday Cake