After a year of trying to shake my son’s nickname “Scooby” we gave in and decided to have a Scooby Doo themed first birthday party! We chose turquoise, green & orange balloons, cutlery and plates, Scooby masks and toys, and of course a Scooby Doo Mystery Machine Cake!
After exploring the internet, I came to the conclusion that I could make a 3D van made out of cake and frosted with standard buttercream. We were traveling 100 miles for the party at a family member’s house, so I made the cakes ahead of time and planned to frost them at the final destination both to keep the decorations safe as well as keep the cake cool in the July heat.
Looking at the Mystery Machine’s shape, I realized I could use two loaf pans to create the body of the car. I used one batch of my fave chocolate cake recipe, Hershey’s Best Chocolate Cake, and another batch of a vanilla cake recipe I found online. (The chocolate had enough extra to make a small round cake layer and the vanilla made an average layer. I used these to make a basic cake for the birthday boy to destroy on his own.) The cakes took a little longer than usual to bake given the larger loaf pan, but I just kept an eye/nose on them and kept doing the toothpick test until they were firm in the center.
Once the two loaves of cake were made and cooled, I packaged them up for transport to the party location. Once there, I whipped up a large batch of white buttercream frosting. I opted to use the vanilla loaf cake as the base, as it was denser. I placed the vanilla loaf on the pedestal with wax paper strips under the sides to keep the presentation surface clean while I frosted. Using a sharp, serrated knife, I cut off the rounded top part of the loaf to make it a flat surface and then I split the cake horizontally as I wanted to add a layer of buttercream and raspberry jelly filling. After spreading the fillings, I replaced the top portion of the vanilla cake. I then added more buttercream and raspberry jelly to the large flattened top of the vanilla.
The next step was to place the chocolate loaf. Like the vanilla, I used the serrated knife to flatten the rounded top of the loaf and cut it in half horizontally for a filling layer. I placed the chocolate loaf on top of the vanilla portion “upside down,” with the larger flat areas of the two loaves touching. This gave the hexagon like shape of the Mystery Machine. Before I added the filling layer for the chocolate loaf, I used the sharp knife to slice off a slight angle on the back of the van and a more accented angle for the windshield. This really finalized the base shape of the van.
I added the frosting/jelly filling layer between the chocolate and then proceeded with a thin layer of white buttercream to create a crumb coat before I started the final decorating step.
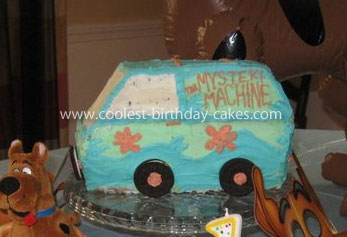
I took the remaining white frosting and divided it into three groups to be colored; I split 40% for aqua, 40% for light green, and 20% for orange. I used a frosting knife to apply an overall coat of the light green to the entire van except for the side windows and front windshield. TIP: When frosting with buttercream, lightly wet the knife with a little water before spreading- this makes the frosting spread smoothly and does not affect the taste or texture of the frosting at all! (If I could have done something differently, it would be save a little white to refrost the “glass” as mine was very clearly still the crumb coat.) I then loaded up my piping bag with the aqua buttercream and a wide tip. (Sorry, I have no idea the tip numbers or names!) Using snapshots I had printed from the web, I slowly and carefully recreated the wave like design along the sides of the van as well as the door and roof borders. I believe I frosted the entire back blue as well, smoothing it out with the frosting knife where possible. When completed, I washed my piping bag out and refilled it with the orange frosting and the fine, round tip. I started *very* carefully with the lettering for the Mystery Machine. This was the hardest part as it required the lines of text to change in size and I also had to plan ahead to not run out of room with so many letters! Not to mention there are two sides to do! Once the lettering was done, I added in the flowers, the headlights, and the roof rack.
The final step was to add 5 Oreo cookies- 4 for the main wheels and one for the spare tire on the front. I removed the wax paper strips gently and decided where I wanted the wheels. I used the remaining orange to apply a dab of frosting where the wheel went and then pushed the Oreo onto the side, applying an orange “hubcap” to each as a last touch.
Frosting the whole thing took over an hour, but the final results were worth it! It was an excellent centerpiece and quite delicious.
Related cakes:
 Coolest Mystery Van Cake-Scooby Groovy
  Coolest Scooby Doo Mystery Machine Cake
  Coolest Scooby Doo Mystery Machine 3D Van Cake
 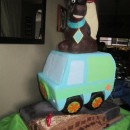 Coolest Spooky Scooby Doo Birthday Cake
  Coolest Scooby Doo Mystery Machine Cake
 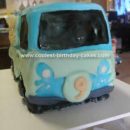 Coolest Scooby Doo Mystery Machine Cake
  Coolest Scooby Doo And The Mystery Machine Birthday Cake
 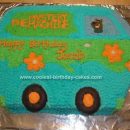 Coolest Scooby Doo Mystery Machine Cake
i have tried and tried to make cars out of cakes and you r the best i never thought of using loaf pans thats awesome thanx