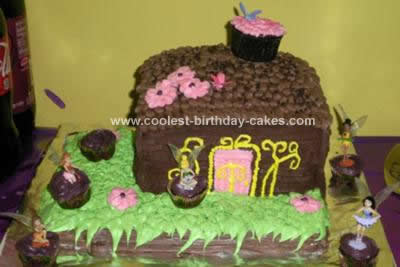
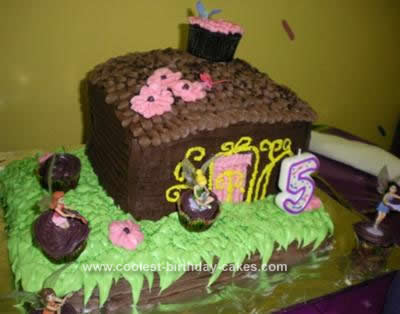
I made this Tinkerbell with Fairy Friends Cake for my daughter’s 5th birthday party. She wanted Tinkerbell, Tinks house and her fairy friends on her cake. After scouring the many photos of Tinkerbell and cakes, I found a photo of a Tinkerbell House Birdfeeder that my daughter fell in love with, therefore my inspiration for the design was a birdfeeder! One of the guests to the party had egg allergies, so I needed a way to be able to accommodate her as well. Therefore, I made flower pots for Tinks Fairy Friends to sit on that were egg-free. That way she would be included and be able to have birthday cake with all her friends.
The components of the cake is as follows: 9 x 13 base, house and roof were baked in 9 x 9 brownie pans then cut down to 6 x 9, the roof was also cut in a diagonal to create roof angle. Mini muffins and regular muffin was used to create the fairy flower pot seats and chimney. I chose flower designed mini-muffin liners to decorate the flower pots. “Decors” chocolate mini-logs, Pink Crystals and Green Crystals were used to create added texture to roof, leaves and chimney. A Tinkerbell and her Fairy Friends set was purchased at Target for about $7 to help create the Tinkerbell theme.
Method: I used a total of 4 cake mixes, 2 Pillsbury Chocolate and 2 Strawberry, and 8 Pillsbury Creamy Supreme Icing containers: 2 Milk Chocolate, 2 Strawberry 2 Cream Cheese and 2 Vanilla, sugar free. I mixed both chocolate mixes together, leaving out the eggs. I then separated enough batter to fill some mini-muffin & muffin cups, then added a cup of applesauce and a mashed banana in place of the eggs. I then added 5 eggs, instead of the called for 6 eggs, to the remaining batter. The egg free batter was used in the mini-muffin and regular muffin cups. The remaining (egg) batter was divided between the 9 x 13 pan and the 9 x 9 brownie pan and followed baking directions. I put these in fridge to cool/set up while I made the strawberry batter. The strawberry mixes were also mixed together at same time and evenly divided between the two 9 x 9 brownie pans. Recommended baking instructions were then followed. Tops of cakes were cut off to make level surfaces.
Note: Let cakes set in frig prior to crumb coat. This helps to prevent crumbling and makes cutting them much easier.
Construction: I placed the 9 x 13 cake on a foil lined tray, then crumb coated with white Cheese icing. After cutting the 9 x 9 strawberry cakes down to 6 x 9, I first placed one 6 x 9 strawberry cake on the bottom layer, added strawberry icing on top, being sure to cover entire top of cake, then added 2nd 6 x 9 strawberry cake on top, following up with crumb coating both layers with strawberry icing. I then carefully cut the remaining chocolate 9 x 9 down to a 6 x 9, then starting at the bottom uncut 9″side, I cut diagonally from the bottom corner to the top corner of the cut 9″ side which made 2 wedges. I then placed the top wedge, large uncut section facing the back and tip on the front to create the roof. This was then crumb coated in chocolate.
Note: If you have room in the frig, place the entire cake in the frig and allow to sit up for at least an hour before frosting and decorating. I mixed the vanilla and cream cheese frosting, so in my instructions I just list “white” frosting.
Icing: Starting with the front of the house, I outlined where I wanted the door to be. I used tip #47 and chocolate icing to make the siding, starting at the bottom, then slightly overlapping on the way up. I did each individual side first, then ran a line up the corners to cover where the sides met and around the front door outline. I used this same method around the outside of the base layer. The roof was also made by overlapping the layers of frosting, using tip # 98, starting at front of roof and working back using chocolate icing, slightly lightened with white frosting. The front door and chimney was filled in with strawberry frosting using tip #97. White frosting, tinted with yellow gel was used to pipe curly designs around front door, using tip #2. The leaves were made with white icing, tinted with green gel, using tip #366. I tinted white frosting purple and used tip #21 to make circular designs the mini muffins for Fairy’s to sit on. The pink flowers were made with strawberry frosting, tip #102, with a small dot put in middle with purple frosting, then placed in frig overnight.
The final touches done at home was to sprinkle the “Decors” decorations on the roof, chimney and leaves and add flowers from frig. I waited until I reached the party before putting the Fairy’s and muffins on the cake.
The cake tasted like chocolate covered strawberries and was a big hit! Several children (and a few adults!) came back for seconds!
Related cakes:
 Coolest Tinkerbell Dress Cake
  Coolest Tinkerbell and Fairies Cake for a First Birthday
 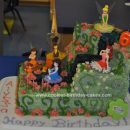 Coolest Fairy Tinkerbell Birthday Cake
  Coolest Tinkerbell and Friends Birthday Cake
  Coolest Tinkerbell Fairy Cake
  Coolest Waterfall Tinkerbell Fairy Garden Cake
  Coolest Tinkerbell Birthday Cake
 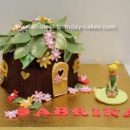 Coolest Tinkerbell Birthday Cake Idea
Your comment has been sent successfully.