Want to learn how to make the trashiest Trash Pack cake that your child will LOVE?!?! You are in the right place. I am certainly no expert and I feel like if I can do it, anyone can! So, put on your brave face and let’s do this! I did not take a lot of pictures along the way; but I’ll try to explain as best I can. So here goes:
When my son said he wanted to have a Trash Pack party, I started trying to think of different cake ideas. I told him not to expect too much when it came to his cake because I didn’t know how to do much more than a plain cake with a few of the little figures on top. The more I got to thinking about it – the more ideas I came up with and the more I got up the courage to give it a shot. My son was so excited about the final product!
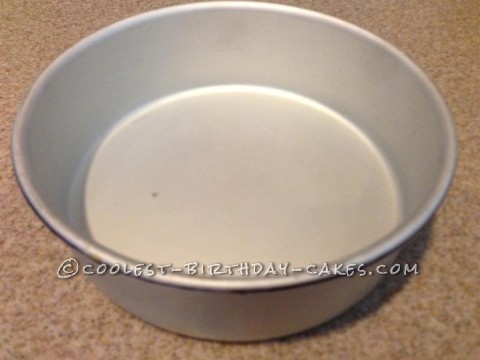
I used a six inch round cake pan. I made four six inch cakes. I ended up using 3 and a half cakes. You can use any cake recipe or box mix you like. I made yellow cake and dyed it green with gel food coloring before baking. Most cake recipes should make two 6 inch cakes. I think chocolate cake would work nicely too for “dirt” color. Remember to wipe the inside of the cake pan with vegetable shortening and dust with flour before baking so the cake will come out easily. After baking the cakes, cut the tops off with a serrated knife so that they are flat. Then put the cakes in the freezer. They are much easier to put frosting on when frozen – and they will still taste good for a couple of weeks in the freezer.Feel free to wrap them up in plastic wrap if it makes you feel better. I always like to do as much ahead of time as I can so isn’t as crazy right around party time!
For the frosting between layers, I used the Wilton butter cream recipe found here (I cut it in half). Remember to use very little frosting between layers. You just need a small amount! If you use too much, the weight of the cake will cause it to push down on the icing (especially at the bottom) and you will have a bump where the frosting is trying to ooze out after you put your outer frosting layer on. Don’t say I didn’t warn you! :) Once I had them all stacked up, I used 3 wooden skewers (cut to the correct length)stuck down into the cake to help stabilize it. You could also use dowels for this.
For the frosting on the outside of the cake I used a method I found online and added a small amount of black gel food coloring to make gray. I also made trash can groves around the outside with the back of a knife and then smoothed them out with the paper towel so they would be more subtle. The whole paper towel method didn’t work as well as it did on that site, but it was OK. OK but not great. If you want it to be exactly perfect and you are a fondant wizard – by all means – go with fondant! I’ve never done fondant before and I like the taste of butter cream better – so that’s why I went with butter cream.
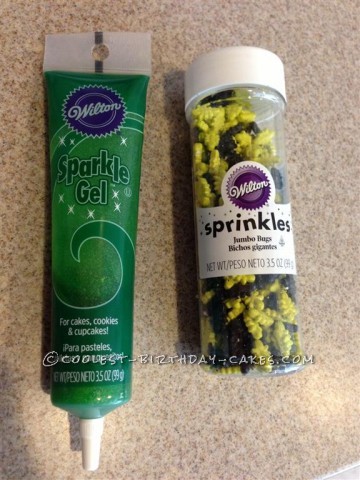
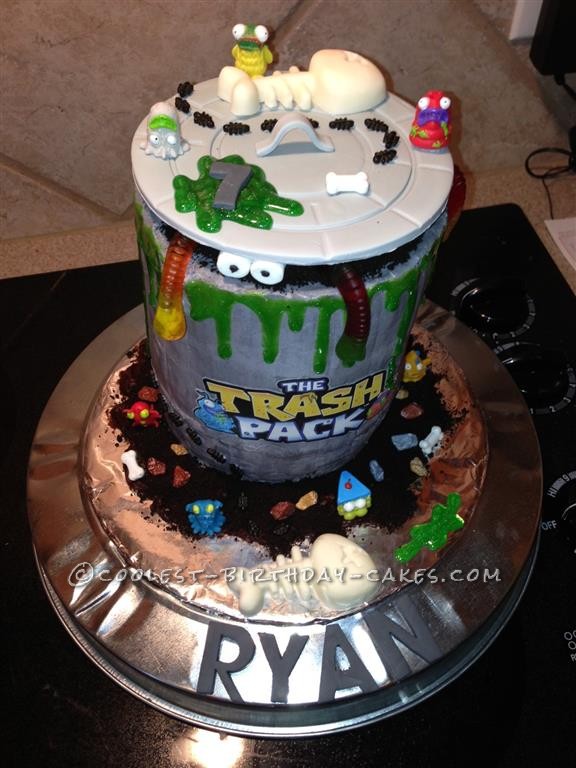
The ooze was green Wilton sparkle gel. This stuff is perfect for that slimy ooziness required for the grossest Trash Pack cake! I just squeezed it all the way around the rim in different amounts so it would drip down and be super oozy!
The ants are Wilton Jumbo Bug Sprinkles. I got them on eBay I think they are probably sold in stores around Halloween. I used a little bit of frosting to attach them to the lid and the side of the cake. I put a lot more ants on the side of the cake that you can’t see from the photos. Who wants to eat ants?!?!! Trash Pack lovers! That’s who!
The “dirt” was crushed Oreo cookies. I used canned chocolate frosting (mud) for the “dirt” to stick to. I also put “dirt” in the middle on the top of the cake like the trash can was full of dirt – YUCKY YUMMY!
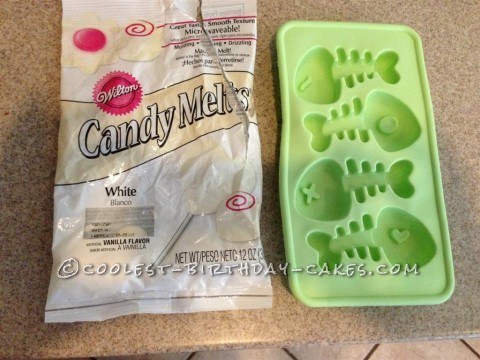
For the fish bones (also a big part of Trash Pack culture), I found fish bone silicone ice trays on eBay and used white Wilton candy melts in them.
The rocks are chocolate. I think they have some at Walmart in the candy aisle. Nothing stranger than taking a big chomp out of a rock!
The little bones came from one of the machines you put a coin in and turn a knob and get a handful of candy out. They are dog bone candy and come in several colors.
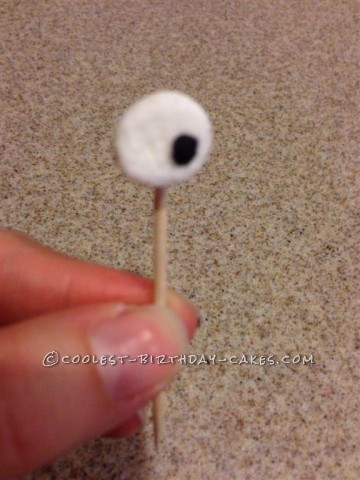
Something creepy is lurking inside this trash can! The eyes peeking out from under the lid are small marshmallows with a small dot of frosting in the middle. I put them on toothpicks and stuck them down in the cake.
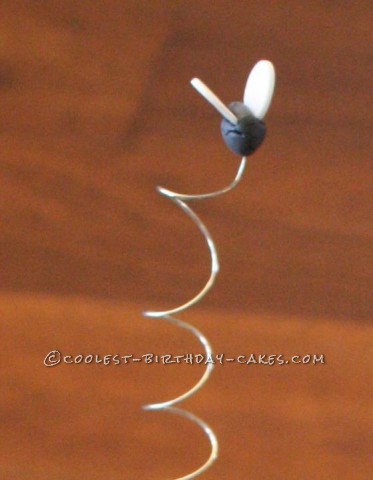
The Trash Pack’s signature bug is the fly! Just go to their Web site to see for yourself! These flies are made out of gumpaste and can also be done ahead of time. You can buy it premade gumpaste or make some yourself. First, I made the wings. I rolled out a thin layer of white and used a washed marker lid to cut the circles. Once they were hard (doesn’t take very long), I made the bodies. I used black food coloring gel. Before they dry put the wings and the wire in. It is ok if they don’t stay but they will need a place for you to stick them in once it has hardened. I got the wire in the jewelry section of a craft store. I spiraled it around a marker to make it look like they were flying. Once the bodies are hard, you can use a small, clean paint brush to put some water where the wings and wire go – this will help them stick together. Nothing trashier than flies buzzing around!
The Trash Pack label on the front of the cake I found online and printed off the computer. I covered the back with packing tape so it would not have frosting bleed through and I used frosting to make it stick to the cake.
The trash can lid is made out of gumpaste. I used a small amount of black gel food coloring to make it gray and rolled it out fairly thick. I used a round Tupperware bowl about the size of the cake pan with a thin rim to cut it out and I used smaller bowls to make the circles on the top. I used a wooden skewer to make the straight lines on top. You have to make the marks fast because the gumpaste will dry quickly. You can attach the handle to the top with a little bit of water. The seven and the letters are also made of gumpaste and cut out with cookie cutters. Nothing better than a seven (or the age of your child) splatted on top of the can! My son loved this part! *Note about gumpaste: don’t put frosting on gumpaste until the day of the party – it will make the gumpaste soft and might change the color of the gumpaste.
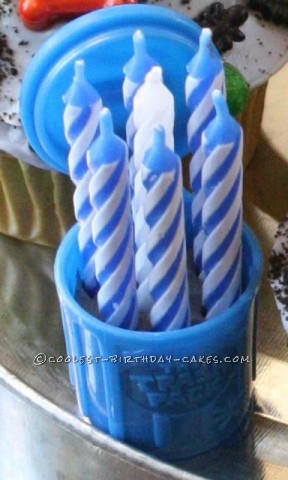
I put the candles in a small Trash Pack trash can. If your child is a trash pack JUNKie, like mine, I’m sure you have one or a zillion of these laying around! I put some molding clay in the bottom to stabilize the candles. You could use play doh too – just be sure whatever you use is not flammable! Also, make sure the trash can lid is as far back as it will go so it won’t melt. The flame will go pretty high doing this – so be careful!
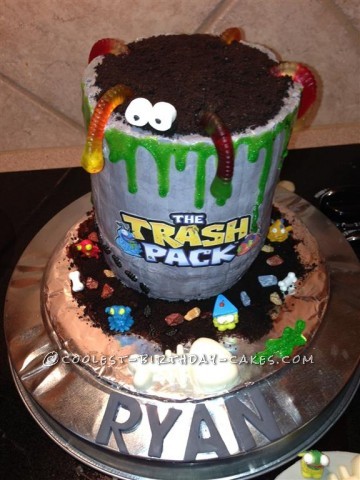
This is what it looked like with the lid off. Don’t forget to add those icky gooey gummy worms! I used a clean dowel to poke a hole in the cake and put the worm’s tail in the hole so it would look like they are coming out of the cake. You might have to add some more Oreo crumbs at the base if any cake/frosting is showing.
The most difficult part about this cake for me was transporting it to where my son was having his party! I was holding it in my lap and my husband was driving. Any time we went over a bump or he changed lanes I got super nervous! Good News though!!! It made it in one piece! SUCCESS!
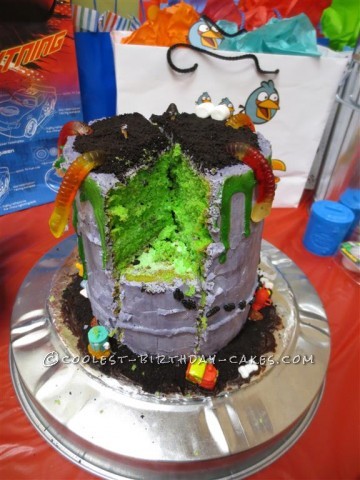
Here’s a picture once it was cut into so you can see the green cake :) My son selected Trash Packs he wanted to put on the cake and I used a little bit of frosting to make them stick on. Don’t forget to bring extras of each type of candy – all the kids will want to try an ant, a rock, a gummy worm, a bone, an eye ball, etc!
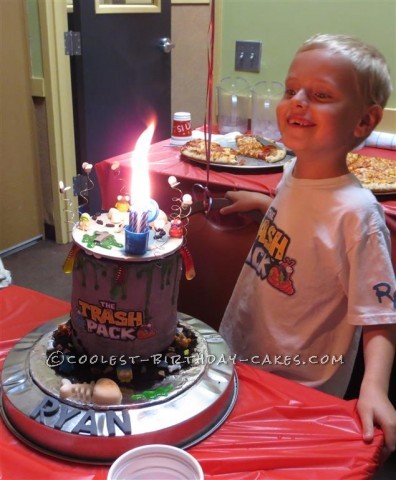
Of course, any Trash Pack cake should be served on a garbage can lid!! As you can see, my son was extremely happy with the cake. He was beaming! He and all his friends were EEEEEWing and ahhhing over every part! I had several folks really surprised that I had made it and that it wasn’t bought from a professional. It was by no means perfect and it is OK if yours doesn’t turn out exactly “right” – it just adds to the TRASHY factor!
Good Luck and Happy Cake Making! ENJOY!
Related cakes:
 15+ Cool DIY Monkey Cake Designs for the Birthday Cake Enthusiast
  Coolest Trash Pack Cupcakes
  5 Coolest Homemade Anti-Gravity Cakes
  5 Dinosaur Cake Ideas of Jurassic Proportions
  Make this Coolest Ever Baby Doll Cake – Step-by-Step Tutorial!
 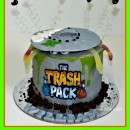 Trash Pack Trashies Cake
  Easy Construction Site Cake
  Coolest Tulips in a Flower Pot Cake
Awesome! I’m planning a Trash Pack Bday party for my son’s 6th birthday. What was the technique you used for icing the outside of the cake? It is mentioned that you found one online, but no other hints. Thanks!
Awesome! I’m planning a Trash Pack Bday party for my son’s 6th birthday. What was the technique you used for icing the outside of the cake? It is mentioned that you found one online, but no other hints. Thanks!
This is really awesome! Well done. Love all of the attention in the details!
This is really awesome! Well done. Love all of the attention in the details!
Thank you for taking the time to put this online with all your comments!! I’m planning my son’s 8th birthday and was looking for just the right project for his Trash cake: easy and spectacular. This is the one!! I found the fish bone mold for nest to nothing on Ebay along with the sparkle gel and ants. So looking forward to try this and see his face! Thanks again!
Thank you for taking the time to put this online with all your comments!! I’m planning my son’s 8th birthday and was looking for just the right project for his Trash cake: easy and spectacular. This is the one!! I found the fish bone mold for nest to nothing on Ebay along with the sparkle gel and ants. So looking forward to try this and see his face! Thanks again!
I am just planning out making my son’s 6th birthday cake (he wants a Trashies cake too!) and this post is fantastic to help with the how and what to use…I want to do butter-cream too. I do have a question that you could answer for me though….how many people did your cake serve? I am just trying to get my head around how much cake I need to make…I think the six inch size looks good, but am uncertain if it’ll feed the amount I need it to feed. Thanks!
I am just planning out making my son’s 6th birthday cake (he wants a Trashies cake too!) and this post is fantastic to help with the how and what to use…I want to do butter-cream too. I do have a question that you could answer for me though….how many people did your cake serve? I am just trying to get my head around how much cake I need to make…I think the six inch size looks good, but am uncertain if it’ll feed the amount I need it to feed. Thanks!