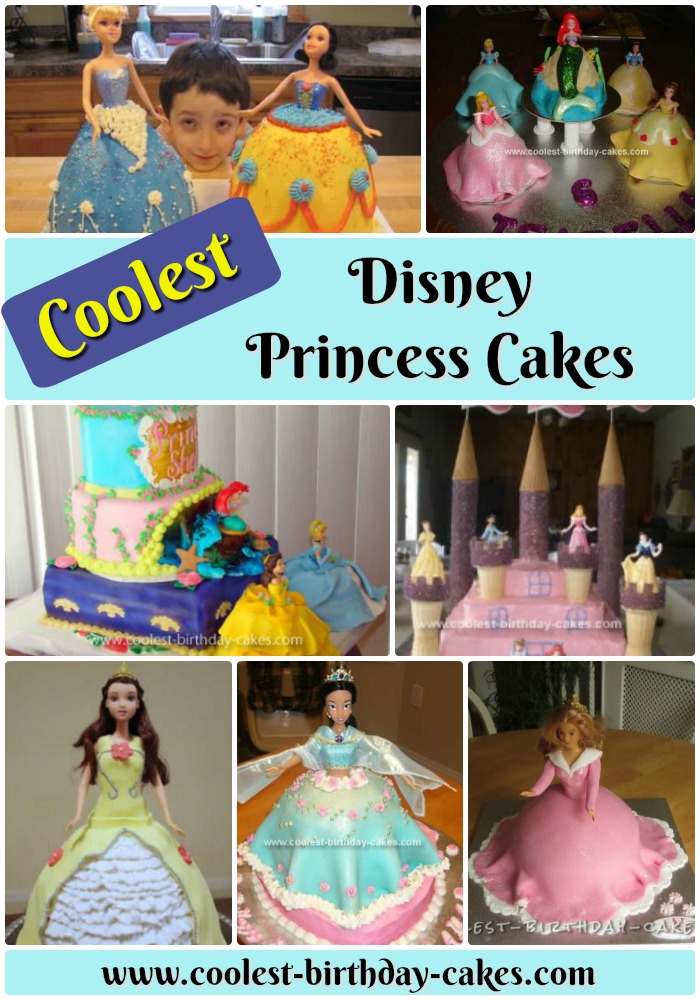
This cool collection of Disney Princess cake ideas and designs is sure to provide you with inspiration as you set off to create the coolest Disney Princess cakes ever. Good luck!
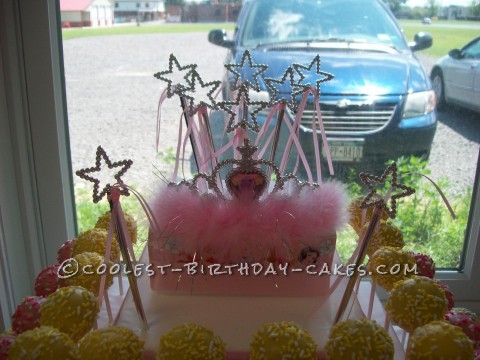
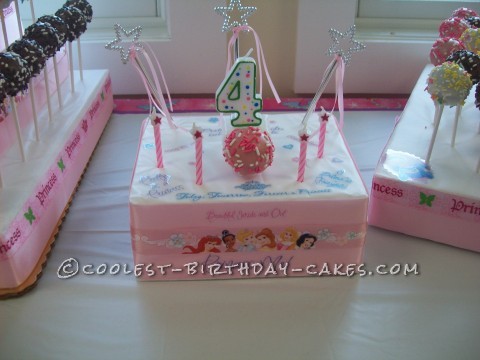
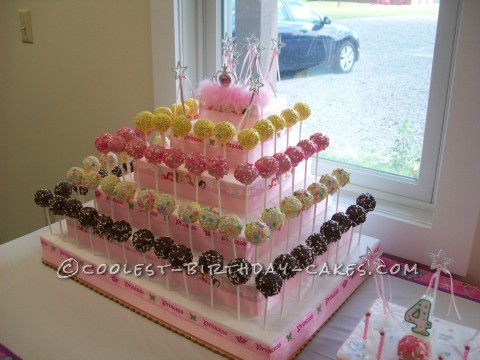
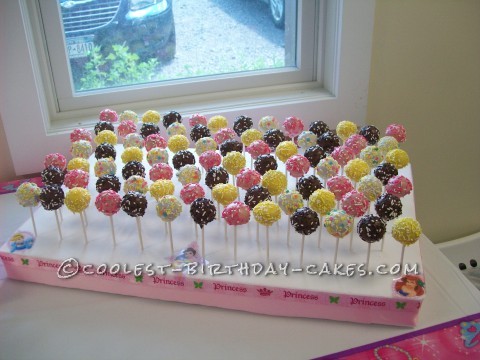
Disney Princess Cake Pops
Disney Princess cake submitted by Stella S.
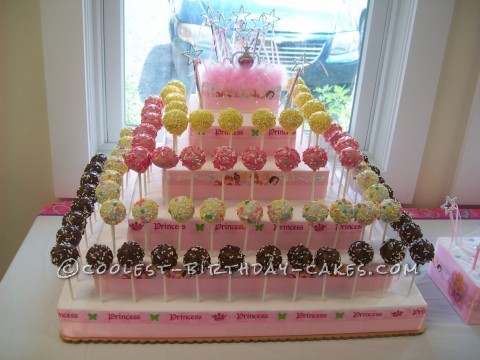
This was my very first attempt at making cake pops, but I was up to the challenge. I bought a Babycakes Cake Pop Maker. It makes 12 little pops every 4 – 6 minutes, depending on the recipe. I actually bought another one to make them twice as fast! My granddaughter chose the flavors…”chocolate, vanilla, pink (strawberry) and yellow (lemon)”. It took about 10 hours to prepare the batters, bake, cool, dip in candy melts and cool again to make over 180 cake pops.
The “castle”, candle holder and the large, flat display were made from Styrofoam. I got it from our local appliance store…FOR FREE!! I cut the pieces (outdoors, it was very messy!), covered them with white plastic tablecloth and decorated with ribbon. The greatest challenge was transporting the “cakes” to the party. The weather was very hot and humid. I had to run the van with the air conditioning on. It’s a good thing that we didn’t have far to go! At least the room was nice and cool!
The look on my granddaughter’s face was priceless, she loved it! The cake pops were very tasty! They were enjoyed by young and old!! Thank you, Stella

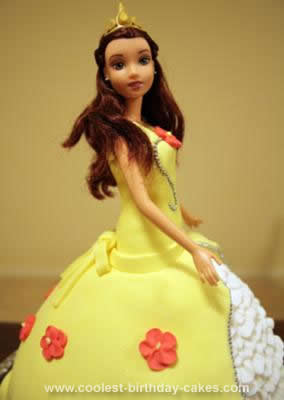
Princess Belle Birthday Cake
Disney Princess cake submitted by Melanie
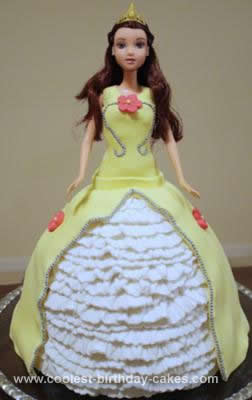
This is Homemade Princess Belle Birthday Cake as requested by my 3 year old daughter for her third birthday. It is only the second cake I have attempted, so please forgive my primitive methods. I baked the cake 3 days beforehand using a Dolly Varden cake tin that I hired. I froze it that night and started work on it later on the next day. It was quite firm and easy to trim.
I assumed my little girl would want to keep the doll, so I used a real Disney Belle doll. The legs did not come off, so I had to build the cake up a little higher by adding a plain round shaped cake underneath. I cut out enough cake in the middle to fit a plastic wrapped Belle inside and then put her to the side again.
I placed the cake on the tray I was going to serve the finished cake on and put 4 strips of baking paper under the edges of the cake to keep the surface clean and protected. They were easy to slide out later.
I used “ready made” fondant icing that just needed to be colored and rolled. By adding the yellow color it required a lot of kneading and was therefore, quite easy to roll, as long as lots of icing sugar was used to avoid sticking.
I made the frills by cutting out circles in white rolled icing using a round fluted pastry cutter and then cutting the middle of the circle out with a smaller cutter. This left a ring. I used a skewer to flatten triangular shapes all around the ring. I was given this idea from a YouTube video called “how to make fondant frills”.
It was trial and error, but after the circle is cut and straightened out a little, the frills looked fabulous and quite convincing. I roughly covered the cake with butter icing and stuck each row of frills on, starting from the bottom and making sure they overlapped each other. With my left over frills I lined them up all around the base of the cake. I assumed I would never get the yellow icing to cover the entire cake (I am prone to disasters), and thought it wouldn’t hurt to have a little frill showing at the bottom of the dress if worst came to worst.
Then I cut up some kitchen paper to see what sort of shape I needed my icing to be to drape over the cake in an effort to leave the frills visible. I rolled the icing out roughly into that shape, and with the rolling pin, (and my husband for moral support) I picked the entire thing up, and placed it over the butter iced cake. It fitted quite well, but I didn’t regret my frilly petticoat idea, as one little bit was exposed.
I cut out a hole for Belle. With left over yellow icing, I rolled a bodice sized piece and gently wrapped it around Belle. I had to make her some straps as well. There were a few imperfections when applying the straps and trying to blend them, but her hair and some decorations covered them.
I placed Belle into the cake and made a yellow “belt” to put around her to hide the join. Next, I decorated her the next night after my daughter was in bed. I used a new pair of tiny tweezers and sat down for about 2 hours, carefully placing tiny silver balls in selected areas. I used watered down white fondant as a “glue” for each ball, although, I’m quite sure you can purchase an edible glue. Next I placed red flowers around the dress using the glue again. I even put a little silver ball on her ring finger and placed some edible silver ball earrings as well.
Finally, I showered the whole dress with a yellow edible glitter. Then I slept for about 12 hours.
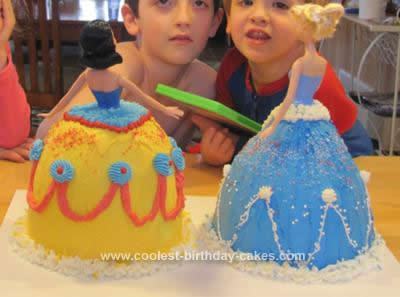
Disney Princess Doll Cakes Snow White and Cinderella
Disney Princess cake submitted by Sonja S.

My 3 year old son is totally in love with Snow White. He is obsessed with her. His birthday is on January 29 and his older sister’s birthday is only one week after that. So, we usually have a combined celebration for them both together.
I knew I wanted to make a Snow White themed cake, but I also wanted to make something special for my other child. I searched and found quite a few examples of doll cakes.
To make two cakesI used my Pampered Chef glass batter bowl. Make sure to oil them well and then also flour them. I think you should let them cool for about 15 minutes before flipping it onto a cooling rack. It took about 50+ minutes at 350F to bake these cakes.
Then, I used my regular round Wilton cake rounds to bake off two cake rounds using a third box of cake mix. You have to do this in order to get enough height for the dolls. No problem.
Then, I stacked the bowl shaped cake over the round cake using butter cream frosting to stick them together. I used a serrated knife to carve the shapes of the two together. Then I stuck the dolls into the cooled cakes and wiggled them around a bit to create a hole for their bodies later. I used my frosting spreader spatula to scoop out a little extra to be sure they would fit later. Then, the crumb coat went on and I tossed both of them into the freezer overnight.
The next day, I stuck each doll into the cake, then used tinted butter cream to frost the dresses. It was fun to decorate using your imagination! I invested a little bit in some expensive sprinkles to add glitter and some Disney-themed symbols like little candy blue high heeled shoes for Cinderella and candy red apples for Snow White. I used Wilton frosting tips for all of the detailed work – just using the star shape in varying sizes. When I finished each princess, I carefully used my frosting spatula to transfer the cakes onto a nice display cardboard piece. I finished each cake at the bottom using a large Wilton star tip to create the finished look. A few sprinkles followed and BAM! My kids are amazed and delighted.
First time project for me – it took a while to bake off the three cakes (I only have one batter bowl to use for this). I baked the two rounds at the same time that I baked off one of the batter bowls. So, it took a total of two hours for baking. I made the frosting up while the cakes were baking. Then, the cooling, carving shape, and crumb coat application took me another hour because I didn’t know what I was doing and took my time. So, three hours in the kitchen the night before.
One obstacle I had was the Cinderella cake was not quite tall enough to accommodate the doll, even after I added the Wilton round to the base of the bowl shape. Luckily I had some brownies on the counter top. I smashed up a couple of them and stuck them onto the top of the cake to create a little more “dress” going up to the doll’s bodice. I think it’s a good idea to save your cake scraps from when you carve out the shape in case you get into this predicament too. Then I tossed mine out the night before…then, I covered my fixed up area with butter cream frosting and my problem went away!
I had the frosting made up ahead of time and tinted, so the decorating took me about an hour the next day. I could have done this much faster, but I didn’t want to make mistakes after the time investment from the previous day.
So, about four hours total time, but this was a fun project and my kids all told me they are the best cakes they have ever seen. Worth it! Cost for these two cakes was about $3 for cake mixes, $3 for butter/sugar, $6 for Disney specialty sprinkles (yikes), and $8 x 2 for the dolls. So about $28 altogether and the kids will play with the dolls as keepsake toys.
I’m proud of this project! Have fun if you decide to try it for yourself!
Disney Princesses Cakes
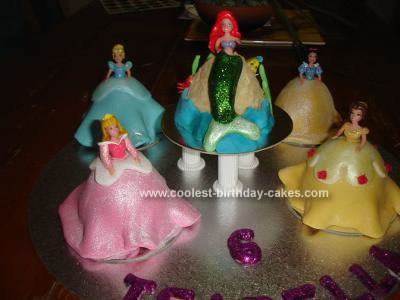
I used a mini dolly pan and found the Polly pocket Disney princess dolls from Toys R Us.
For Cinderella, sleeping beauty, Snow White and Belle, I used fondant to make the skirts and brushed on cake glitter dust. I left the shirts on the dolls because I thought it would be too hard to try and make something out of icing for tiny dolls! For Belle’s dress I used a flower cookie cutter and cut out white fondant and then brushed it with yellow cake edible glitter.
Sleeping beauty I used a heart shaped cookie cutter and just pressed in the top half of the heart on both sides to make the top half of her skirt, Cinderella I just rolled the icing and moulded it to the shape I wanted.
For Aerial, I made her tail and sea weed out of modelling paste (I am from Australia so might be called something different – it dries hard) and I used gel food colouring to colour in the top half and then used (non-toxic – decoration purpose only) glitter so it would be sparkling!! For her sand hill I just used butter icing and crushed biscuits and make the waves out of fondant and used a cutter
It took me about 4 hours to make these Disney Princesses Cakes including moulding the tail a few days before.
Pink Disney Princess Castle Cake
Disney Princess cake submitted by Belinda F.

I made this Disney Princess Castle Cake for a friend whose little girl loves Princesses. I used the yellow cake recipe from the Betty Crocker cookbook and added almond extract to make it even more delicious. Since I don’t have square pans, I baked rounds and trimmed them. The top tier is not square, and it sits flush with the back of the bottom tier, to give the princesses more space for dancing.
All the towers are made from Rice krispies treats with sprinkles added in. I covered them in buttercream, then fondant. The ice cream cone roofs are covered in buttercream and covered with course sparkle sugar. I used a skewer to support the ice cream cone, and a glob of buttercream on the end of the skewer. Next I used cut skewers to support the towers from the side, and I glued them with buttercream on the bottom and where they attach to the cake. I should have piped the green before I put the tower on.
Then I piped the green vines with buttercream. Next time I will practice the piping more before I dive in. I transported the cake very nervously on my lap, then put the princesses on with skewers. I used sprinkles on the plate to hide the bottom of the fondant.
Really, I love using toys on cakes. The child gets a special handmade cake and then keeps the toys as souvenirs. Next time I will make up extra ice cream cones and bring them to the party. They were a hot commodity, along with Rice Krispies treats. Don’t be scared to make a fancy cake. This is my second. I have a lot to learn, but this cake made a little girl very happy!
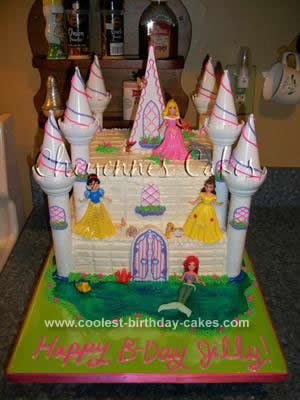
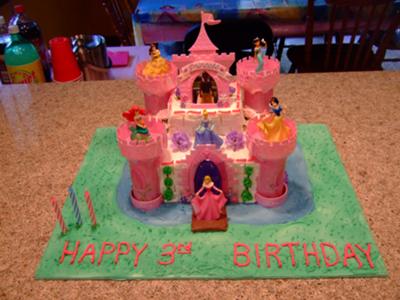
3-Tiered Disney Princess Castle Cake With Princess Figurines
Disney Princess cake submitted by Kendra

For my daughter’s 4th birthday we did a princess theme. Being that it is VERY popular I was looking for ideas for a Disney Princess Castle Cake. I found several good ideas on this website and with that knowledge and my own ideas this is what I came up with.
The cakes are just out of box cake mixes. Bottom layer is 2 10inch square cakes. Middle is one 8inch square cake. The top is a small (maybe 6 inch) round cake. Assembling the cakes were easy.
I used strawberry flavored frosting out of a can so I wouldn’t have to color it. The smaller towers are regular ice cream cones – 2 stuck end to end on both sides of the cake and then 2 singles on the 8 inch cake. The back 2 tall towers and the middle one (with the turrets) are made from paper towel and toilet paper rolls.
The most EASY part of the towers were that I used Karo light corn syrup as the “glue”. I used a pasty brush and just brushed a thin layer on the paper then I rolled them in the purple sparkle sprinkles! It was SO easy. They dried pretty fast and held up SO well. I did all the towers a couple days before then baked the cakes on another day and assembled the day before and day of the party.
On the tops of the regular cones I used a template to make the “edge” and used the Karo and sprinkles on them as well. (I also used the Karo to glue the cones together). The tops of the purple towers are sugar cones and I just hot glued them on. I printed the birthday message on colored paper and used a flag stencil to cut it out and toothpicks to hold them on the tops of the cones. It was hard to poke a hole in the end of the cone without breaking it but that’s why I had 12 cones available!
I already had the princess figurines which is one reason I didn’t want to purchase the “kit” to make the Disney princess castle cake. I used a small bit of icing colored purple to make a few windows and a door and then green for some grass. Over all – I think this cake was pretty easy to make – the part of figuring out what to use was the hard part. I got tons of compliments on this cake and of course my daughter LOVED it!
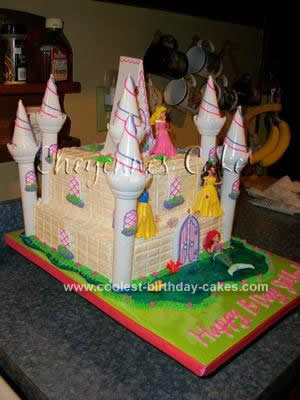
Disney Princess Castle Cake Using the Wilton Castle Set
Disney Princess cake submitted by Cheyenne B.
This Homemade Disney Princess Castle Cake is a 2 tiered funfetti cake. The bottom tier is a 12in square pan. Top tier is an 8in square pan (got my pans at Wilton.com). I used 2 cake mixes in each pan. I then stacked and used wooden and plastic dowels to keep the cake sturdy. The top tier also has a thin piece of cardboard underneath it for extra support.
Once frosted I let sit for about 20min to a half hour, then with a toothpick made the indents in the frosting to give it a slight brick effect. All the towers and castle pieces that are on and around the cake are also from Wilton.com. I bought the Disney princess dolls from Walmart. I used Wilton glittery blue food gel icing (can buy at Walmart, Stop & Shop etc.) for the water. That’s about it. Have any questions on how I did anything I didn’t state in the info please feel free to ask!
Disney Princess Castle
Using a set of cake toppers and set, my daughter and I made a castle with all the princesses. We used plain white frosting and only colored it to make the vines. The flowers came from a a specialty cake store and were helpful when you’re short for time. Finished with a picture of the birthday girl, the cake went over well. It was simple, but still beautiful.
Princess Aurora Birthday Cake
Disney Princess cake submitted by Pearl C.
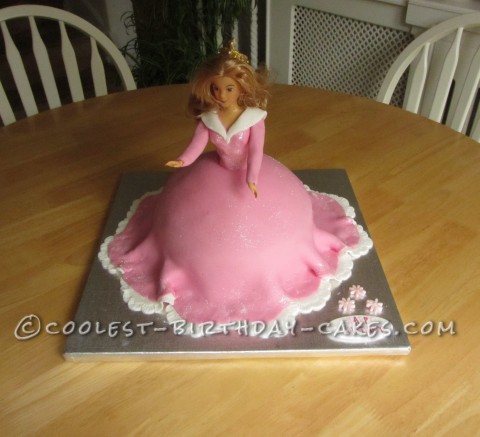
I made this Princess Aurora birthday cake for my stepson’s girlfriend Emma who was 22 yrs old! No, I haven’t made a mistake and put too many 2s ! We had just returned from a trip to Disney and that was all she could talk about. That’s what gave me the idea and as I have 3 grandsons. It was nice to do something ‘girly’. We went for a meal and I got the waitress to bring it. Her face said it all and I don’t think she would have been any happier if she’d have won the lottery….the only draw back was….she didn’t want to cut it.
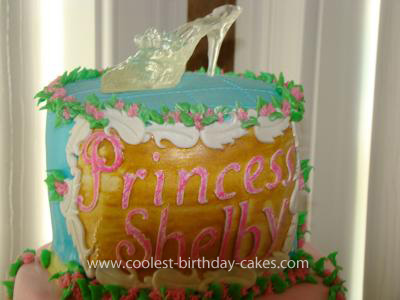
Pretty Disney Princess Birthday Cake
Shelby wanted THREE of the princesses on her 4th birthday cake. I found the “princess toppers” and made the skirts from rc treats and fondant and gumpaste and touches of icing flowers. Everything else was completely edible…even the “glass” slipper made from isomalt sugar.
I covered the cake board with fondant and gumpaste flowers and trimmed the edge with fluffy tulle and pink ribbon.
The bottom cake was yellow cake with strawberry filling and an actual layer of cheesecake topped with cream cheese frosting. Middle tier was red velvet w/cream cheese frosting and the top was chocolate espresso with chocolate filling. All covered in fondant and airbrushed and hand painted details.

Princess Jasmine Cake
Disney Princess cake submitted by Erin K.
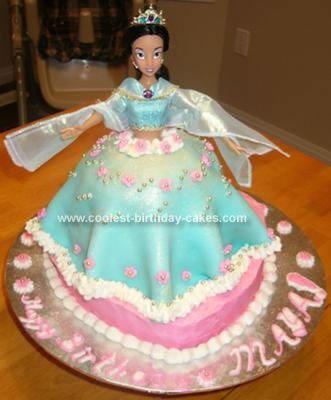
My daughter wanted a Princess Jasmine cake for her 5th Birthday. My mom bought the Jasmine Barbie from the Disney store. It was quite a beautiful doll. I used the Pampered Chef large batter bowl, and a Wilton heart shaped pan for underneath the dress, since the Barbie was too tall. Then I carved out a small hole for the Barbie before I put the Barbie in the cake. I wrapped the Barbie in seran wrap before putting her in.
I made all the flowers for the dress the day before, and bought Wilton white fondant for the dress. Nexgt I had to tint the fondant using Wilton dyes and knead it. I added some confectioners sugar to the fondant as I kneaded it because it was getting too sticky. I think I added too much though, because the fondant did crack a little. However, the colour was perfect.
I lightly covered the dress with buttercream frosting, then carefully put the fondant on top and shaped it. I tapped to find the hole I had made in the cake, then cut a hole in the fondant to put the barbie in.
Then I piped around the top of the dress, and put little dots to attache the gold balls (Wilton) and flowers. Then I piped around the bottom of the dress. I also sprinkled some Wilton gold powder on the dress to make it shimmer, like Jasmine’s costume.
My daughter was thrilled and all the little girls loved it as well.
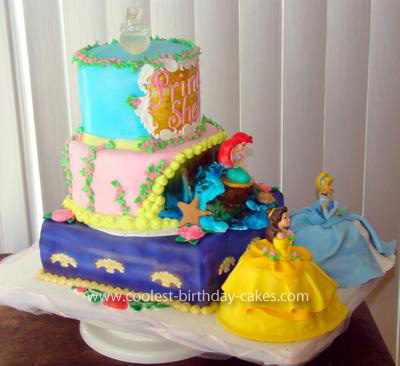
Princess Tiana Dress Cake
Disney Princess cake submitted by Gen T.

Of all the Disney Princesses, we like Princess Tiana the best. Her dresses are great and we wanted to do both the white (2nd wedding dress) and the iconic green wedding dress but it wasn’t that big a party and we only needed a small cake for my daughter’s 4th birthday. We went with the green wedding dress, it inspired the whole party.
The cake itself was just the dress, as if on a form waiting to be put on. I sketch out how I would build the cake after looking at the dress detail on the party goody bag. I made a simple cream cake from scratch. Then I baked it in my Pampered Chef Classic Batter Bowl and a small round pan (to add extra height at top of dress). Overall height was about 12 inches. After a crumb coat and some chill time in the fridge, I covered it in a good layer of pale yellow-green butter cream icing. Kids prefer more butter cream than fondant so I wanted them to have enough below all the fondant detail. Then I added individual fondant leaves/petals in pale yellow to the front followed by larger pale green ones.
I used my fondant tools from Wilton to mark the lines into the fondant so it would look more like leaves. I added a dark green fondant vine and topped that with a flower.
The flower took the most time to make. I started while the cake was baking and had to leave it in an egg carton section over a glass (to accommodate the toothpick) to dry in just the right shape. Next I formed the center ball on a toothpick before adding the petals I cut from the fondant so I could push it into the cake at an angle to secure it to the front. I dusted the flower, vine and front of the dress with shimmer powder for a little sparkle.
If I had to do this Princess Tiana Dress Cake again, I’d roll the final layer of green petals as one large piece that I cut out like a coat to wrap the lower petals on the cake. That would have eliminated some of the extra lines that I didn’t have time to disguise on this cake.
Overall it turned out great and the birthday girl loved having a cake to match her dress.
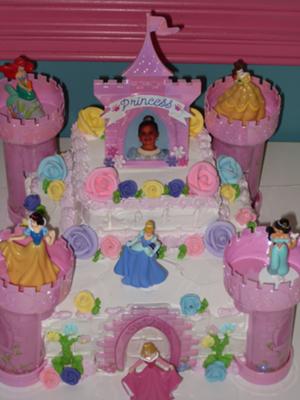
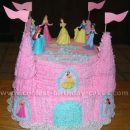
Pretty Pink Castle Cake
I made this cake for my daughter’s 3rd birthday because she is totally obsessed with Disney princesses. This cake is made using a kit that you can order online and includes the plastic tower pieces, turrets, door frame, picture frame and princesses. The kit also comes with detailed instructions, including what tips to use.
I baked two yellow cakes in a half sheet pan according to the pans directions and then cut the pieces according to the kit directions to build the castle. After an initial crumb-coating I iced the cake with white icing and created “bricks” using a wooden skewer. I then added the towers and piped the door with a ridged tip to look like wood. I then piped the vines (on sides and back) and topiaries. The kit says to make icing flowers, but I used artificial flowers for convenience. I iced the board to look like a moat around the castle and used chocolate icing on a graham cracker to create a bridge. This castle was a huge hit, and was much cheaper to make myself than to get at the local bakery.
For even more Disney Princess cake ideas check out our main Disney cakes section…
Related cakes:
 Coolest Princess Castle Cake Ideas
  12+ Coolest Castle Cake Ideas – Awesome Homemade Castle Cake Designs!
  12+ Original Homemade Princess Castle Cake Ideas
  12+ Pretty Homemade Princess Cakes
  12+ Inspiring Homemade Princess Birthday Cake Ideas
 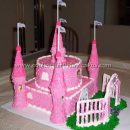 Coolest Disney Castle Cake Ideas
 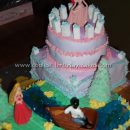 Coolest Homemade Castle Birthday Cakes
 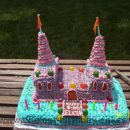 Coolest Castle Cake Ideas and Decorating Tips
Where did you purchase the kit from
it’s a Disney Princess Castle cake Kit 3-D
but I don’t think they even make it anymore
search for you might get lucky but it will be used for sure you wont find it brand new….
you can still buy the kit itself at wal mart bakery but it does not come with the detailed instructions