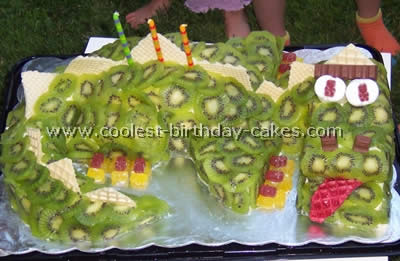
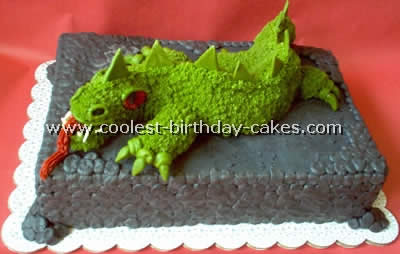
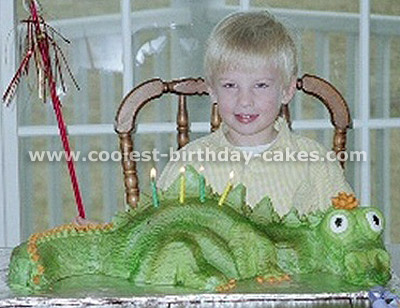
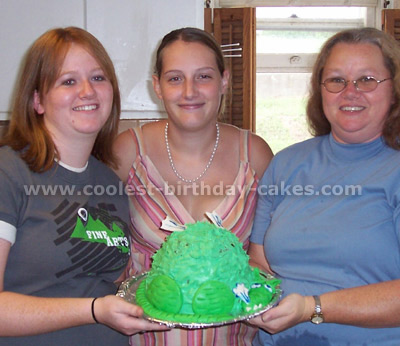
The idea for this dragon cake for my son’s three and a half birthday (he’s born on Christmas so we have summer kids parties for the half-birthdays instead) came from Family Fun magazine where they had detailed instructions on how to cut and arrange two 9′ round cakes to shape the fire-breathing creation as well as ideas on a medieval knight’s birthday celebration. I came upon this website while searching for dragon cakes and was very impressed by the original cup cake version plus I’m “stealing” some ideas for a diaper cake for a friend’s baby shower next month – great website thank you!
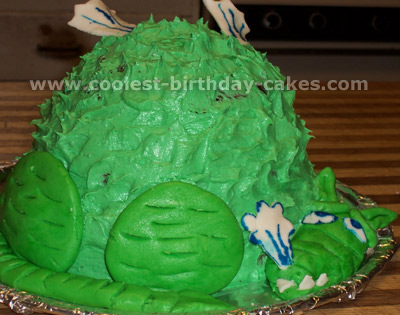
I’m not a big fan of using food dyes and additives especially when feeding the final product to a bunch of two- to five-year olds so using green store-bought frosting kept bugging me for days. Until that I looked at the pictures of my friend decorating the cake she made for my last birthday with thinly sliced strawberries and kiwi! I had a little Eureka moment there – what can be better for dragon scales than some kiwi – 24 kiwi fruits to be exact to cover up the dragon (hubby had to run to the store mid-way through the decoration as the dragon had larger “square footage” to cover than I had anticipated). After pre-arranging it to determine exact position (I ended up altering the suggested shape a bit to add more dimension) each part of the dragon was sliced horizontally and filled with home-made vanilla cream (4 cups of milk with 4 tbs. flour, 4 egg yolks and 8 tbs. sugar boiled over medium heat and constant stirring for about 20-25 minutes until thick flavored with a 1 tbs. vanilla extract) effectively making it a two layer cake.
For the frosting and any vital connections between the cake pieces I used about 1/3 of the vanilla cream whipped with two sticks of butter and some powered sugar to make it stick better and hold its shape – an initial layer of frosting covered up the surface lightly to keep crumbs at bay, then after briefly refrigerating it I added more frosting so the kiwi slices can attach easily. The kids of course loved the gummy-bear dragon nails, marshmallow eyes and wafer spine the best. I had a plate full of extras of all the goodies to prevent the inevitable fight over the slain dragon (so much for no “bad stuff” :-). In retrospect I should have covered the wafer spine in chocolate or in the raspberry sauce used for the tongue for more color and should not have forgotten the wings but unaware of such silly grown-up details my son keeps talking about his dragon cake.
Thanks again to this website for such wonderful ideas for dragon cakes!
More Dragon Cakes
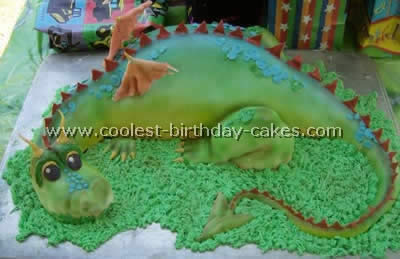
I wanted to make a dragon cake for a friend’s grandson. I searched for ideas for dragon cakes on the internet; I looked at some of his dragon toys and some coloring pages and got the idea.
I baked the cakes, one 1/2 sheet and one 1/4 sheet. Cut and built the shape I wanted for the cake. I covered it with buttercream icing first then rolled fondant. I have an airbrush and used it for the coloring. I made the tail triangles by rolling out strips of thin fondant and cutting triangles with a pizza cutter. I made the scales by making balls and fattening them.
I attached the extras to the cake with royal icing. The grass is green buttercream and I used a grass tip.
Dragon Cake by Lindsey K., Kent, UK
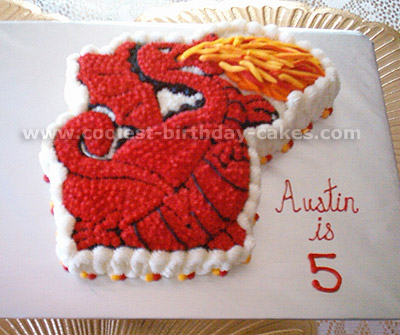
This cake like all other dragon cakes was made with chocolate sponge throughout. To make the body I made a circular cake and cut it in half, sandwiched it together like a double-decker half moon with butter cream and stood it on its flat edge in the middle of a foil lined tray.
I then cut the other shapes to make the tail, neck, head, arms and legs from other sponges. I iced the whole body in chocolate butter cream but covered the rest in cocoa infused marzipan sealed down with melted apricot jam. I then decorated it with colored sweets and jelly diamonds and used writing icing pens to create the features.
Dragon Cake by Samantha E., Tucson, AZ
I made this cake for my son’s 5th Birthday. The dragon is a huge rice crispy treat that I shaped into a dragon. I then star tipped it with green butter cream. The spikes and claws are made of fondant. The dragon is sitting on a stone wall.
I piped #10 round tips in rows on the cake. After piping a row I went back and flattened the balls with my finger to give the wall an authentic look.
Everyone was impressed, especially my son and not difficult to make dragon cakes at all.
Dragon Cake by Julie F., Smithfield, UT
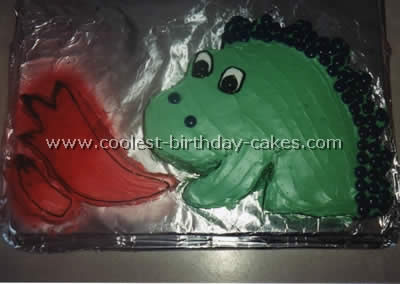
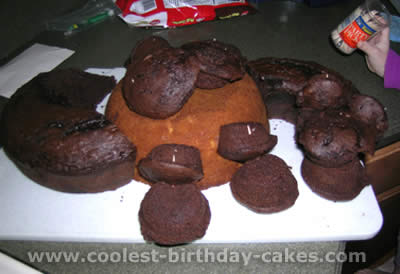
This is a 9×13 copy of dragon cakes I made a day ahead and froze it. The next day I cut the shape of the dragon out first. The left over cake became the flames coming from the dragon’s mouth.
I frosted the dragon in green and used dark blue M&M candies for his spikes and nostrils. The eyes were a little white frosting and black gel with a black candy for the pupils. The flames were frosted then sprayed with the edible spray frosting in red.
Dragon Cake by Melissa E., Bendigo, Australia
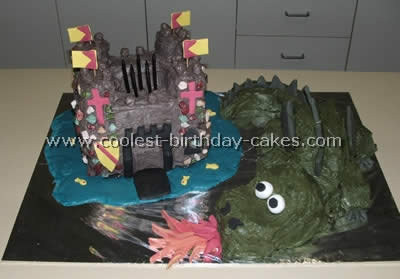
For my son’s 5th Birthday he was very into dragons and castles. For fun we decided to do both the dragon cakes and the castle cakes.
The castle was very simple. It consisted of two large square cakes. The first cake was left whole and lightly frosted to the board.
The second square had an inner square cut out of the centre to make 4 smaller squares all the same depth as the remaining outer square: i.e. if the cake was 20 inches cut a 10 inch square out of the middle and cut those into four five inch square pillars. I then glued it all together with heaps of frosting colored with powdered dyes.
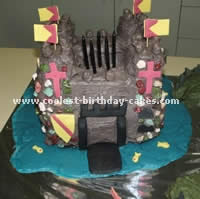
I used a lot of modeled icing which I purchased pre-made and colored black for the drawbridge and windows. Then with a tiny bit of left over I colored it red and yellow to make a crest flags and fish for the moat. I managed to find pretend chocolate rocks from a local chocolate shop which worked very well. The small squares on the top of the castle are simply baking mallows covered in frosting
The dragon cakes are simply two round cakes. The body makes up half the cake the face is two wedges joined so as to not quite meet. The tail is the second cake cut into two crescents with a descending edge. For the legs I just used triangle shape off cuts. The modeling of the icing was done in the same manner as the castle with the two wings an assortment of triangle to go down the back as spikes and claws all done in a dark green.
The eyes are made as simple balls of white with small amount of black pressed in. All the kids wanted to eat some of the flames which were again just pre-packed icing that I tinted with powdered dyes. To make the icing more pliable I added a one teaspoon of gum together to each 500g of icing. Once I finished the cake I decided to do the moat last minute in just plain icing mix and water. I do wish now that I had of used gel. This basic icing mix shifted slightly in travel.
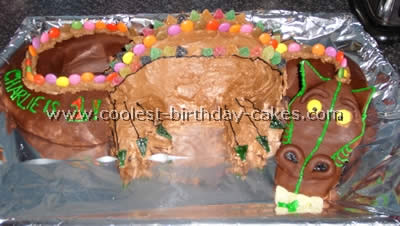
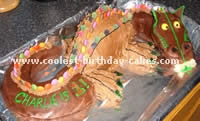
Dragon Cake by Chandra S., Pasco, WA
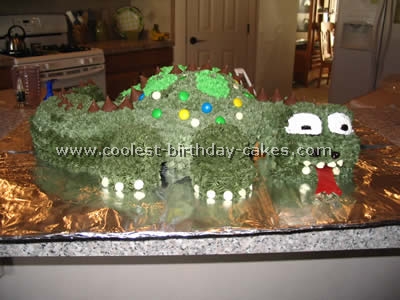
I made this cake off the other dragon cakes that was on this site. I did three cakes mixes one in a Pyrex Dish for his body, a set of 12 cupcakes for his legs and an angel food cake for his tail and neck.
Instead of just frosting the dragon I decided to star tip it with different shades of green. I used M&M’s on his back for spots, Hershey Kisses for his spine, white chocolate chips for teeth and toenails and a red fruit roll up for his tongue.
We then used candles in his mouth and lit then so it would be like he was breathing fire. Using cake mixes for dragon cakes is great because you can have several different flavors so everyone has options. I made Wilton Buttercream Frosting and did 4 batches of it and tinted it with Wilton’s food coloring. These seem to be more vibrant than liquid brands and they do not water down the frosting either.
Dragon Cake by Amy W., Lexington Park, MD
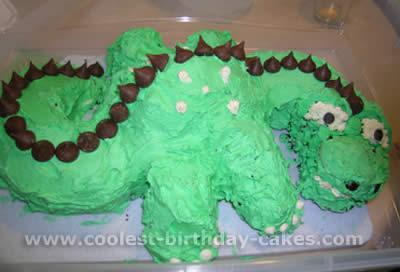
My son wanted a dragon cake for his 5th birthday party. I ended up using 3 cake mixes. I baked one cake in a Pyrex baking bowl for the body. I baked one cake in a ring (angel food) pan and I used about 1/3 for the neck and the other part for the tail. I shaved the tail down some to make it pointed.
With the 3rd mix I made cupcakes. For each leg, I used a cupcake and a half. I had an upside down cupcake for the foot and half of a right side up cupcake for the thigh. I put two cupcakes on top of the body to add some height. For the face, I sliced a cupcake in half and positioned it for the eyes and used two cupcakes with their bottoms together for the mouth. All cupcakes were held in place with toothpicks.
I frosted the dragon green and used Hershey kisses along the spine and white chips for the toenails. I did the eyes with frosting and chocolate chips for nostrils and pupils. He loved it and there was plenty of cake. My son wanted a fire-breathing dragon so I stuck the candles in its mouth.
Dragon Cake by Melissa S., Springfield, Ohio
I made this cake for my son’s “mid-evil” party.
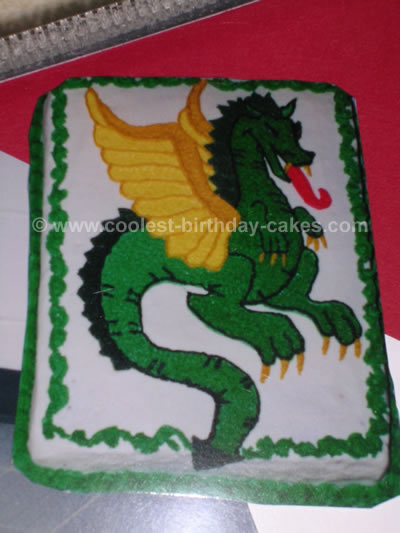
I found a dragon picture in my printing software and printed it out, put wax paper over it and traced it with piping gel (bought at grocery store), using a small dot decorating tip. I let this sit open to air for about 3 days so it would become dry.
I prepared a cake from a mix and iced it white. I let the cake sit for several minutes to allow top of icing to become “hard” or no longer sticky to the touch. I then laid the piping gel picture face down on the cake and rubbed gently. Then I carefully peeled off the wax paper picture.
I was then able to fill in the picture with decorating tips just like coloring. The great thing about this is you can do ANY theme this way. Use clip art, coloring books, invitations, plates or napkins (enlarge using a copy machine or scanner then trace!)
Dragon Cake by Laurel D., Calgary, Alberta, Canada
I haven’t seen too many dragon cakes, but I found the Wilton Mystical Dragon and did it red!
Dragon Cake by Brenda V., Douglasville, GA
Jett wanted a dragon for his 4th Birthday. I got directions for dragon cakes from the Internet and followed them. I had to change the face and take the teeth out, as my 1 year old started to cry when he saw it (my husband suggested the scales on the body).
After it was completed in green butter cream, I sprayed it with red and purple colors to give it depth. It turned out better than I expected. Needless to say Jett loved it.
Dragon Cake by Tammy W., Saint Joseph, MO
Ingredients: 1 mixing bowl, 2 quantities of butter cream, 1lb 2oz green fondant icing, wax paper, and edible writing pens. Remember to work in room temp or cooler, if it is too hot, the fondant will sink into the cake because of the weight and the melting.
Homemade fondant: 2 tbsp corn syrup, 1lb 2oz powdered sugar, 1 egg white. Put the ingredients in a mixing bowl. You can start mixing with a wooden spoon but you will soon need to switch to your own hands, it turns into clay. It is also really sweet so I wouldn’t suggest tasting it unless you desire a sugar high.
It will be really hard so the more you play with it the softer it gets. After you get it soft enough to play with you can add the color you desire (food coloring). It can be stored in the fridge for a week wrapped real well in plastic wrap and placed into a Ziploc bag. If the fondant is too sticky, dust hands with powdered sugar. Use the powdered sugar to roll out the fondant in sheets (kind of like homemade cookies).
Butter cream- for 1 quantity: 1 cup butter (softened), four and a half cups powdered sugar, 1-2 tbsp water. Add butter and sugar into a mixing bowl and mix on low speed until well blended. Add water to help create a silky icing then add the desired food coloring for color.
Bake a cake in a bowl-shaped baking pan. Let it cool. Then slice it horizontally twice. When putting the cake back together add butter cream in between each layer. Cover the whole cake with butter cream and spike it with a butter knife to create scales.
Out of fondant, shape the dragon cakes head, tail, and feet. Then lay the tail around the bottom of the cake surrounding the cake. Place the head at one end and draw the eyes and taking an icing tip decorate the fondant with scales. You can store in the freezer or in room temp.
Related cakes:
 12+ Coolest Castle Cake Ideas – Awesome Homemade Castle Cake Designs!
  12+ Coolest Disney Princess Cake Ideas – Awesome DIY Cake Decorating!
  Coolest Homemade Castle Cake Recipes
  Coolest Homemade Castle Birthday Cakes
  12+ Inspiring Homemade Princess Birthday Cake Ideas
 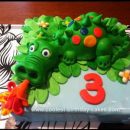 Coolest Green Fire Breathing Dragon Cake
 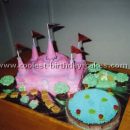 Coolest Castle Cake Ideas
  12+ Original Homemade Princess Castle Cake Ideas