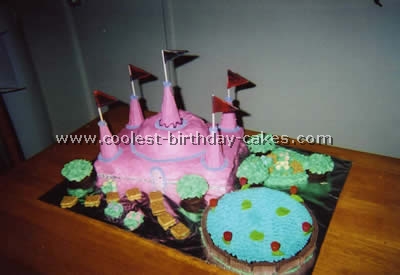
The idea for this Castle cake came from doing another castle cake just the week prior. I decided to have a little more fun with it and the kids really love to help.
I used a 15x11x2 pan for the bottom layer of the castle. This pan works best with 2 boxes of cake mix. I followed the directions on the box and allowed the cake to cool on a wire rack. After it was cooled I placed it in the freezer for safe keeping while the other cakes were being baked.
Next is the round layer. For this cake I used a bunt pan however a regular round cake works just fine also. Again I used a box cake mix allowed it to cool and placed it in the freezer. These are the castle pieces.
The pond is a single layer round cake and the bushes are cupcakes without paper cups. I covered the cakes with white icing to “glue” the layers together and prevent any loose crumbs to mix in with the pink layer of icing. I used Wilton colors to color my icing.
After covering the castle with pink icing I placed it back in the freezer. I covered sugar cones with pink icing to be used as towers. The flags are fruit roll ups the flower shrubs are simply a pile of icing with sweet tarts. The garden dirt is graham cracker crumbs. I used chocolate sugar wafer cookies for the decorative stones around the pond. The tulips in the pond are Dots candies and green tootsie rolls. The door on the castle is a chewy sweet tart.
I pretty much just played with the placement and had lots of fun. This is definitely a castle cake the kids can help put together!
More Castle Cake Ideas
Castle cake by Samantha M., Brandon, MS

For Kennedy’s 3rd birthday we had a princess themed party complete with a castle jump and pony drawn carriage ride. The castle cake was a 2 layered 14″ square for the base with a 2 layer 9″ round for the next layer then a 2 layer 6″ round then a 2 layer 4 inch round for the very top. I used shish kebab skewers to hold it all together. I had to cut them in various lengths for the different layers.
It took about 5-6 batches of cake batter to do it this large. I would estimate it would feed around 50 or so. I baked all the cakes about 10 days ahead of time and froze them. I tinted the cake batter with red liquid food coloring to make the cake itself pink and I tinted the frosting with Willton’s paste pink coloring. I used a bit much and that’s why it’s almost hot pink but if you want a lighter shade of pink I suggest putting the paste on a toothpick and slowly adding it to the frosting. I used a teaspoon and it was too much.
The doors and windows and edge trim in purple are tinted rolled fondant I hand cut. If I were to do this again I’d get a fondant cutter instead of trying to use a knife. The number is also fondant. I tinted the fondant with the paste coloring as well. I would suggest using the liquid coloring for fondant to get a better equally mixed color and wear gloves to mix it. My hands were purple for a day or so. I did all the fondant about 4 or 5 days prior to the party and put it in a zip lock and laid it flat on the shelf in the fridge.
The top of the Castle cake is a sugar cone turned upside down frosted with the same frosting and sprinkled with edible food glitter. I think I’d use colored sugar next time for a better coverage and shimmer. The sides have the cones as well. I bought tiny sugar flowers and placed them on the sides of the cake for a bit of decoration and hand piped the vines.
I placed the whole Castle cake on a doubled cardboard cake board. I used 2 because the cake was so heavy I didn’t want it to bend in the middle. I covered the board with tin foil then frosted the board with green tinted frosting for a “grass” look. I hand piped her name and around the edges of the base of the cake to conceal the edge where the cake and board met. To keep the pink frosting off the board while frosting the cake I used strips of wax paper tucked right under the edge of the cake and then when I was done frosting the cake I pulled them out from under the cake so the pink didn’t get on the board. I frosted the board last (with the green).
It was the HIT of the party. Hope you enjoy!
Castle cake by Amanda P., Ennis, TX

I made this castle cake for my 1 year old’s princess themed party. The bottom half is two 9×13 pans and the top half is two 9in round pans.
I made 5 cupcakes for the bottom portion of the turrets. The amount of cake mix needed is the equivalent of three and a half cake boxes. I used store bought white icing and food coloring to get the pink purple and blue icing. The white icing that outlines the bottom of the round cake is a decorating icing that comes in a can with 4 different tips. You can purchase this at any grocery store.
The roof with the turrets is simply ice cream cones covered in icing and then rolled in sprinkles. I had to cut the tips of the cones down with scissors so that the flags would fit securely in the bottom of the cones. The flags are toothpicks and little foam pieces that I cut out with and I put the “s” for Sadie with a silver sharpie.
The bottom portion of the cake is outlined with gumdrops and all the windows and door are Hershey’s chocolate. Twizzler pull and peel pieces were used for ropes to the drawbridge secured by decorator’s icing.
I was really nervous about making this Castle cake because I had never done anything like this before. I got some really good ideas on this website and Google images. Then I drew out on a piece of paper what I wanted to do and went for it. I think that everything turned out so much better than what I had planned and that was a bonus!
Castle cake by Diana M., Neosho Rapids, KS

I made this Castle cake for my son’s 4th birthday. I used an 11×15 pan and a store bought mix. I cut 4 inches off one side and put it on the top. I used wooden skewers to make sure it didn’t fall over.
I frosted it with store bought icing and decorated it with candies. The door is Hershey miniatures and the bridge is made of sugar wafers and pretzel sticks. The turrets are ice cream cones.
The flags I printed off a template from the computer and wrote “Happy Birthday Jacob” with gel pens. I found it a lot easier than writing it with icing!

My son loved his castle cake and he loved the knights on the horses. He had a lot fun helping me too!
Castle cake by Melanie P., Meridian, MS

I took ideas from all the cakes I saw and created my own version. I baked three 13×9 cakes and cut them to make my castle. I used ice cream cones for the towers. It was an easy castle cake but it took hours to ice.
Castle cake by Jessica C., Elizabethton, TN

This is the Disney princess castle cake. I did this cake for my 4yr old daughter’s birthday this year. I got the idea from eBay. I used two 6” pans for the top of the castle and two 8” pans for the bottom.
I used a 1/2-sheet pan for the base. I used coconut that I colored with green food coloring for the grass. To make the grass just mix green food coloring in with the grated coconut and mix until even.
I used a made-from-scratch buttercream icing and food coloring for the different colors of icing that was on the castle cake.

I bought the plastic pieces for the castle from eBay. I used some plastic stencils to get some of the designs on the sides of the cake and then just piped the icing onto the design. The most important thing is to try to get the cakes as level as possible. If you can do this, the rest is a piece of cake (castle cake!).
Castle cake by Jessica C., Middle River, MD

I decided to do my daughter’s birthday in the Disney Princess theme. I was originally going to buy a cake with 4 of the Princess’ on it. But then I got the idea to make a castle cake. This site actually helped me with that. I found a cake that I really liked and went off of that as a template.
I started making the cakes in the beginning of the week and froze them. I had to bake about 6 or so cakes so it helped. I bought the 4 boxes of the Duncan Hines cake mix (2 vanilla and 2 devil’s food)… but I followed a different recipe to make it moister. With the box of cake mix I added 1 box of pudding (chocolate with the chocolate and vanilla with the vanilla), 1/2 cup of oil, 1 cup of water, and 4 eggs.
I made 2 round chocolate cakes, 2 round vanilla cakes, 1 square chocolate, 1 square vanilla, and 1 square marble. I also premixed all the icing colors the day before my big task. Also the night before I took the frozen cakes out of the freezer and put them in the refrigerator. On the day of decorating I took out the cakes and the icings from the fridge to get them room temperature.
I got a cake tray from my local store and with the vanilla cake I put regular buttercream frosting on the bottom to keep it from not moving around. I centered that cake in the middle of the cake tray. I added yellow frosting on the top of it. Next I placed the marble cake on top of that. I put a layer of blue frosting on top of that cake. Last I topped it off with the chocolate cake.
I then put light pink frosting on the sides – the left and right sides on the cake up to the second level. I took the 1 round vanilla cake and cut it in half, placed on half next to the square cakes. I added a layer of orange frosting and then the other vanilla cake on top of that. I did the same thing with one of the round chocolate cakes on the opposite side except I put purple frosting in the middle of the cakes. I frosted the whole castle cake with hot pink icing.
With the turrets I used Oreo ice cream cones, frosted them with light pink icing, and sprinkled pink crystals on them. I used Hershey Kisses as the little “up/down things” on top of the castle cake. I sprinkled the pink crystals on the tops of the cakes also. I then placed the turrets on after that. I used white fondant to make the windows and then I dyed white fondant in shades of blue purple and pink, cut out star and flower shapes, and randomly placed them.
I took decorating bags, filled them with my colors and used my imagination to create the castle. I outlined the windows, doors, and other things. Then I filled in the cake tray in with grass, created a pong, and added the flowers.
Lastly, I added Disney Princesses that I bought from my local Disney Store. With the other left over cakes I made a personal birthday cake for my daughter and then cut the rest of the cake in little squares for munchies.
Castle cake by Kody C., Lyman, WY

I made this castle cake using things I had around the house only. I used a 13×9 pan for the bottom (metal so it was square) and two 8” round pans for the top stacked. I used frosting from the local bakery.
To make the pillars I stacked one sugar cone on top of one or two regular ice cream cones and frosted them; the trees are the same. The grass is coconut with green food coloring and the moat is made of blue saran wrap. Jell-O would be cool too but we didn’t have time. The other decorations on the castle cake are chocolate bars, starbursts, and rope licorice. Have fun!
Castle cake by Rachael S., Worcester, UK

For this castle cake I rolled out some ready-made green-coloured icing and laid it on the silver foil cake base for grass. I made a Battenburg square sponge cake (three layers of different coloured sponge with butter icing between each one) and cut into the shape of the bottom layer.
I laid ready-rolled white icing on the top of it and smoothed down the corners using my fingers dipped in warm water. I repeated the same process for the smaller square but this time I used a chocolate sponge. I placed the small square on top of the later one. I then decorated the castle with thin rolled out brown icing for the doors and windows, which I cut to shape and stuck on the main cake with water. I then iced the ivy doorknobs shutters and Birthday greeting using small ready-to-use coloured icing writing tubes.
The turrets were made by cutting down ice-cream cones, brushing them with melted apricot jam (you call it jelly!) and then rolling each one in Barbie sparkly sprinkles from a Barbie cake decorating kit.
The fairies are cut off from hair bobbles bought from H&M and secured with half cocktail sticks. The flowers used for the grass and the roses on the ivy were also from the Barbie kit as were the stars used to decorate the doorframe.
This was my first real attempt at cake decorating and I really enjoyed it. The castle cake was for my daughter’s 5th birthday and she was delighted. None of my friends believed that I’d made it myself!
Castle cake by Laura D., Lulling, LA

My mother in law made this castle cake and we both decorated it. I got the idea from this site. I used different candies to decorate. It took five cake boxes to make this castle cake.
Castle cake by Misty B., Atlanta, GA

I made this castle cake for my daughter’s 4th birthday. I experimented with cooking regular box cake mix in soup cans. It works! Just make sure you spray the cans well with the vegetable spray with flour in it. I made several different shapes and assembled them the night before.
The middle or main part of the castle cake is made of two square pieces of cake, with a round, and then a soup can cake. The Cinderella pieces are store-bought in the toy section. It was a little set for about $4. My daughter played with these after the party.
I used sugar cones for the tops and iced them with the crusting buttercream icing. The stairs are the wafer cookies you can buy at the store. This castle cake took a lot of time, and I’m not sure that I would try it again! My daughter loved it though, and so did the guests.
Castle cake by Missy L., York, PA

For this castle cake I baked two 9×13 cakes for the bottom and used a glass Pyrex bowl to bake the top cake. For the towers I used regular ice cream cones and sugar cones for the pointy tops. On a couple of towers I used toilet paper rolls.
I wanted to have somewhere on the cake to say Happy 4th Birthday, so I made a little sign and covered with contact paper and put 2 princess stickers on it.

I also printed a picture of my daughter out and covered with contact paper to put on the castle cake. It was her Halloween outfit, which was a princess so it was the perfect touch to this cake. She loved seeing herself on her castle cake. It took me 12 hours straight to create this cake. She wanted a pink castle cake for her birthday so I gave it a shot.
Related cakes:
 12+ Coolest Castle Cake Ideas – Awesome Homemade Castle Cake Designs!
  Coolest Princess Castle Cake Ideas
  12+ Original Homemade Princess Castle Cake Ideas
  Coolest Homemade Castle Birthday Cakes
  Coolest Castle Cake Ideas and Decorating Tips
 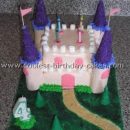 Cool Homemade Castle Birthday Cake Ideas
  Coolest Homemade Castle Cake Recipes
 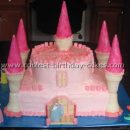 Coolest Castle Cake Ideas and Decorating Tips