Hone your Spidey sense with these amazing Spiderman cake ideas. Discover how to create a 3D birthday cake with the incredible instructions here.
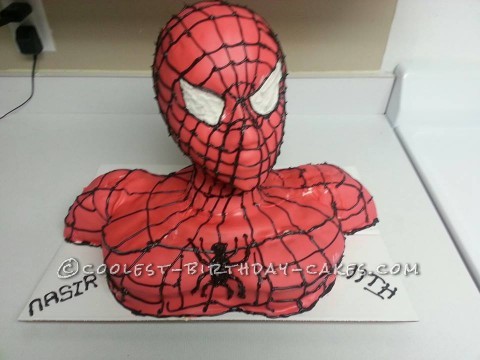
Spiderman Bust Cake
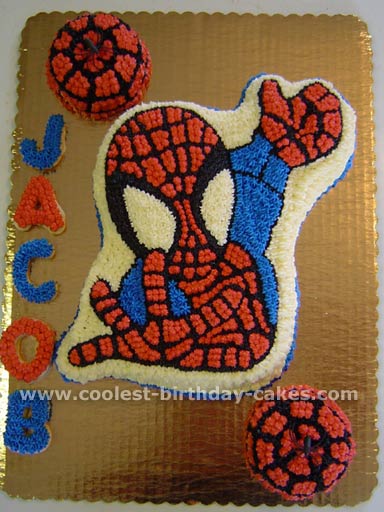
Spiderman cake submitted by Kelly E.
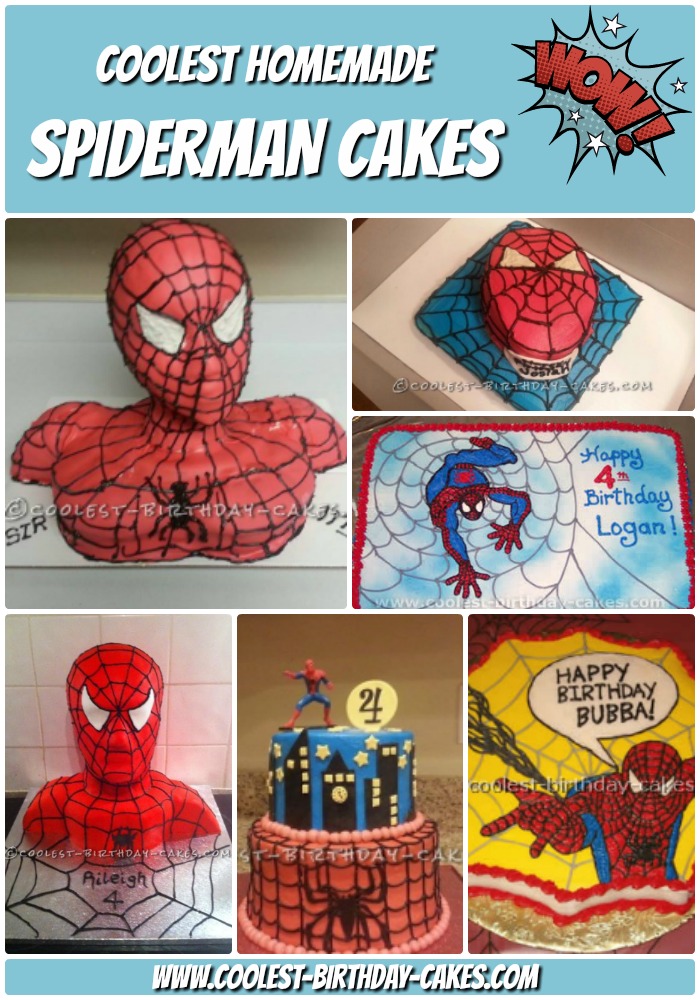
I made this Spiderman bust cake for my son’s 4th birthday. I am quite new to cake decorating but always like to challenge myself. The cake was the easy part. I made 2 x 10″ cakes and layered them on each other and I made an 8″ cake which I cut into quarters then layered two pieces together to make each shoulder. I then covered the whole cake in butter icing then in red fondant.
The head is made from polystyrene and to begin with was a nightmare to do. I had read a lot about icing this using the ‘viva method’ but it didn’t quite work out for me so I scrapped it and started again. I covered the head in butter icing then red fondant. This was difficult to do as the icing was to big and to heavy and kept tearing but after a lot of smoothing in, it worked out well. I then put two wooden dowels into the underneath of the head (I had already made the holes for them) then placed the head onto the cake. Then I added Spiderman’s eyes made from white fondant and used a template to cut out the spider emblem from black fondant then piped on the webbing.
I was so happy at how it turned out and the look on my son’s face was a picture when he saw it. I had many amazed faces from children and adults when they saw the cake.
Spiderman Cake Perfect for a Boy
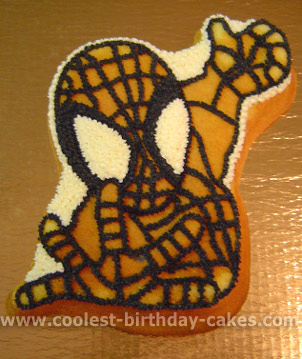
Spiderman cake submitted by Erica G.
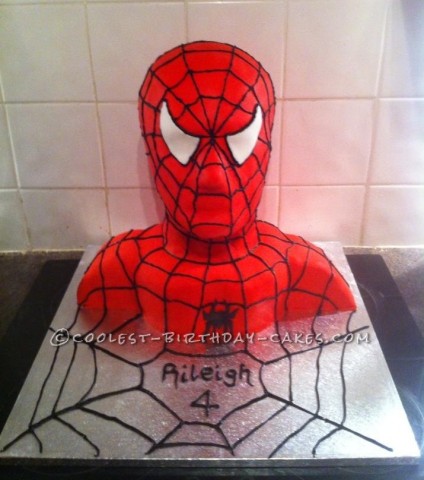
This was an amazing attempt of the famous Spiderman upper torso cake. It was a request for my friend’s son who turned 8 years old. I wanted to something creative rather than a decorative two tier cake and I thought this was much easier and fun!
The body consisted of two 10×2 inch cakes and one 8×2 inch cake. I frosted the 10×2 inch cakes which made a 10×4 inch and I quarted a 8×2 inch cake and stacked it on sides for the shoulders. Hardest part was making white fondant red! Boy did my hands turn blood red for a day! Small sacrifice to make for a amazing cake. So I covered cake with fondant and I piped the web with butter cream. This was hard because you have to have time, patience and steady hand.
The eyes and spider on chest were also fondant and I outlined the eyes with black butter cream. Since time at hand, the head was a Styrofoam purchased at beauty store that was also covered with butter cream and fondant. The guest list was for about 25 to 30 people so more cake was not needed. Let me tell you that the birthday boy was amazed! The cake just lit up the room and everyone was astonished! Not only was cake an eye popper, so was the flavor! The flavor was a delicate humming bird with pecan cream cheese!
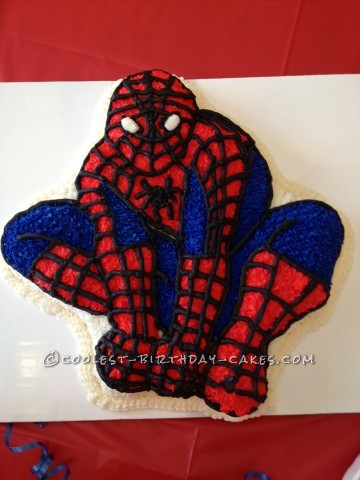
Coolest Spiderman Cake
Spiderman cake submitted by Roshanda B.
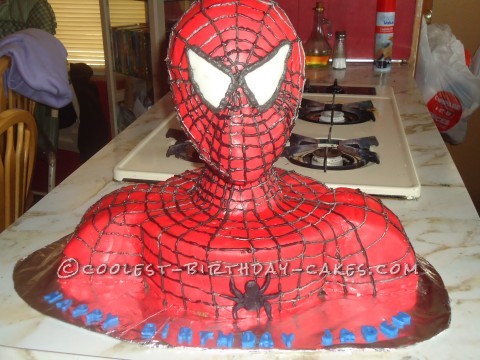
Wow. Where do I begin? This Spiderman cake was absolutely fun to make! Bit tiring with all those webs lol, but hey, I wont complain.
First I baked one cake using a heart pan. And then I baked another heart cake. So two total. I also needed to make a cake using the 8in round. The 8in round will be used later for the ‘shoulder’ pieces. Imagine the circle being cut making 4 equal wedge pieces. Sorry I don’t have pictures. After all is said and done. Cakes have cooled, etc. The fun begins!
I placed one heart cake on a cake board. Followed by some frosting. Then I placed the second heart cake on top of that. I then cut the 8in round in half one way. And then the other way to end up with 4 equal wedge shapes. I took two of the wedges and placed together and placed where Spiderman’s shoulders should be. Repeat on the other side. Now you have a cake that is heart shaped with wedges.
Okay. Now this is where in the end I messed up. When I first made this cake from this point I just added the mannequin head on top and frosted everything. That was a BIG no no! Be sure. PLEASE! Make sure you cut off the ‘point’ area from the heart cake. Your ‘shoulders’ should be flush with the heart cake and you should be able to cut off a straight line.
Whew! OK. Now. After you have positioned the mannequin head and you have done the above go ahead and frost EVERYTHING. Don’t frost underneath the head as it will make everything more messy. Because I am picky about what I put on my cakes, I put a cake board underneath my mannequin head. There may be other ways to avoid doing this. I noticed on the YouTube videos that I watched that they didn’t use anything underneath.
OK, now after everything was frosted, I rolled out my homemade red MMF. I personally like to mix the color in before I add the powdered sugar. So much easier this way. Because I wasn’t sure where to start LOL I just rolled and cut and placed. I made sure though for the face to just roll out a bigger piece so it would be seamless. The rest is chocolate frosting with black icing color. The eyes are vanilla frosting. Now I just looked at a picture and tried to get the same effect for the webbing!
This cake was for my son’s birthday. He loved it!
Simple Spiderman Cake
Spiderman cake submitted by Jenn W.
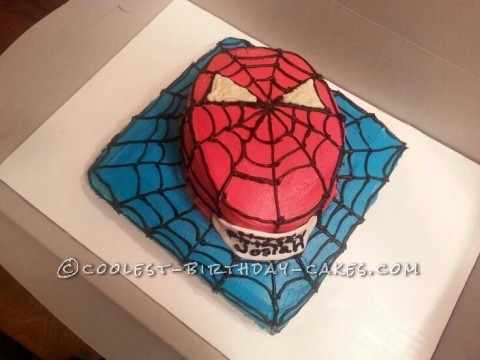 My very sweet 6 year old neighbor loves Spiderman! I always make cakes for all my neighbor kid’s birthday, so he was very excited to pick Spiderman! I started by using a 10″ square cake pan for the bottom cake. For the top of the cake I used a 8″ round cake pan. After both cakes were cooled, I cut the round into an oval shape for Spiderman’s head.
I tinted some butter cream icing blue and iced the bottom cake. Then with some black icing, I drew lines for the appearance of a spiderweb. I then laid the oval cake diagonal on the square cake. I tinted more of the butter cream icing red and iced the oval cake. Then I did the same thing with the black icing on the head for the appearance of a spiderweb. I left 2 empty spots for the eyes I filled in with white butter cream.
For the birthday message, I decided since I didn’t have room on the cake to write it, I rolled out some white fondant into an oval and then with black icing wrote the birthday message. He loved this cake so I was very happy!!
Spiderman Birthday Cake
Spiderman cake submitted by Teresa W.
This is a Spiderman birthday cake I made for a party. I saw a version online ( I can’t remember where ) and thought I would give it a try. I used buttercream to frost the cake and make the web with and fondant for the decorations.
The Spiderman figure is a plastic toy I found at the Dollar store. I had tons of fun with this creation.
Cool Spiderman Cake
Spiderman cake submitted by Robin T.
QUESTION: Carl LOVES Spiderman! Could you do his birthday cake like Spiderman?
ANSWER: YOU BET!
I baked a 16 “- 1 layer FUNFETTI cake. This pan size takes about 3 cake mixes! I mixed up a batch of decorator icing, coloring some blue, red, black and leaving a little white! Spread the blue icing all over top and sides of cake. I didn’t want to get caught in a web, so I found an awesome template of Spiderman that I printed, cut out and placed on the blue icing then traced with a tooth pick around it (including the cut out eyes!)
I filled the eyes in white and smoothed out. Filled in the traced area with red icing, smoothed a little but we all know spiders are kind of rough! I traced around the red icing with the black. Then I started in the center with a small circle and then expanded out with more circles at random intervals. When the circles were done I took a tooth pick and pulled it through all the black circles to create the web effect, because after all, what is a Spiderman without his Web?
I wrote the Happy Birthday in black icing. The birthday boy’s name was big balloonish letters so I could complete the look by filling in with the spider web and created spiders dropping down!
The birthday boy LOVED the cake! When his sister got a piece of it, he asked why she was eating HIS cake!
Spiderman Cake with Wilton Cake Pan
Spiderman cake submitted by Rebecca W.
My son wanted a Spider-Man cake for his 5th birthday party. I used a Wilton cake pan and followed the instructions. I used a homemade buttermilk white cake recipe from the Better Homes New Cook Book that I always use for making cakes. It is firmer than a box mix and of course tastes a lot better. The firmer it is, the more likely it will easily pop out of the mold without cracking.
I used the Wilton butter cream frosting recipe. This was probably one of the easiest cakes I have ever made mostly because it was flat and not 3-D and didn’t use a lot of different colors. The most difficult part was doing all of the spider web lines, but it really wasn’t that big of a deal. I also made cupcakes that was Spider-Man’s face. I didn’t take pictures of them though, but they turned out pretty cute and were also pretty easy. The little boys at the party loved the cake.
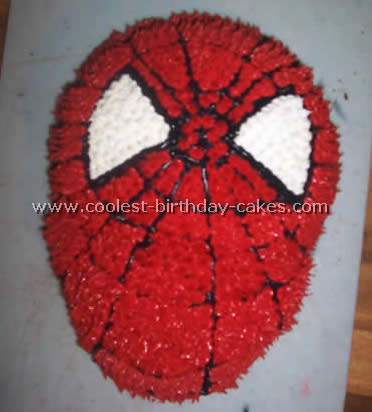
Cool Spidey Face Cake
Spiderman cake idea by Laura F., Belleville, Ontario, Canada
For my son’s 5th birthday he really wanted a Spiderman cake. Since I was new to creating cakes I kept it simple by starting with a 9×11 cake pan and frosted it with white buttercream frosting. I then drew Spidey’s face on the top with a toothpick.
From there I used Wilton’s red decorating icing to colour the face in and then used black shoestring licorice to create the spider web design.
My son was ecstatic about his unique Spiderman cake!
Awesomely Piped Spiderman Cake
Spiderman cake idea by Crystal M., North Augusta, SC
Preparing the Spiderman Cake
I used 2 boxes of Duncan Hines Cake mix, prepared as directed on the box, combined with my Betty Crocker Bake’n’Fill pans, and a single extra 8-inch round cake pan.
After getting the first cakes baked (using the Betty Crocker set), I cooled them in the freezer for 1-1/2 hours, to firm the cake. I then filled the main section of the cake with ice cream (flattening ice cream and smoothing it to prevent air bubbles) and put first pan cake on the bottom and refroze overnight.
The second 8-inch round cake was used to form the “chin” section of the face. There are no specific directions for creating this Spiderman cake, its just a “play with it till it looks right” thing, LOL. Only directions are to use a bit of frosting to help “glue” the pieces together while building the chin, otherwise it won’t hold when you decorate.
Decorating the Spiderman Cake
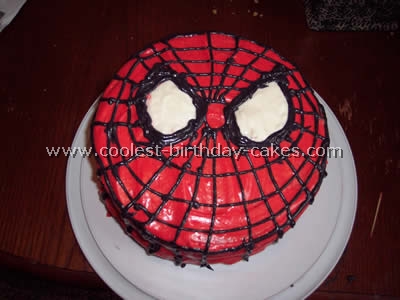
Black and no taste red (mostly red) food coloring is needed, as well as white decorating frosting. I used a picture of Spiderman as a guide for the face outline, and drew the eyes and “webs” first with a toothpick, just on the surface of the cake. Then I went back with my prepared black frosting, and using a #5 round tip, I piped the outline (leaving the eyes blank). Start with the eyes, then do the circle of web between the eyes, followed by your straight lines, and add your circular webbing last.
For the eyes, use the white frosting with a #5 Star tip and create stars to fill in the eyes. This is the only part that will use white icing. Then, fill the rest of the cake in with the red stars, for the color of the mask, touch up any of the black lines you may need to, and you’re done.
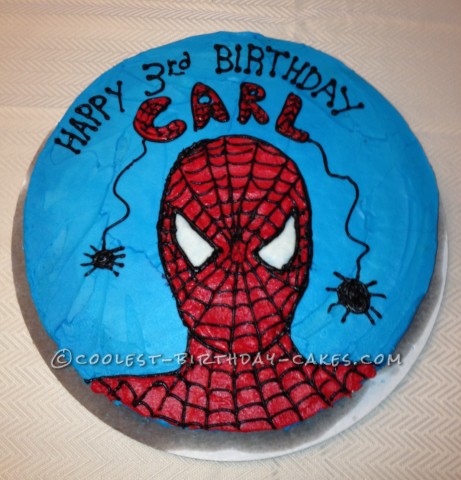
Incredible Spiderman Cake and Instructions
Spiderman cake idea by Anita B., Murray, KY
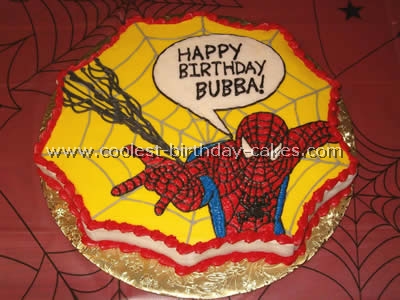
This is a Spiderman cake that I made for my little boy’s third birthday. :) The size of the cake was around 11X12 1/2″ I made a one-layer cake. That will serve 12-15 people. You could make it two layers or adjust the size of the slices to serve more people. I made a template, and cut the shape out of an 11X13″ sheet cake (It’s kind of rough, but I’ve included a picture of the template in two parts. They will need to be cut out and taped together).
Spiderman Cake Instructions
1) I iced the top of the Spiderman cake in yellow Wilton lemon yellow and the sides of the cake white (I used a cake icer tip for the side. It makes icing the sides of a one-layer cake much easier!
2) I used cocoa stenciling (see instructions at the bottom) to transfer the Spiderman design from the template to the top of the cake, after the yellow icing had crusted over a bit.
3) I used a straight edge (piece of stiff paper or a ruler) to press the straight lines of the web into the icing (don’t worry about pressing the lines into the Spiderman design they will be covered up later); I didn’t put the curved lines in yet. If you are making a “bubble” where Spiderman’s words will be drawn into, ice this area white and smooth with a spatula. Outline this in black. Write message in bubble.
4) Outline Spiderman with a Wilton tip #2 in black.
5) Outline web in the background with a tip #3 in light gray. Draw connecting curved lines. Refer to picture for placement. For the web shooting out of his wrist I used a darker gray.
6) Fill in red part of the Spiderman cake (Wilton no taste red) with a tip #2, fill in blue (Wilton royal blue) with a tip #2 or #3. Fill in eyes with white. Draw spider on his chest with a tip #2.
7) Then I did the top and bottom border in a red shell design using a Wilton tip #18 (star tip). I had fun making this cake and I hope this helps spark some ideas for your Spiderman cake. :)
Cocoa Stenciling Instructions
Materials
– The image that you want to transfer, – 1-2 tsp. cocoa powder – A needle (a fatter needle works better for me), – A folded up bath towel (the real instructions call for a block of Styrofoam but I usually don’t have a block of Styrofoam lying around the house)
If you are going to be using this method a lot I would go buy a block of Styrofoam (craft dept.)
Instructions
1) The first step in cocoa stenciling is to find the image that you want to transfer to your cake and make sure it’s the right size for your cake. I usually scan the image I want and resize it, or if I’m lucky I’ll find a picture on the Internet that’s just the right size.
2) Once you get it to the size you want just print it out on a regular piece of typing paper.
3) Lay the paper with the image on it on your towel or block of Styrofoam.
4) Next take your needle and begin poking holes through the image. I would poke the holes about 1/4″ apart or even closer if this is your first time using this method. It’s kind of like connect the dots in reverse. You want to poke holes over all of the lines in the image so that when you are done and hold the piece of paper up to the light you can clearly make out the image. *Always hold it up to the light to make sure you haven’t missed any lines. Also, the more detailed the image the closer together your puncture holes need to be.*
5) Now you’re ready to transfer the image to your Spiderman cake. Position the piece of paper on top of your cake so that the image is where you want it. If you are transferring an image to a cake iced in butter cream make sure that the icing has ‘crusted’ – is dry to the touch so that the paper will not stick to the icing when it is lifted off. It’s also important that the surface be as level as possible so that the image will transfer well.
6) Carefully place 1-2 tsp. of cocoa on top of the image on the piece of paper then take a brush or you finger (I feel like I have more control with my finger) and gently rub the cocoa over all of holes that you punched in the picture. Then VERY CAREFULLY lift the piece of paper off of your cake so as not to drop any of the excess cocoa onto your cake. If your cake is larger than the piece of paper that you have your image on you might want to cover the exposed parts of the cake up with a paper towel or whatever so you won’t accidentally drop cocoa where you don’t want it.
7) After you’ve lifted the paper off you should have a dotted line outline of your image that you can now trace and fill in.
Awesome 3D Spiderman Cake
Spiderman cake idea by Aimee B., Austin, TX
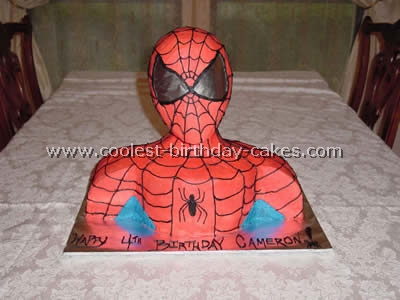
My son wanted a Spiderman party for his 4th birthday party. So, I chose a couple of Spiderman cake ideas from the internet and let him choose… this is the one he chose. I thought it was going to be hard but it really wasn’t. It was a BIG hit with everyone. The kids were a little concerned when I pulled the head off to cut the cake but got over it quickly!
I bought black spider rings to put in the goody bags as well as decorate the cake table with them. I also found on eBay candy wrappers to wrap around the mini chocolates that had a picture of Spiderman. They were personalized with my sons name and thanking everyone for sharing his Spidey day with him!
Cute Homemade Cake
Spiderman cake idea by Mandy S., Ahiawa, HI
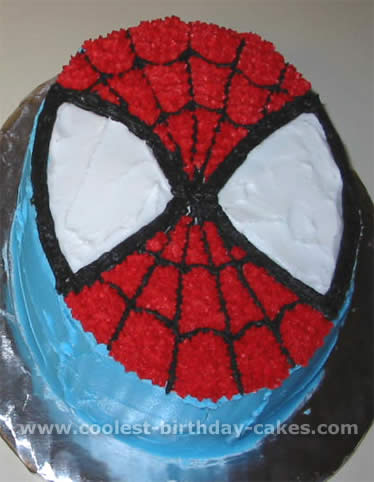
My son wanted a Spiderman cake so I tried to figure out the best way to do it since I had never made a special cake before. I just made a round cake and then looking at the picture from a shirt of my sons that was just a face I eyeballed it on to the cake. When I mixed the colors I left a little white for the eyes and then made red and black.
I made my frosting from scratch but you could just add color to already made frosting. To get smoother color, melt it in the microwave for about 10 to 20 seconds and then pour it over the cake while it is on a wire rack. I then put white on for the eyes and drew the lines with a pastry bag.
It was actually easier than I thought it would be.
Coolest 5th Birthday Cake
Spiderman cake idea by Lynn P., Manchester, UK
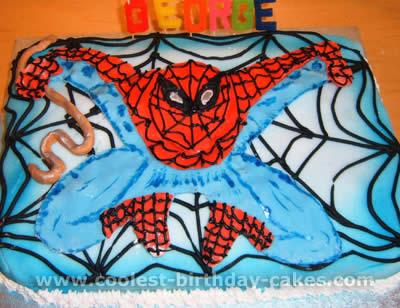
This Spiderman cake was for my grandson, George’s, 5th birthday. I made a basic sponge, which I split and coloured (half red and half blue) and then laid it into a marble effect in the baking tin.
I covered the cake with icing, which I sprayed blue to get a shaded effect. Then iced a web over it. For Spiderman I downloaded a photo off the web and cut round it in blue then red. The head I did with 3D effect. Spiderman’s rope I made go into a number 5 shape. Finally, I coloured his eyes with silver food colouring.
Fun Birthday Cake
Spiderman cake idea by Catrina T., Marietta, GA
For this Spiderman cake, I made a two layer 9×13 cake. I then iced it in green. I put a chocolate icing path down one section. Then I crushed chocolate cookies and pressed into the icing to look like blacktop. I piped white lines down the sides and middle.
Next, I piped grass over the top. I made the buildings from cardboard (the icing ones didn’t make it, my son thought they looked fun to play with) and purchased Spiderman for the top. It was a huge success!! My son still asks me to make him a Spiderman cake like that again.
Cool Buttercream Birthday Cakes
Spiderman cake idea by Rena C., Meriden, KS
I had to come up with a very small two-person Spiderman cake for my son to take to his godmother’s house for his birthday. I used two small oval cake pans and 1 box cake mix. He took one Spiderman cake to her house and had one left over when he came home.
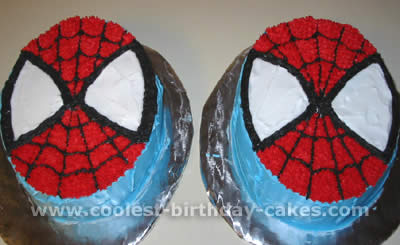
I covered the sides in light royal blue icing, the eyes with white, and then I used a #3 tip to do the webs. I then used a #16 star tip to fill in the red. Done is record speed, it was easy and I was able to make a little one happy at the same time!
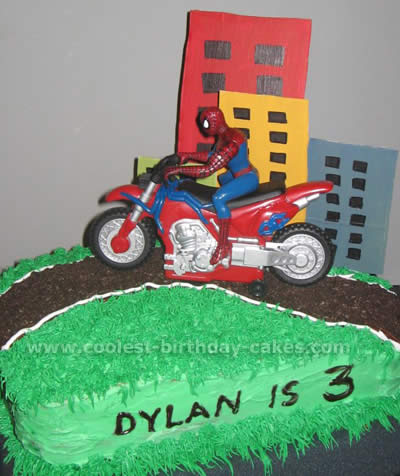
Happiest 4th Birthday Cake
Spiderman cake idea by Amy, Seattle, WA
This Spiderman cake was prepared using 2 1/2 cake mixes to fill a Wilton 1/2 sheet cake 3/4 full (as directed on pan instructions).
Once the Spider Man cake was baked and cooled, I used a large knife to level off the top (make it flat) and frost with Wilton’s basic buttercream frosting recipe. To get a smooth finish, I used a large spatula dipped in water and went over the top and sides of the cake until frosting was smooth.
For the Spidey decoration, I cut out a picture from a coloring book, placed it on waxed paper, and cut the same shape out of the waxed paper. I placed the waxed paper on the top of the frosted cake (very lightly so it wouldn’t stick) and used spray-icing color and sprayed over the top of the wax paper and around the top of the Spiderman cake. This gave me the basic outline of Spiderman.
From there, I finished Spiderman freehand by piping with frosting and filling in with appropriate colors. Finally, I made the spider web design on the top and sides of the Spiderman cake and finished with decorative borders in red and blue.
Fun Buttercream Birthday Cake
Spiderman cake idea by Farrah B., Las Cruces, NM
I was a party hostess at the local roller rink. We provided all sorts of party packages and one of our packages included cakes. I love making and decorating cakes, so when given the chance, I would always make all the cakes for the parties. I found a picture of Spiderman on the internet and since it was a Spiderman themed party, this cake was perfect.
The Spiderman cake was made in a standard 1/2-sheet pan (12x18x2). I frosted it with standard butter cream icing tinted in a light blue. I also piped out black in a circular motion on top of the cake and used a small paring knife and pulled from the center making the spider webs.
Then, I placed the Spider Man cake in the fridge overnight and then the next day began my drawing of Spiderman. I tinted some butter cream icing in red and dark blue. First I drew out Spiderman in black and then piped in the red and then the blue. I colored in his eyes with white and I then went back in and drew more black lines if necessary. I used left-over blue to pipe out the shells around the Spiderman cake.
For the Cake
Standard Betty Crocker boxed white cake mix times 2 for the pan size.
For the Icing
2 cups (one stick) of Crisco regular shortening, 2 sticks of butter (not Margarine), 1 bag powdered sugar, 2 tsp of clear vanilla, 4 tbsp of milk. Cream shortening and butter together until smooth, add vanilla. Mix in powered sugar slowly. Mix will seem thick. Add milk and mix until nice and creamy.
Tip
I always put my cakes in the freezer after baking to help lock moisture in. This has been a secret tip I have used forever. I have always been complemented on how moist my cakes are. Try to remember not to take it out too early because sometimes the frosting will lift parts of the cake and always frost in one direction.
Amazing 3D Spiderman Cake
Spiderman cake idea by Sarah J., Kansas City, MO
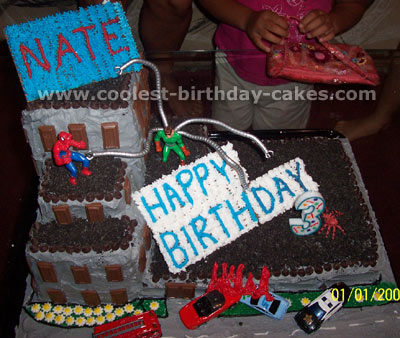
For this Spiderman cake, I used 9X13 cake pans and 2 bread pans. Using fishing line, I cut the cakes the sizes and shapes that I wanted. As far as the buildings I just stacked and restacked until they looked good.
Using Hy-vee Whipped Icing dyed gray I covered the cakes, layers and all. I used ground-up Oreos for the “tar” roofs, chocolate chips for roof edges and Hershey’s for the windows. Then the Billboards are just cardboard with icing. I even went as far as putting a roadway around the Spiderman cake.
Buy green sugar for the grass (you can buy it anywhere). And the flowers I found at Wal-mart. The Spiderman Figures I got from Hy-vee Bakery., , This was such a fun Spider Man cake to make. It did take about 5 hours to make and the night before to cook all the cakes. The accident scene was a last moment detail I did while the cake was setting in the refrigerator!! The Bad part was no one would cut it and they made me do it!! Enjoy
Incredible Wilton Spiderman Pan Cake
Spiderman cake idea by Sonya M., Tallassee, AL
To make this Spider Man cake, first bake a two-layer cake mix (I used Betty Crocker French-vanilla). Then let it cool. Next mix a second box of cake batter for the mini-bundt pans. You can make two of these or as many as you would like to be around Spiderman. Then, I used the remaining batter to make cupcakes with plastic spiders on the tops.
I mixed a double batch of Wilton’s buttercream icing to ice everything. Then I outlined Spiderman with Wilton tip#14 black. Next fill in Spiderman with appropriate colors using tip #16. Finish decorating Spiderman. Position the mini-bundts on the board using butter cream icing underneath to stick them down. Ice the bundts as desired using tip #16 and pipe in spider web lines.
Place a small plastic spider (found in most party supply stores) on the top center of the bundt. Finally mix a batch of sugar cookie roll out cookie dough (I used a mix and added 1/2 cup all purpose flour to roll the dough easily).
Using Wilton ‘s cookie cutter letters cut out and bake the desired child’s name for your Spiderman cake. Cool cookies. Place them on board using butter cream icing as the glue. Finally, decorate in coordinating colors with Wilton tip#14 or #16.
Related cakes:
 Coolest Pictures of a Spiderman Cake
  20+ Easy Spongebob Cake Ideas
  Coolest Lightning McQueen Cakes and Cars Cake Decorations
 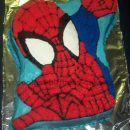 7 Cool Spider Man Cake Ideas and How-To Tips
  Coolest Homemade Curious George Cake Ideas
  Coolest Thomas Birthday Cake Photos and Ideas
  Coolest Car Birthday Cakes
  Coolest Blues Clues Birthday Cake Ideas
Your comment has been sent successfully.