Let me start off by confessing that I am fascinated by hot air balloons, although I’ve never even seen a real one! You see, I come from Malta, a very small and densely populated island, measuring around 27 km/ 16.8miles by 14.5 km/ 9miles, so I guess flying in hot air balloons over here is practically impossible, as you’d end up landing in the sea… And I’d probably be too scared anyway, hanging in mid-air in a basket… But I simply am in love with the idea of flying ‘like a bird’ and being out there ‘in the sky…’
So well, the inspiration for my daughter’s 1st birthday cake came from my fascination for hot air balloons and the party banner reading ‘Growing Up, Up, Up….’ as Audrey Anne has really grown up, up, up in this first year. Besides I figured that it’s now or never, because I know that soon enough it will be my daughters who get to decide on what cake they want for their birthday and it will be Peppa Pig or some other Disney character, and not a hot air balloon. You see, I am a mother of 2 beautiful little girls – Audrey Anne has just turned 1 and the older one, Julia Lynne, will turn 3 in June, and they simply are my world!
I am not a baker and I am not a cake decorator and I don’t decorate cakes for anybody except my daughters. For my daughters’ birthdays yes, and I give my heart and soul in making them the best cake I can possibly make, because if I die tomorrow, I want them to see pictures of their birthday cakes, and say ‘mummy did put love in making my cake.
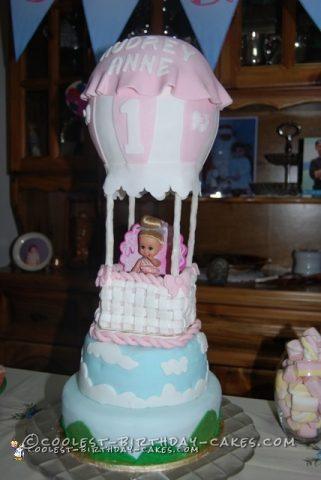
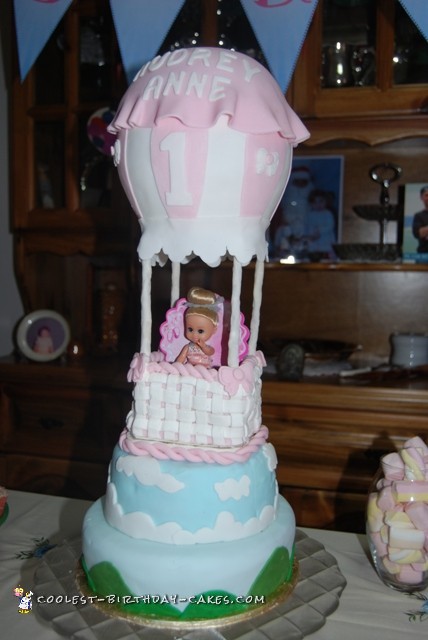
My Hot Air Balloon Cake, specially made for my daughter’s 1st Birthday!
Covering the structure and weaving the basket
So yes, with the help of my mum and dad, I did put my 100% into this cake. Months in advance, I watched videos on youtube, saw tons of pictures and read what others had to say about their attempts at making a hot air balloon cake, and I immediately knew that it wasn’t going to be an easy cake. Many admitted that they had failed in keeping the balloon from collapsing, so I knew I needed something strong enough to hold up the balloon part of the cake. So I told my dad what I had in mind, and thanks to his engineering skills, he built a structure strong enough to hold in place what turned out to be a really heavy balloon. I covered this structure in a sugar-paste kind of dough, a recipe which I got from my mother. I left it white as I didn’t want to introduce too many colours besides pink for the balloon.
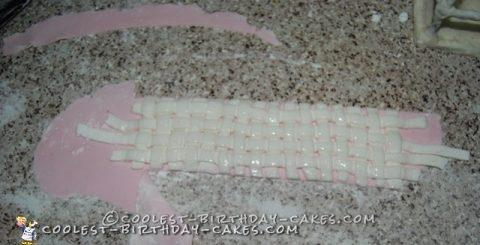
Then I moved on to weaving the basket, using 1cm wide strips from the same sugar-paste dough. This took quite some time and had to be extra careful so that the strips don’t break, while lifting up piece after piece to weave the basket. I started from the centre and moved out towards both ends of the strips, until I had a weave long enough to go round the base of the structure my dad had built for me.
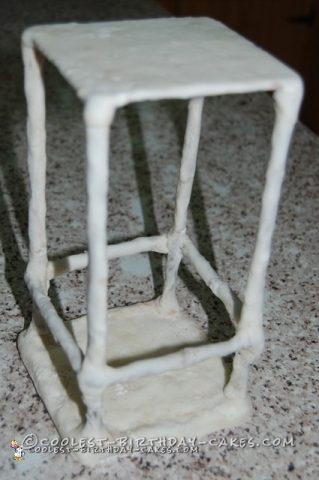
The structure that took all the weight of the hot air balloon and which my amazing dad built for me!
Weave on pink fondant
Next I rolled open some baby pink fondant, big enough so that the weave could fit on top of it. I needed this fondant behind the weave to strengthen it, as this was going to hang vertically and I went for pink instead of white so that it can show through the holes the weave leaves between strips. I generously brushed water onto the pink fondant, so that the weave could stick to it really well. I guess if I had to do this again, I would weave the basket directly onto the pink fondant, as picking up the weave and placing it onto the pink was challenging, but it did find its way on top of it! I cut out the excess pink fondant and was left with a strip to go round the structure and form the basket.
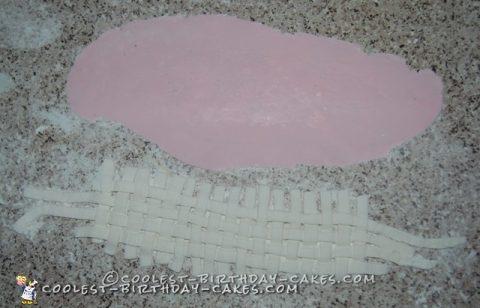
Rolled out pink fondant and finished weave
Weave ‘glued’ on to the baby pink fondant with water
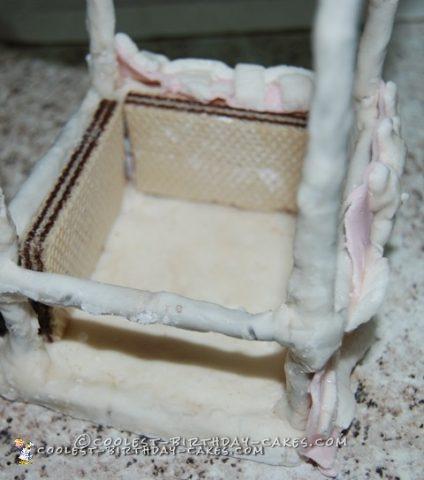
Basket complete!
But before shaping this strip into a basket, I first had to build walls of wafers around the bottom part of the structure to support the weave. The wafers I used were of the exact size so I didn’t need to trim them or anything – I simply placed 2 wafers horizontally on each side of the basket, 8 wafers total. Once in place, I spread them with edible glue from the outside, and attached the weave onto them. The weave broke, so my original plan of making the basket from 1 single sheet of weave failed :-( So I had to join two sheets of weave at the corners of the square structure. This wasn’t noticeable at the end, so no big deal after all. What mattered was that the weave went round the 4 sides of the structure, forming the basket!
Next I twisted 2 snakes of pink fondant together to form the rope (4 ropes actually) and glued each piece of rope at the top of each section of the basket. The rope helped to hide the wafers underneath, besides adding detail to the basket.
And finally, some touches of pink bows glued at each of the corners of the basket. I used a medium-sized plunger for this and added a squashed ball of fondant to the centre of the bows. And that was it for Day 1, 4 days before the actual day of the party so that the basket had time to dry and harden completely.
Walls of wafers to support the weave

Weave wrapped around the 4 sides of the structure forming the basket
Bake the Cakes day!
Next came Bake the Cakes day! Which I did at my mother’s a few minutes away. Have I yet said that my parents are simply the best?! They are, and they were so involved in this cake, that this cake is theirs just as much as it is mine! Well we used Lara’s (my sister-in-law who also makes amazing cakes) Madeira cake recipe throughout. The bottom tier was 9½ inches and the top tier was around 7 inches wide. For the balloon part of the cake, we baked 2 cakes, one in a semi-circle tin, 6½ inches wide, and another in the top mould of the jumbo cupcake mould, but I ended up not using this latter cake as it simply was too small and was going to make my balloon look disproportionate. So what I did was a rice krispies treat (easy to make and its recipe is everywhere on the internet) so that I can shape it to look like the bottom part of the balloon myself. I first pressed the rice krispies mixture into the semi-circle tin which I used for the cake so that I get the width right, and then squashed and narrowed it down towards the bottom. I forgot to take a picture of the rice krispies treat since I immediately put it in the fridge to harden. The semi-circle cake and the rice krispies treat were butter creamed together to form the balloon.
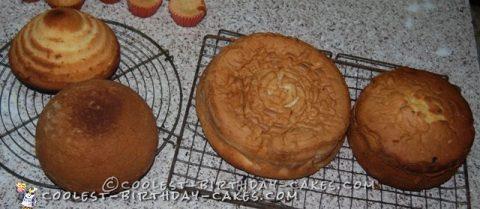
Cakes cooling down
Covering the hot air balloon
Well I guess the next stages are pretty much the same for everyone – levelling the cakes, spreading butter cream and covering in fondant. I went for 2 shades of sky blue fondant for my 2 tiers – one slightly lighter than the other. I used Wilton’s Icing Color to dye white fondant in sky blue. With a knife, I then cut out hills from 2 different greens to go round the bottom tier, and cut out clouds for the top tier and stuck them to the cakes with water. I stacked the cakes and so far so good!
Covering the hot air balloon was not easy though. Once balloon was fixed in place over basket structure, I tried to cover it all at one go, but I couldn’t stretch my fondant big enough – you see my balloon alone without the basket ended up measuring around 8” tall x 7” wide. So I decided to ‘drape’ the bottom part of the balloon (where the rice krispies treat was) in a rectangle of white fondant and I joined ends together where they met. This was hidden by 1 of the 6 pink panels or vertical stripes that I stuck evenly around the balloon. Then I cut out an almost 10” circle out of pink fondant and tried to position it in the centre as much as possible and let it hang loosely to form a frill at the ends and hide where top part of the balloon meets bottom part. With the help of a stencil pressed onto a 1½” wide strip of white fondant, I created a frill to cover where balloon meets ‘ropes.’ Now it all sounds very simple and straight forward, but believe me, for someone who has just started decorating cakes, it was major! Even my alphabet cutters weren’t good enough for the job – you see, my cutters are quite large and make chunky letters but I needed smaller letters to go on the pink ‘hat’ of the balloon. So my brother Bernard came to the rescue – he crossed half the country (Thank God it’s a small country :-) ) to bring his wife’s alphabet cutters! I’m blessed to be surrounded by wonderful family! And so I cut out ‘Audrey Anne’ and a big number ‘1’ out of white fondant and stuck them to the balloon with water. I used the small bow plunger to make bows for 5 of the pink panels.
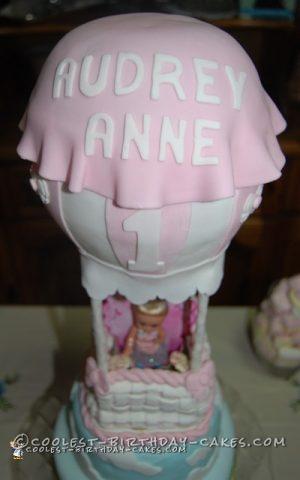
Hot air balloon all set to float :-)
And I thought I was done! All that I thought I needed to do was place my finished hot air balloon onto my 2-tiers and my cake would be ready, but no! Well I actually did put the balloon onto the cakes, but after a couple of hours, my mum noticed that the balloon was starting to tilt forwards. I removed the balloon because I knew that if I had to leave it there, it would fall down and break. So, something which I should have thought of right from the beginning, I needed dowels to support the weight of the balloon. In fact, the balloon was so heavy that it had already dug into the top tier of the cake. I called my dad, he got on his bike, and in a flash he was there with the dowels. (Am I not blessed?!) The 4 dowels took the weight, I modified the basket to include another rope at its bottom and it was good to go. The little dolly hopped into the basket and off she went up into the sky…
(To be honest, I still put the cake together at the very last minute, but it stood the test of time :-) )
I must admit – I love my hot air balloon cake, some couldn’t believe that I made it with my own hands, but I know that I wouldn’t have made it without the help of mum and dad!
So thank you Ma, thank you Pa – this one’s for you!
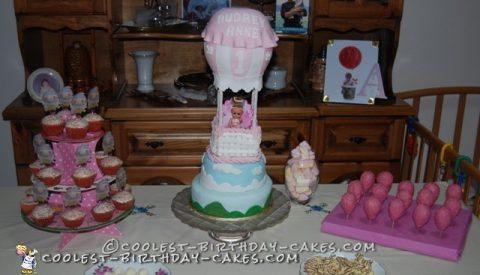
Cake surrounded by cupcakes and mini hot air balloons
Related cakes:
 Art Inspired Hot Air Balloon Cake
 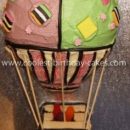 Coolest Hot Air Balloon Cake
  15+ Cool DIY Monkey Cake Designs for the Birthday Cake Enthusiast
  Cool Homemade Hot Air Balloon Cake
 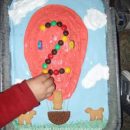 Cute Homemade Hot Air Balloon Cake
  Coolest Dr. Seuss Giraffe Birthday Cake
  Coolest Easter Basket Cake 2013
  Coolest Hot Chocolate Mug Cake