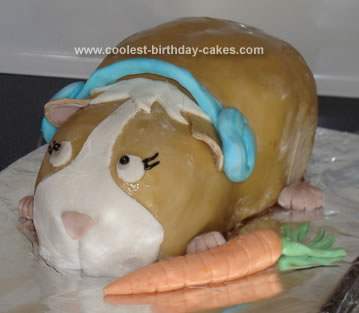
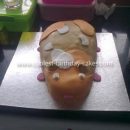
I made my own birthday cake, since I had leftover marshmallow fondant from a cake made earlier this month. I chose a guinea pig because I think they’re cute, and I grew attached to Fluffy the Classroom Guinea Pig books that my kids brought home from school. I made my guinea pig ear muffs because I have a winter birthday, and she needed some color. The carrot was also added for color and because I thought it would be fun to make. A cake from this website helped provide a lot of inspiration in shaping and decorating the guinea pig.
For the cake, I mixed together a cake mix, 1 pkg. instant pudding, ¾ c. vegetable oil, and ¾ c. water until moistened. Then I added 4 eggs and 1 tsp. vanilla extract and beat well. The batter was very thick. I spooned it into my prepared pans (making sure to grease and flour the pans well) and baked at 350 degrees for about 40 minutes (until a tester came out clean). This was to make the cake denser and easier to carve. After cooling completely and removing from the pans, I put the cakes in the freezer for about an hour, but I probably should have let them freeze longer.
Meanwhile, I made chocolate buttercream frosting. I frosted the top of one of the cakes then put the other cake directly on top of it. I then carved the cake into the shape of the guinea pig (rounded ends with smaller/narrower snout and bigger hindquarters). I frosted the entire thing with buttercream frosting and put the cake in the fridge until the next day. At this point, I thought the cake looked rather like a spider without legs or eyes.
I tinted the marshmallow fondant using Betty Crocker classic gel colors. I achieved the color for the guinea pig’s main body by starting with the following ratio: 7 Red: 2 Yellow: 1 Blue. I added more yellow and blue until I liked the tone. I covered the body entirely with that color. I made a flesh color for the feet, inside the ears, and the nose.
I made the ear muffs using blue-tinted fondant. I rolled it into a snake shape (here’s where your playdoh experience comes in handy) then formed it into the pieces that cover the ears. I rolled out a strip for the headband. I made it twice as wide as I wanted and wet one side of the fondant. I put a pre-measured pipe cleaner down the middle and pressed the edges of the fondant together. I wet the fondant with a little water to make it all stick together. I used black writing gel for the pupils and eyelashes.

That is the cutest cake ever!!!!
Hello!
I am wondering if you wouldn’t mind telling us what pans you used…your cakes is absolutely awesome and my daughter wants a guinea pig birthday party. Thanks!
I used two loaf pans (like you would bake bread in). Mine were metal. After baking, cooling and freezing, I stacked the cakes and put a layer of buttercream frosting in between. The cake looked a lot like a spider without legs before the fondant went on.
Guinea Pigs are my favorite animals and my birthday is in winter too, thanks for the idea.
I LOVE your cake. It’s the cutest cake I’ve seen in my life. I want you to make that for me for my birthday. It’s absolutely 100% ADORABLE!
me and my coz love guinea pigs we want 1 so badly we only have zhu zhu ones so that cake will be great thank u so much
plus my birth is in winter
That cake is so sweet! I’ll try it out myself
I am going to try making a jelly roll and then carving it into a Zhu Zhu. My daughter’s birthday is on Saturday. I am making the cake today, and trying to decorate it tomorrow.
Oh wow that is amazing i want one :)
too cute u guys should make a show on TV so every one could see your hard work