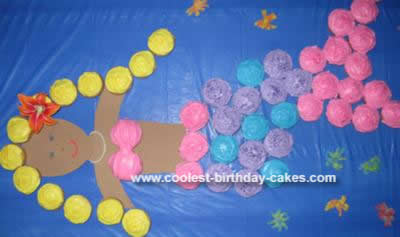
For my daughter’s 6th birthday party, she requested a “mermaid with a swishy tail” cake. I had never attempted any of her birthday cakes before, but after doing a little research online and adding a few ideas of my own, I came up with this Mermaid Cupcake Birthday Cake design. As you can see from the picture, almost the entire cake is made up of cupcakes.
For the face and upper body- I used light tan foam paper (purchased at a local craft store). I cut out the face and the upper body and let my daughter decorate the face- I did ask her to make the eyes blue (like hers). I wasn’t sure what to do with the arms, so I decided not to make hands and just covered the ends of the arms with the mermaid’s hair.
For the hair, I used 13 yellow iced cupcakes with yellow sugar sprinkles for added sparkle.
For the bra, I used 2 pink iced cupcakes pushed together with an added notch of icing in the middle (no sprinkles).
For the tail, I used 32 iced cupcakes (pink, purple and blue with coordinating colored sugar sprinkles for added sparkle).
For the mermaid’s necklace- I used my daughter’s pearl bracelet.
For the hair accessory- I used an artificial lily purchased at a local craft store.
For the background- I used a Tri-fold poster display board- reinforced with heavy duty tape at the folds so it couldn’t fold up. I covered the front with an inexpensive plastic royal blue table cloth (purchased at Walmart).
Additional accessories- I used sour gummy octopus (found in the candy section of Walmart) to scatter around the mermaid. I had just enough for each child to get one with a cupcake.
Helpful Tip: Make sure that where you start assembling your cake is where you plan for it to stay for the party. Transporting this big cake is challenging. Since my daughter’s party was at a local skating rink, I chose to carefully put everything in boxes, transport it and assemble it there- giving myself at least 30 minutes to put it together before the party. Everyone was pleasantly surprised with the finished product, especially ME!
Related cakes:
 12+ Coolest Frozen Birthday Cake Ideas for the Ultimate Frozen Theme Party
  Beautiful Mermaid Birthday Cake Tutorial | Ariel and Friends Cake
  12+ Coolest Peppa Pig Cake Ideas
  Coolest Mermaid Birthday Cake Design
  Coolest Little Mermaid Birthday Cake
 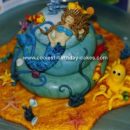 Coolest Little Mermaid Cake
  12+ Coolest Minnie Mouse Cake Ideas
  Coolest One Eyed Minion Cake
Your comment has been sent successfully.