
My son requested a Minion party for his 6th birthday. More specifically he wanted a one eyed Minion cake. After spending several hours over the course of a few weeks looking at Minion cakes on the internet I decided I thought I could pull it off. My son, Ben, looked at some of the pictures and picked his favorite so I set out to duplicate it the best I could. I made a list of everything I thought I would need. Luckily I started gathering supplies few weeks early because I ended up forgetting things and kept making last minute runs to Hobby Lobby during the last week before I got started on it.
I really wanted to do a test run on this cake before his party but because of the cost of supplies and the time it was going to take it just wasn’t an option. When I was a kid my mom always made my birthday cakes for me. It’s a tradition that I love to continue with my son. I have made every birthday cake and this Minion was by far the most time consuming and difficult. I had never worked with fondant ever before this cake. I don’t care for the taste of fondant so never really had a desire or need to use it until now.
However, I knew that I just couldn’t get the details I needed for this cake without it. I’m sure this will make a few people cringe, but, I just bought a five pound bucket of fondant from Hobby Lobby. That saved me not only time but some sanity. Everything I had seen or read online about making fondant looked messy and I wasn’t guaranteed results. In the following steps I’m going to try to explain everything I did the best I can. Even though it was a difficult cake it was also funnest I’ve made. The smile on my son’s face made it worth every ounce of frustration. It was exactly what he wanted. I hope that these birthday cakes are memories he will always remember.
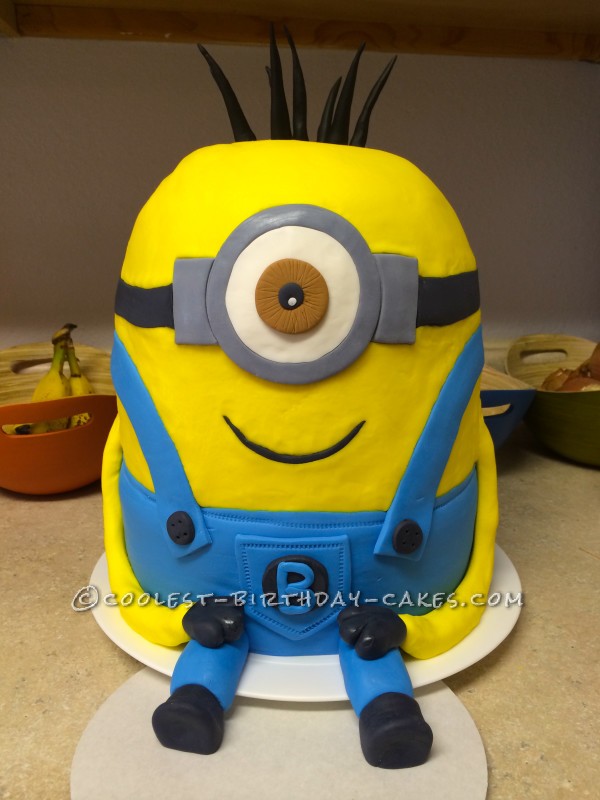
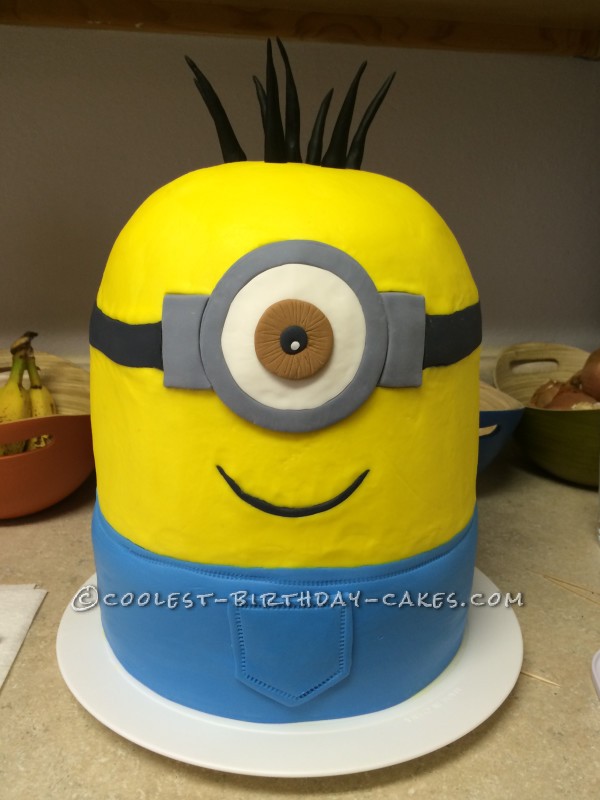
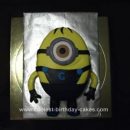
Finished Minion
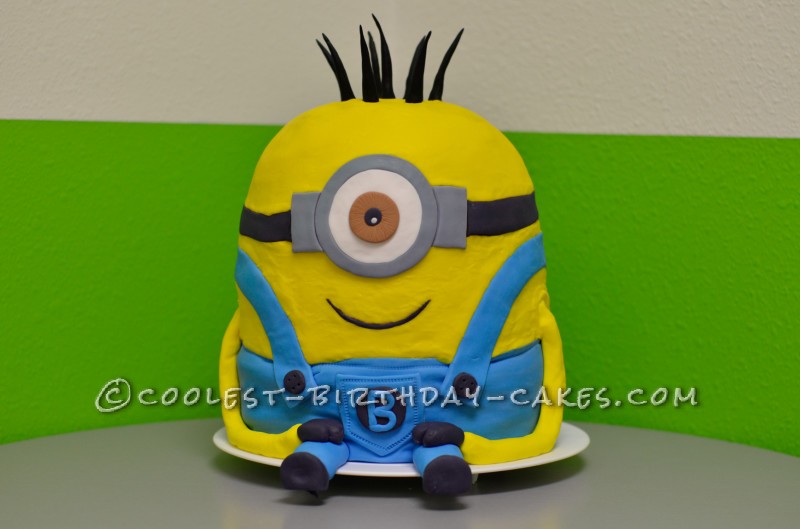
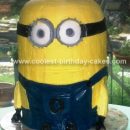
You can see that he has settled from the weight of the cake
Baking and Assembling the cakes
I knew I was going to need my cakes firm so I baked them a few days ahead of time. After they had cooled completely I sealed them and put them in the freezer. I used a 9 inch Wilton sports ball pan and 9 inch round pans. I baked one of the dome shaped using the sports ball pan and five of the round 9 inch layers. This was going to be a VERY heavy cake so I assembled it on a firm plastic cake separator plate instead of a board.
The day before I started the assembly I moved the cakes from the freezer to the refrigerator. I still wanted them cold and firm but not frozen as I needed to slide them down over the dowels. I trimmed my dowels and got to work. I had precut four holes into my cake boards that would go between each layer. Since these are 9 inch cakes I used 8 inch cake boards. You don’t want them to be all the way to the edge or they might show through if you don’t stack the cakes perfectly. They are absolutely necessary for a cake of this size and weight. You’ll see why in a later step. I found that it was easier to push the dowels down onto the cake instead of trying to push the cake down over the dowels.
Prior to assembling I put the cake boards over each layer and pushed my dowels through to make the holes in the cake. That way I also knew they would line up correctly. At this point I had the five round layers with four holes each that would line up with my dowels. I centered my first round layer onto the separator plate and inserting the dowels into the holes I had already made. I used all homemade butter cream frosting, the Wilton recipe. It’s a perfect decorator frosting. Next spread a layer of frosting over that layer. It doesn’t need to be pretty, just spread it out the best you can but don’t make it too thick because the cake will settle. Slide a cake board down over the dowels and on to the top of that frosted layer. Add another layer by lining up the holes in the cake with the dowels and carefully slide it down onto the cake board.
Spread some frosting on this layer and add another cake board. You’re going to continue these steps until all five of the round layers have been assembled. Once you reach the last one you’ll still need to spread on some frosting and add the last cake board. Then you’ll carefully take the rounded dome cake and center it up with your round layers and carefully push it down onto the dowels. Don’t push it all the way through though, if you start to feel the dowels you need to remove the dome cake and cut them shorter.
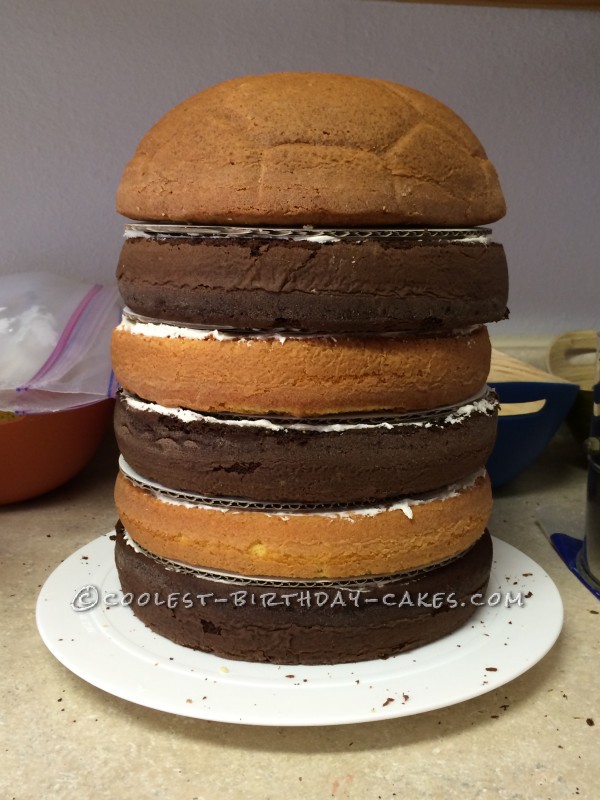
Assembled layers
Covering the Cake in Frosting
Using some of the white butter cream that I had left from assembling the layers I put a thin crumb coat of frosting all over the cake. It doesn’t need to be thick or pretty. This is just to seal the cake and keep any crumbs from falling off while you frost it with the yellow. After I got the crumb coat on I put the cake into the freezer to help it harden up. I left it in there probably about half an hour but there is no real time limit. Because of the size of this cake, covering the entire thing in fondant just wasn’t going to work. I’m sure if you are experienced with fondant you would know how. As I mentioned though, I don’t like the way fondant tastes so I didn’t want it covered in it even if I could have done it. So I set out with high hopes that my good old Viva paper towel method was going to help me accomplish what I needed. It didn’t disappoint! You MUST use Viva paper towels though, no other brand with work.
I made a second big batch of butter cream and tinted it yellow. If at all possible try to avoid using food coloring for your frosting and fondant. You’ll get much better results using the gel. Wilton and AmeriColor are both great choices. You’ll use less because it’s more concentrated and also get a more vibrant color. I’m partial to the AmeriColor because it comes in a little squeeze bottle where as the Wilton you have to dig it out of a little container with a toothpick. Add a little coloring gel at a time and mix will before adding more to get to the desired color you want. Once my yellow was to my liking I started frosting the entire cake. Using an offset spreader I worked from top to bottom all the way around. Smooth it out with the spatula the best you can but know that it won’t be perfect just from that.
Another reason I love the homemade butter cream is because of the way it will crust over. This is what allows for the paper towel method to smooth it out. After the cake is completely covered in the yellow butter cream go sit down and take a break. You need to allow the frosting to dry a little bit. If you put the paper towel onto the fresh frosting it will just stick to it. It’s also important that your frosting is a stiff consistency to start with. If you’ve added too much milk it will be too soft and won’t firm up. Do not even attempt to do this with canned frosting, you will be disappointed because it doesn’t work.
When you think it’s dry enough test it out. Tear off a Viva paper towel and put the soft side against the frosting. This will be the side that is facing out on the roll. The other side is a little more rough and won’t work well. I used a fondant smoother but you could probably get decent results just using your hands. However, the fondant smoother was only a couple of dollars so it’s well worth it to have for this. Using the fondant smoother and gentle pressure smooth it over the paper towel back and forth. If you pull the paper towel off and the frosting is stuck to it you have one of two problems. It’s either not dry enough yet or your frosting is too wet as I mentioned above.
Continue working this way until all the frosting is as smooth as you can get it. It will take some time and patience but works well. You’ll use several paper towels because there will be times when a little bit of frosting sticks to it, that’s okay you just don’t want globs of it. Just use gentle pressure and keep moving your way around the cake. You should end up with something like in the picture.
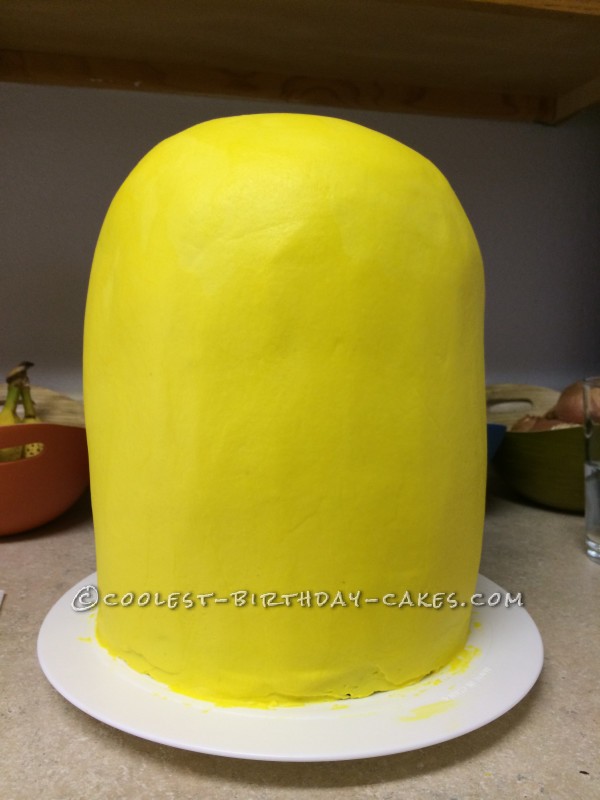
Covered in yellow buttercream
Adding the Face
Up until this point it’s been fairly easy and to the point, just time consuming. Now starts the fun part. The details! I made the hair from gum paste. The fondant was too droopy and wouldn’t stay up straight to dry. I didn’t want to lay them down or I would have had hair with one flat side. So I got some premade gum paste and tinted it black. Once that was done I just pinched a small piece off and used my fingers to mold it into that shape. They don’t all need to be the same. Some can be tall and some short. I curved some and left some straight. I think it gives it more character.
Once I had them the shape I wanted I put a toothpick in each one and stuck the toothpick into a thick piece of cardboard so that they would stand up to dry. The next day I noticed that they had actually lightened and were more gray than black. Since we weren’t actually going to eat the hair I mixed up some of the black gel coloring with a tiny bit of water, just enough so that I could paint it onto the hairs. I wasn’t sure if it would dry but it really didn’t matter if it did as long as it wasn’t dripping. It surprisingly did dry well overnight. You can add the hair whenever you’d like. It’s not really a step that needs to be first or last. I chose to go ahead and add the hair before the other details. Just stick the toothpicks straight into the cake and your Minion will have hair. Remember, I had never used fondant before this cake so for those of you that have I ‘m sure you could do a better job. To be honest, it wasn’t as hard to work with as I thought it would be. Not exactly the easiest but not hard either.
I searched through my cabinets and cookie cutters until I found the right round sizes for the eye and goggle. I traced around each round cup or cookie cuter onto a piece of paper and actually used some crayons to color it in exactly like it would be on the cake so that I could have a better idea of what it would look like. I could also hold it up to the cake to make sure the proportions looked right in size. For the goggle I tinted some fondant gray, rolled it out with my fondant roller and used my largest round shape, a cup, to cut out a circle. Because I wanted the goggle to be around the eye I didn’t want to just put the white of the eye on top of the whole piece. So I used my next round size, a cookie cutter, and cut through the gray again in the center which left me with just the round gray goggle edge.
I then rolled out some white fondant and used that same size cookie cutter to cut out the white of the eye. That way it would fit perfectly inside the gray goggle. Next I tinted a small amount of fondant brown and rolled it out, used my next smallest size cookie cuter I had chosen and cut out the brown for the eye. The lines that you see were made by just dragging a toothpick across it from the center out to the edge. The next piece was a very small black circle that I used a large milkshake straw to make. Last was a tiny little dot of white that I just rolled between my fingers and pushed onto the black circle. Very lightly wet the back of the black and push it gently into the brown for the eye. Do the same thing with the brown piece and push it gently into the white of the eye. Then very carefully pick the whole eye up, with the goggle edge, and lightly wet the back of it and put it onto the cake with light pressure.
Because of the butter cream you shouldn’t have any trouble getting it to stay in place. For the two gray pieces that go with the goggle edge I just free hand cut those. Just roll out some fondant and do your best to make two pieces the same for each side. Push those into the butter cream gently on each side of the goggle. Then you need to roll out a long piece of black fondant to use for the goggle strap. As you can tell in the photo one side of mine is wider than the other. This was because it was very difficult to carry a long piece of fondant and get it wrapped around the cake without it stretching out. If I were to do this cake over again I would probably cut it in half and have the seam meet in the middle on the back of the cake. Either way, use the same method to put the goggle strap onto the cake. For his mouth I rolled out another piece of black and just free hand cut it as well. Push it into the butter cream and your Minion now has a face!
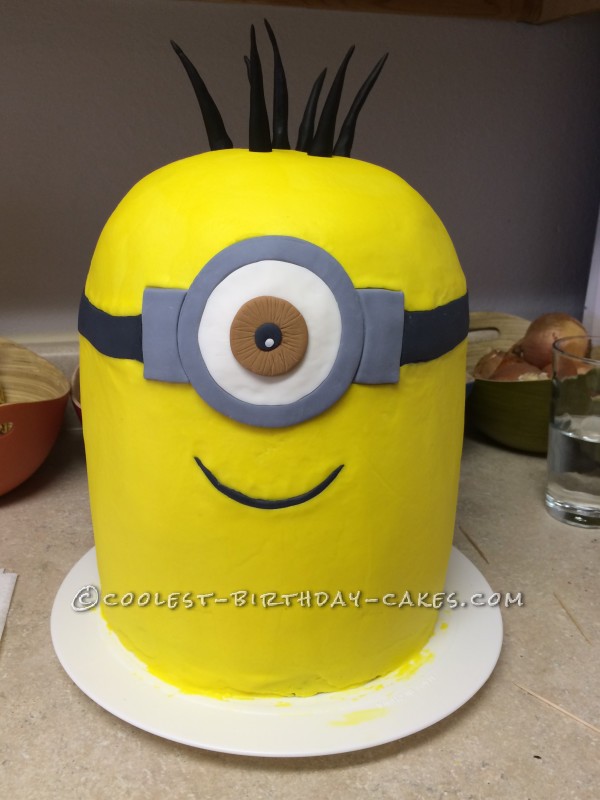
The face
Overalls, Legs and Arms
Last was the overalls and limbs. I apologize that I don’t have any additional pictures until it was finished. Once I got into the home stretch and knew I was close to completion I forgot to take more pictures of the process. I’ll describe them the best I can though. I started with the overalls. I rolled out a large piece of blue fondant and cut out two rectangles. I used a flexible ruler to measure half way around the cake in order to have an idea of the size. I knew I would never get a whole piece that big wrapped around the cake so I place one of the rectangles on the front and the other went around the back. So there is actually a seam in the blue fondant on each side the you can pinch it together and the arms will also help cover it.
Next I cut out the pocket that’s on the front of the overalls. The little ‘stitches’ that you see were made using a Wilton fondant tool that I have but one of those little pattern rollers that come with pumpkin carving kits would also work just fine. I wet the back of the pocket using a wet paper towel, you don’t want it dripping wet, and then pushed it gently against the front of the overalls. Then I just cut out two long overall straps and carefully pushed them into the frosting kind of shaping the curve of them as I went along. The button details are just black fondant that I poked four holes in with a toothpick and then wet the back to attach them to the overall straps.
I used more blue to shape his legs and black for the feet. There is no real tutorial for this step. I had no idea what I was doing and just used some pictures of Minion feet as my guide. Just mold them until you like the look of them and then attach the feet to the legs using a toothpick and a little pressure where they meet. I also put a toothpick in each leg to attach them to the cake with. Then just push them in where you want them and that’s it for the legs. The arms were the hardest part for me. My rolled yellow fondant was too heavy to shape around the cake without it falling down. So I finally gave up and just let the arms rest on the cake plate. Ideally they would have just curved down against his body and stopped level with his legs. I just had a Minion with really long arms.
The hands were the same as the feet, just look at some pictures and form them the best you can. I really don’t think you can go wrong here. You could even just make little mitten looking hands if you don’t want to try and make the little fat fingers. I just pressed the top of the arm where it was against the body a little bit flat so that it blended in better. Push it into the frosting a little bit and then rest the end on top of his legs. I attached the hands to the arms using toothpicks again. Now, the yellow fondant for the arms, you’ll just have to do your best to match the same color of the frosting. I just kept adding a little yellow gel at a time and would then knead it and compare. It’s not as hard as you think to match the color. Even if it’s off a tiny bit chances are nobody will notice. The last detail that I added was the black circle with the letter ‘B’. I used a B instead of a G like the Minions in the movie because my sons name starts with B.
That’s it, your Minion cake is complete! I won’t lie, this cake took me several hours. Including baking time it was probably at the 10 hour mark. But keep in mind that it was my first cake of this magnitude and with so much detail. Also you will notice from the first picture to the last that he has settled quite a bit. I made the cake the day before the party. When I woke up the next morning the Minion had become a slightly more wrinkled version of himself as you can see in the overalls. I didn’t mind too much because it just adds character I think. But this is also why I mentioned the cake boards for between the layers. If you make this cake without them and only have frosting between your layers expect a disaster. There is no way it would hold up. Plus I had to transport this guy a few miles down the road to the party location.
My husband drove while I held it in my lap. I think I held my breath the entire time. When we walked through the door at the party venue a lady stopped me to look at it and wanted to know where I bought it. I told her I made it and her mouth almost hit the floor. In the three weeks since his party I’ve been asked what I would charge to make another one. So to say it was a hit would be an understatement. But the best part was how proud my son was to show off his cake at his party telling everyone that his Mommy made it for him. I’d do it for him again in a heartbeat!
Overalls, Legs and Arms


Your comment has been sent successfully.