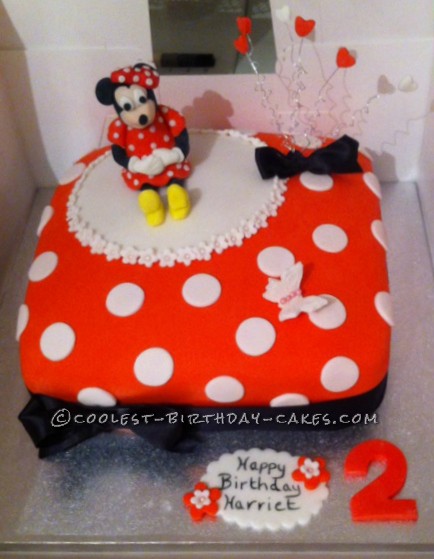
I was asked by a friend to make this Minnie Mouse 2nd birthday cake. She gave me a picture of how she wanted the cake to look. The cake she showed me was round, so I did the decorations similar but with a few extra finishing touches.
Making Minnie Mouse
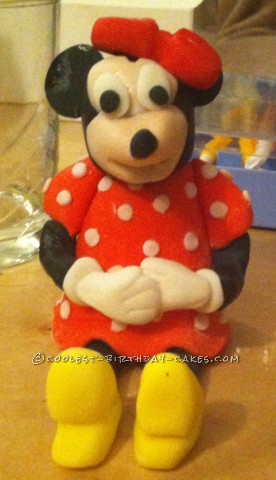
To start off this 2nd birthday cake, I made Minnie Mouse first. This is how I made her.
- I made two thin black sausage shapes for the legs and then I made the torso in black too.
- I rolled out some red fondant thinly to make the dress and attached it to the torso, cutting off any excess fondant with some scissors and smoothing it so you couldn’t see the joints.
- Then I made the sleeves of the dress and attached them using a little water.
- I cut out small spots using the end of an icing nozzle and attached those to the dress.
- I made some arms in black and then the hands in white and attached these and then left these to harden slightly.
- Next rolled a small ball of black icing for the head and slightly flattened the front as I needed to add the front of the face.
- In some skin coloured fondant I cut out a small heart shape for the top part of the face and cut off the bottom of the heart before attaching it to the head,
- I made Minnie’s snout with a modelling tool and shaped the mouth and attached this.
- I rolled out a small ball for the nose and attached it.
- Then I cut out two small white circles of fondant for the eyes and then two smaller circles in black for the pupil of the eye and attached these to face.
- Using an icing nozzle I cut out two circles big enough for the ears and cut out an arch off each ear so they fit the head. I made a small ridge in the head for each ear to fit into and attached these.
- Using the red fondant I made a bow to attach to the head by the ear and then cut out the same sized spots as the dress and attached these to the bow.
All that was left to do now was make Minnie’s shoes in yellow and she was finished.
The 2nd Birthday Cake Base
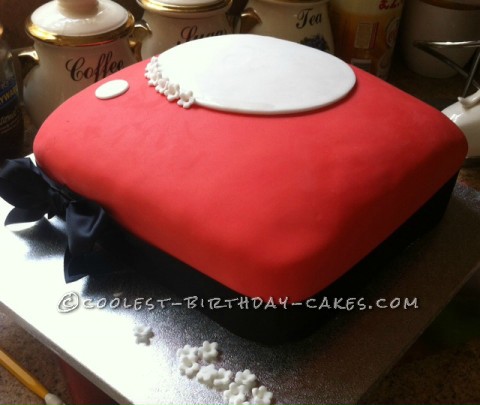
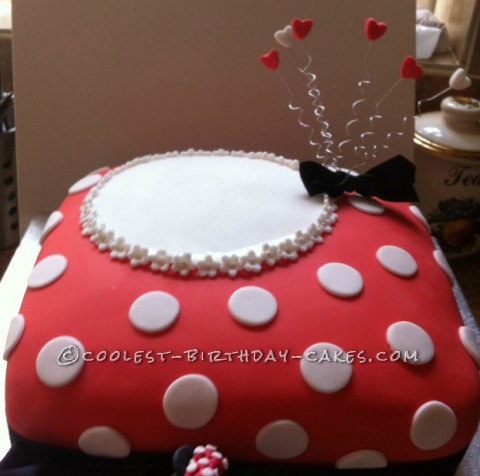
I baked an 11″ square cake and when cold I filled it with jam and covered it in buttercream. Then I covered it in red fondant and then cut out a large white circle for the top of the cake for Minnie to sit on.
I made small flowers to edge this circle and attached a small edible pearl bead to the centre of each flower. I then cut out lots of large circles using a large piping nozzle and attached these randomly around the cake. Next, I attached a satin ribbon around the cake and made a bow to match to attach to one of the corner edges.
Decorating the 2nd Birthday Cake
Using flower paste only, I cut out some red and white hearts. I attached them to curly wires and laid them flat to dry. Meanwhile, I made a small bow ready to attach to the base of the heart spray. I then made a small oval plaque out of flower paste and a butterfly and left these to dry.
I made two small red flowers and two smaller white flowers. Then I attached the two together and then attached a small edible pearl in to each one. These were to attached to the plaque when dry.
When dry I attached the heart spray into a poesy pick and pushed it into the cake. I attached the bow to the base of this.
I wrote a message onto the plaque. Then I attached it to the cake board and then attached the flowers to the edges. Next I cut out a number 2 in red fondant. I attached this to the board of the 2nd birthday cake. Finally, I attached small edible pink beads to the body of the butterfly I made earlier. Then I attached it to the cake.
She loved the Minnie Mouse 2nd birthday cake!
Related cakes:
 15 Cool Minnie Mouse Birthday Cakes
  12+ Coolest Minnie Mouse Cake Ideas
  12+ Coolest Mickey Mouse Cake Ideas
  25+ Cool Mickey Mouse Clubhouse Cakes
  Coolest Minnie Mouse 2nd Birthday Cake
  6 Cool Mickey Mouse Picture Cakes for Birthday Cake Inspiration
  12+ Coolest Peppa Pig Cake Ideas
  Coolest Minnie Mouse Birthday Cake Idea