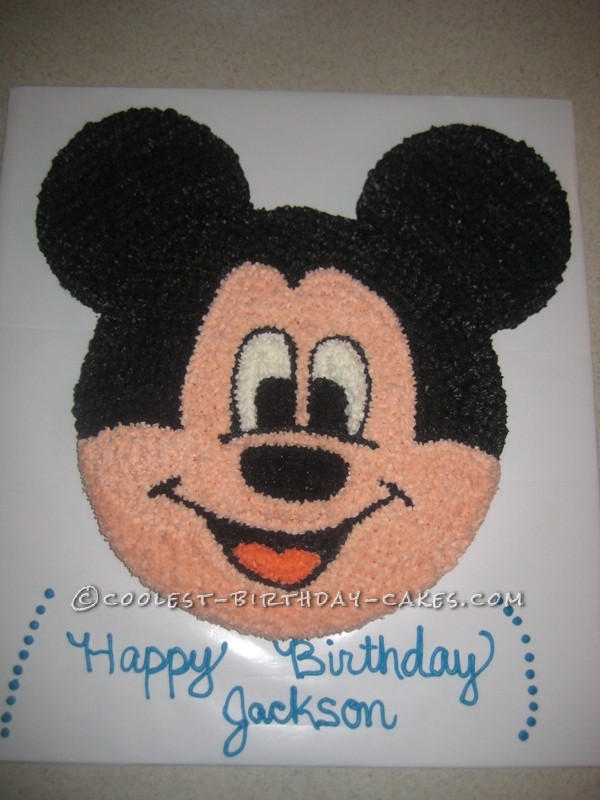
With some encouragement from my mom, I decided to attempt to make the Mickey Mouse birthday cake for my son’s 2nd birthday. I can make “regular” cakes (from a box!), but had never tried making homemade butter cream, never used icing tips/bags etc. About 1 month before, I made a “practice” cake, just to see if I could properly ice the cake, get the shape just right (dimensions etc)…all of this completely free-handed. I made my trial run (except for the ears) and it turned out great…I was SOOOO excited that I had actually done it all by myself!
To make the cake, I prepared a white cake (boxed mix) in a 12 inch round pan for the face. I made another mix and made (2) 6 inch round cakes for the ears. I don’t remember exact amounts of batter per cake pan, I had to Google it at the time. After preparing my cake board, I placed the 12 inch cake on the board. Then I took my smaller cakes and using the 12 inch pan (empty), I used it (like a biscuit cutter) to trim off part of the 6 inch circles so that it would fit against the 12 inch cake nicely and the ears just wouldn’t be stuck out by themselves.
I began my frosting by first making a crumb-coat layer and just thinly iced the entire cake in my white butter cream. Then I had pre-mixed my Mickey colors using Wilton icing colors (copper for the flesh tone, black and according to the Mickey pan recipe, peach for his tongue, but red would have been fine). I took a toothpick and free-handed my design into the crumb-coat icing. Once I had my lines drawn, I used my bag of black icing with a #4 tip to outline everything (eyes, mouth, nose and ears. Then with each color, I used a star tip (I believe #16) to fill in everything. This part was quite tedious, but I finally had it complete…almost!
My eyes were getting so blurry from staring at it for so long, so I used my camera and took a picture of the cake from completely overhead, just to give me a different look at it. Once I did this, I could see some areas that needed to be touched up a little and spots where the stars had tiny bits of space between them, so the white icing underneath was showing through. Once the job was complete, I felt like a “SuperStar” lol! My first cake and it turned out perfect (in my eyes anyway!). Everyone at the party was so surprised when I brought out the cake and my boys LOVED it!
But…we ran into a problem! When we began eating the cake, the black tasted HORRIBLE! I had to use so much black to tint the white icing that it tasted like “ink”! So, after we had a good laugh (and most people had BLACK tongues!), we shared the parts of the cake that were not covered in black icing…they were still edible! After the party was over, I researched a little more on the black icing and most sites actually recommend to make a chocolate icing when using black, so that you don’t have to use so much to color it, ruining your taste. Since this cake (Feb 2012), I have made a football for Superbowl, another sheet cake for my father-in-law’s b-day, a Candyland cake for my other son’s 4th birthday and I’m now getting ready to make my son’s 3rd birthday cake this week (Toy Story). I guess I’m a little “addicted”! Once I get an idea of my theme, I instantly come to this site to get ideas on how I want to make my cakes!
Related cakes:
 12+ Coolest Mickey Mouse Cake Ideas
  12+ Coolest Minnie Mouse Cake Ideas
  Awesome Mickey Mouse Crazy Cake and Cupcakes
  12+ Coolest Peppa Pig Cake Ideas
  1st Birthday Cake for my Daughter who loves Mickey Mouse
  12+ Coolest Frozen Birthday Cake Ideas for the Ultimate Frozen Theme Party
  Coolest Mickey Mouse Birthday Cake Design
  Coolest Mickey Mouse Cake and Cupcakes
Your comment has been sent successfully.