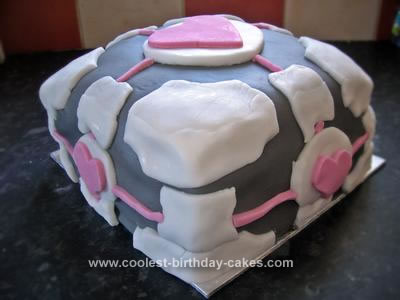
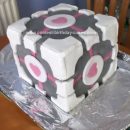
This Portal Companion Cube cake is a triumph…
For those of you who don’t spend hours of your life gaming, Portal is a computer game in which you wake up as a test subject in the Aperture Science facility. In order to escape (and receive cake), you have to go through a series of rooms, solving laser-ridden puzzles along the way in order to proceed. You are armed only with a gun that can shoot portals into walls – the use of these is paramount to moving forward. The only other character in the game is a sarcastic and malicious robot that controls the testing facility. She gives you a ‘companion cube’ to look after for an entire level, then cruelly forces you to destroy it. (The quote above is in reference to the song from the credits.)
This was my first time using fondant icing and I’m very happy with the results. It was surprisingly easy to use and there was actually very little room for error. The only real problems came from the complicated scaling I had to do in order to get the white sections of icing right.
In the end they were still a bit iffy and the cake is more a cube as viewed from above because, even with four layers, I couldn’t manage to get the cake to 20cm tall. I think I could have managed it if I’d doubled the amount of batter per layer, but you wouldn’t believe how much I already had to buy for this cake and buying extra sponge ingredients was a step too far.
I am also over the moon because my theory about why Swiss meringue butter cream wouldn’t take to any flavorings (and tasted like an airy mouthful of butter) was correct, or at least by using my chemical knowledge I was able to fix the problem and made a batch of wonderful vanilla-flavored butter cream. If you want to know the technicalities behind it, I think that it’s because the fat molecules repel the water-containing flavoring molecules, so in order to get around this you need to put the flavoring into the mixture before adding the butter. The egg whites aren’t very fatty so will not repel the flavoring and will combine with it nicely so that when you come to add the butter the flavor is already there.
If any of you actually try to make this cake, do plan accordingly because the cake is best decorated after the sponges have been frozen for at least four hours and ideally overnight. The icing procedure will then take at least an hour. Having said that, I’m glad I took on this challenge.
Ingredients
For the cake:
400g Self Raising Flour
400g Butter
400g Sugar
4 Eggs
10 Tbsp Milk
2 Tsp Baking Powder
For the filling:
300g Butter
180g Sugar
6 Egg Whites
2 Tbsp Vanilla Essence
200g Strawberry Jam
For the icing:
1kg Grey Fondant Icing
250g Pink Fondant Icing
250g White Icing
Recipe:
Preheat the oven to 190C/170C fan. Line four 8in/20cm square sandwich tins (or bake in batches) with baking parchment.
To make the cakes, cream the butter and sugar together until fluffy, then stir in the eggs. Slowly add the flour and baking powder, then add milk until you achieve a soft dropping consistency.
Divide the mixture between the four tins, then bake for 20 minutes or until a skewer comes out clean.
Allow the cakes to cool completely before wrapping them in cling film and freezing for at least four hours (ideally overnight).
To make the Swiss meringue butter cream, first put the sugar and egg whites in a bowl over a saucepan that has been filled up to 1/3 with water. Make sure that the bottom of the bowl does not touch the water.
Put the pan over a gentle heat and stir the egg mixture with a fork. Every now and then, dip your (clean) fingers in and rub them together. If you can still feel grains of sugar then keep on stirring, but if you can’t then the sugar has dissolved and you can remove the bowl from the heat.
Pour the egg mixture into a mixing bowl, add the vanilla essence and whisk until stiff peaks form and the bottom of the bowl is cool.
Slice the butter into small chunks and add them, whisking for about 15 seconds between each one, to the whisked egg whites. At first the mixture will turn soupy, but by the time 250g of butter has been added you should see that it is starting to thicken. By the time all of the butter has been added the butter cream should be smooth and fluffy. If this is not the case, put the mixture in the fridge for 30 mins. and try whisking it again. If this still doesn’t work, add another 100g of butter.
Remove the cakes from the freezer, unwrap them and place one onto a cake board. It might be a good idea to spread a small dot of butter cream over the board first so that the cake doesn’t move around.
Spread the top of the cake with about 1.5 tbsp of the butter cream, then cover with the same amount of strawberry jam. Put a second cake on top and repeat the process until you reach the final cake. Spread a thin layer of the butter cream over the entire cake, filling any gaps as you go, until most of the cake is covered. This is a crumb coat. Measure the height of the cake, then put it in the fridge for 30 minutes to let the icing set.
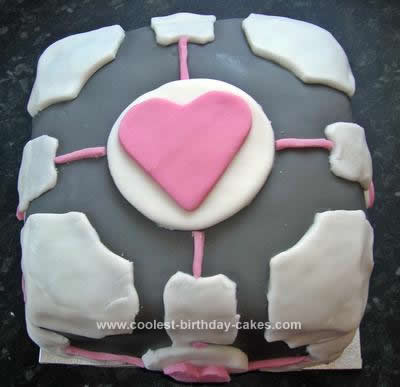
Find a picture of a portal companion cube and carefully measure the heights and widths of all the parts: the corners, the middle white parts, the circle and the heart. Scale these lengths to the height of your cake and draw yourself some patterns so that you can cut the icing around them later.
Dust the work surface with icing sugar or cornflour and roll out your grey icing to a 1cm thickness and, using the rolling pin to help pick it up, lay it over the cake. use a sharp knife to cut off any excess and meld the icing to fit the corners. Smooth the sides and top down.
Roll out your white icing to 1cm thick and cut out 12 corner pieces, 10 middles and 5 circles (use a circle cutter if you can). Attach them to the cake by dipping your finger in water and rubbing it over the back of the shape before placing it on the cake and holding it there for a few seconds.
Roll out the pink icing to 1cm thick and use a heart cutter to cut out 5 hearts. Attach them into the middle of the circles using the same method as above.
Use a ruler to mark 3mm separations along the remaining pink icing and cut several strips using the marks as guidelines for the widths. Use these strips to make the pink stripes, attaching them with a dab of water, as before.
If you have any leftover icing (I had quite a lot as I didn’t want to get caught short), just wrap it in clingfilm and store it in an airtight container. It should keep for a few weeks. Don’t make the icing shapes ahead of time as apparently they dry out very quickly so will crumble when you try to use them.


Your comment has been sent successfully.