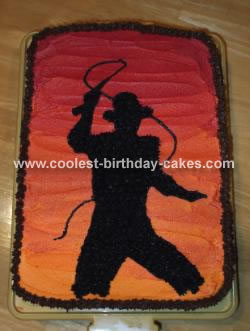
My son wanted to have the full picture and face of Indiana Jones. I searched the web and couldn’t come up with anything that I felt would do justice to Indiana Jones. So while on the “official” Indiana Jones site the silhouette image appeared while the web page was loading and “bam” my cake idea was born.
I was able to find a coloring page picture of Indy with his whip, printed it off, sized it to my cake and then colored it in entirely with black and then recopied it so I could transfer it to the cake (I tried the gel method this time and it worked great). I blended the colors of golden yellow, orange and pinkish-red to produce the sunset background.
I did put “Indiana Jones” writing (SF Fedora) on the side of the cake wishing my son a happy 7th birthday. I hope my post will help somebody else when they are trying to make an Indy cake.


I love your cake. What a great idea to use the coloring book outline.
Very cool! I hope mine comes out so great, if so, my soon to be 9 year old will be impressed!
While searching for an Indy cake my son and I loved this one! We found the same coloring page and was wondering if you did the sunset background first or second? I hope mine will come just as good! You did a great job!! Thanks for the wonderful ideas!!
I was Wondering how you did the picture on the cake did you put the paper on it?
Hi,
Sorry for the delay in answering the questions, but I’ll answer them now in hopes of helping someone else.
I did the background sunset first. As a rule, for any cake that I do, I usually do the background first.
As far as transferring the image….I print out my design on regular paper. Flip it over, back side up (blank), pasted to a window, and then trace the design (it will be backwards) with cake decorating gel. When finished, I put the gel side down onto my cake, lightly rub to “transfer” it to the top of my frosted cake. This makes it very easy when you have intricate lines and want to make sure you capture the image.
I was looking for some images to print out for signs for party I am throwing for a 6 yr old… I only wish I would have seen this cake idea first! I was drawing a blank since the party supplies have been discontinued. This was a super idea. Thanks for sharing!!!
Hi! Great cake- I found this picture when I was trying to find the proper technique to blend icing colors for a sunset. For my mom’s birthday cake, I wanted a dark purple-ish color for the bottom, working up to a light orange. How can I do that without it looking sloppy?
I decided on 3 colors that I liked for the sunset. I started with the lightest color first, laid a strip down, then proceeded to the next darkest color, laid a strip down, blending the 1st and 2nd colors together where they met with a cake frosting knife. I repeated this step with the 2nd and 3rd colors.