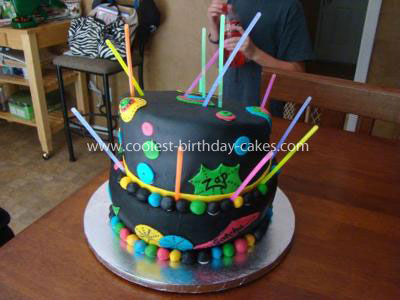
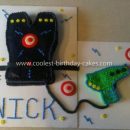
When my soon-to-be 12 year old son decided to have his birthday party at Laser Quest I took on the mission of finding a really cool cake to make for him. Of course I scoured the internet looking for just the right cake. I never really found one that I loved, but I began to develop an idea in my head from several other cakes I had seen. I knew I wanted it to have two layers (more on flavors below). I also knew that I wanted it to be wrapped in black fondant with neon accents. The best idea I saw was using glow bracelets for laser beams coming out of the cake. With all of those ideas I began the journey of this Laser Tag Birthday Cake.
My birthday son wanted a strawberry cake, but my younger son doesn’t like strawberry. So, I made the bottom layer strawberry with cream cheese butter cream frosting and the bottom layer was vanilla with chocolate butter cream frosting. I used three 10” cake recipes to form the bottom layer- meaning, I cooked three 10” strawberry cakes and staked them layered with the cream cheese frosting to form one giant layer. The top layer was made from three 8” cake recipes. I wanted to do a Topsy Turvy cake but the circumference of the top layer was too big so I just did the top layer at a tilt.
After I completed the bottom layer I wrapped it in black fondant (more on fondant below). I then took a long dowel rod, about ¾” , and stuck it into the middle to gauge the height of the bottom layer. I then marked the dowel rod right at the cake surface. I removed the dowel rod and cut five pieces of that length. Next, I inserted the dowel rods into the bottom layer in such a way that they would support the top layer but not be visible once the top layer was placed. Before baking the top layer I traced the circumference of the cake pan onto a piece of cardboard. I then cut the circle from the cardboard and assembled my cake on it. Next, I covered the top layer in black fondant and placed it on top of the bottom layer.
About the fondant, I make my own fondant using one bag of miniature marshmallows and one bag of confectioner’s sugar and a little water. I melt the mini marshmallows in the microwave and then put the crème into my Kitchen Aid mixer. I used my dough hook attachment to mix with. I then added the powder sugar little at a time and 1 tablespoon of water at a time. If the fondant is too sticky add more sugar, too dry add more water. You can add the color to the marshmallow crème before mixing, but I like kneading it in after the fondant is complete. I made two recipes of fondant- one black and one divided for the neon colors.
About the black color, I wanted the fondant to be super black and found that Wilton’s color just wasn’t working- it was actually turning slightly dark green. So I found a new color at Hobby Lobby, America something. Anyway, the color is called Super Black and it worked like a charm!
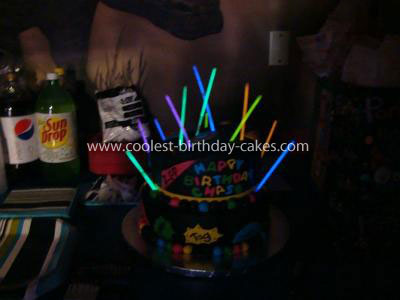
Once the cake was covered and stacked, I just used shape cutters to make the neon fondant shapes and words. I also used black food coloring to write on the shapes. I applied a little luster dust to the border balls. I then used a steamer to remove any leftover sugar on the cake. Last, I lit the glow sticks (Michael’s $1) and stuck them around the cake.
My son and his friends all loved his cake! He had a truly unforgettable laser tag party!


That is great! I love the glow bracelet idea!
Great cake. Thanks for the ideas.
Making one for my 6 yr. old’s birthday.
it is the most AWESOME cake I have ever seen!!!!
Love this cake! I might just create something similar to yours for my son’s party next week. I found your cake on Pinterest.