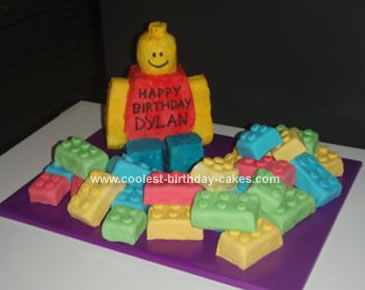
For my son (who is fanatical about Lego) sixth birthday there was really only one choice of cake. After a week or two of thinking up and discarding various ideas (ouch! my brain still hurts) and thanks to your site, I settled on the jumbled block design for a Lego Birthday Cake. I liked the idea of each child having their own Lego block to eat and having the Lego man solved the problem of where to write the happy birthday.
In hindsight the idea was the easy part.
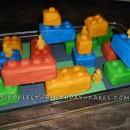
For the bricks I cut pre-made sponge cake into block size proportions then cut in half and stuck them back together using butter icing and a layer of m&m’s for extra flavour. TIP 1: Putting them in the freezer at this stage makes them so much easier to do the next part which was to coat the four sides with a crumb coat. Without the freezing bit it was really hard to keep the shape.For the outside I used fondant icing which was a heck of a lot easier to use than I had anticipated.
Like the sponge I used pre-made fondant from the shop. There are some great clips on youtube on how to use fondant so I won’t go into detail except to say, TIP 2: Wearing surgical type gloves for the colouring stage will stop you from looking like a party decoration yourself afterwards.
I had read somewhere that to much colouring in the fondant can lead to staining hence the pastel shades of the blocks. I don’t know if that’s true or not but did’nt want to take the chance of all Dylans classmates turning up on Monday with rainbow coloured teeth.
For the knobs on each block I rolled out a snake with the fondant, cut to size and formed a button shape by rolling each ball using the thumb and fore fingers. TIP 3: Lightly wiping the top of each block with a damp cloth removes the icing sugar dusting from the rolling out and also helps the knobs stick to the block.
For the Lego man I stuck pre-made sponge together the same as for the individual blocks making a separate block for the head, body and legs. The arms were cut separately from a single piece of sponge. Again freezing at this stage makes it easier to work with when shaping and icing.
When the blocks had firmed up in the freezer I shaped them into the body parts using a bread knife. The icing was done using coloured butter cream. TIP 4: I think the icing at this stage would have been easier if I had kept the parts separate rather than assembling the man first. Lastly I covered a board with glossy wrapping paper and arranged the bits on it an hour before the party.
I must say that it took quite a bit longer to make this cake than I thought it would but the look on my little boy’s face when he saw it made it totally worth it and thanks to this site the thought of helping other amateur cake makers bring that same joy to their little ones is well, priceless. Good luck.


I was looking through this site and I came across your fantastic cake, my son is also called Dylan and is fanatical about Lego. You must have the patience of a saint. Your cake is a brilliant idea and looks fabulous, no wonder your son was so pleased. Well done!!!
Love the blocks. I’m doing this for my boyfriend so thanks for your clear instructions, I just hope he likes it as much as your son did!
Thanks so much for your helpful tips too. I will def give this cake a try.