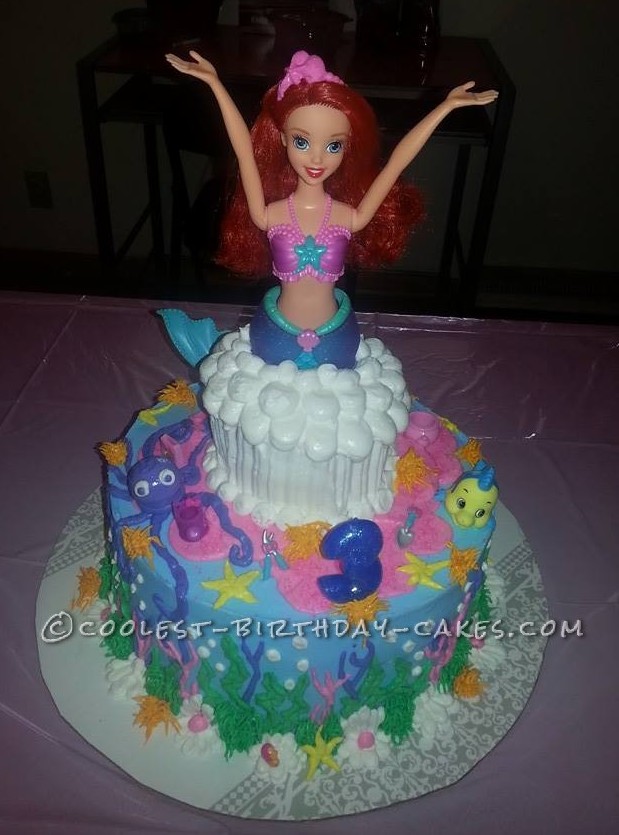
The creation of this Little Mermaid doll cake all began on a work day that started at 9 am and lasted until 11 pm… LOL! I’ve never been so tired before starting a cake in my life, but the thought of a smile on my 3 year old granddaughter’s face was a real driving force for me.
My granddaughter adores the Little Mermaid and I had been planning this cake for some time. Her mom called me and asked for a Little Mermaid cake and gave me free range to create it based on my own ideas.
The idea itself came quickly to me. The doll, however, did not. It had to be ordered from Kmart and picked up at Sears about three days later. When I received the doll my girlfriend was all but happy as the box was totally crushed and the hair was matted. Guess that’s what I get for trusting a picture on the internet… LOL. I truly believe there is nothing beyond repair, especially when it comes to cakes, so I laughed it off and my girlfriend was kind enough to comb and style her hair for me.
This cake was made with two 8″ round cakes and a flower pot cake. I cut a hole in the shape of her torso through the flower pot cake and the top layer giving her enough room to slide into the cake and still remain aloft. Then I took off her tail piece and wrapped her lower half in plastic wrap, so as not to cover her in cake or frosting. I inserted her into all three layers for a measurement. This is when i found her rear to be a little more endowed than anticipated lol. So I trimmed the hole in the cake a bit bigger. I then leveled the tops of the 8″ round cakes and layered them with purple buttercream. Next, I centered the flower pot cake on the top and attached it with buttercream icing. After that, I dirty iced the cake (also known as a crumb coated) and put the cake into the freezer to set.
I left the cake in the freezer for fifteen minutes, which was long enough for me to go for a swim in a pot of coffee… LOL.
After the cake set I base iced the bottom layers in a pretty ocean blue icing (the flower pot remained un-iced). I then proceeded to decorate the bottom portion with green seaweed, and pink and purple coral tree designs, all done with a small round tip and a leaf tip. Next, I added bubbles in white icing with the small round tip again. The cake at this point was really coming together.
It was then that I got the brilliant idea of using the white icing and the same small round tip to make sea shells around the border. About halfway through my hand really stated to cramp. I did one open and one closed all the way around the border about a half inch apart. Now let me tell you… when my hand started to cramp… that idea I had became a not so brilliant idea, but my stubbornness got the better of me and I pressed on.
After the shells where done, I made little pink pearls with pink icing using the same tip. It really made the pain worth while. I then put grass in between the shells with green icing and a grass tip. After the grass was in place I made a few star fish with yellow icing and the small round tip in a few random places, and did a few pink rock shelves on the top of the 8″ round cakes with a large round tip. After that I smoothed the pink icing on the top and then did a second layer and smoothed again.
Next, I added pink sugar crystal to the tops of the platforms for an added glittery effect. Then, I took the same large round tip and made lines of white icing up the sides of the flower pot cake and used a rigid icing paddle dragged in an upward motion to give the top a water geyser effect. The top was done as a bunch of balloon shapes dragged inward toward the center till the top was covered.
Then it was time to insert the Ariel doll. Yay! Once placed I tuck her tail (earlier set off to the side) into the top of the 8″ layers directly behind her making her look complete. It appeared that if you pulled the doll out, the whole cake would be ruined, but it was all an illusion.
The final touches to make it pop included a few little dishes on the shelves from a hello kitty play pack, an Octopus made of buttercream and a few spots of orange grass for color. The last thing I did was put on the flounder figure that came with the doll.
The whole process of decorating (not including the baking) was 3 hours from start to finish. It was now time for bed, but I was so excited for my granddaughter that sleep didn’t come easy and morning came a little too quick.
When all was said and done, she was literally so excited she was jumping up and down. The adults were also really amazed by the detail and beauty. The cake was a huge success and I highly recommend it to brighten anyone’s birthday.
Hope you enjoy the picture and this story and I encourage you to make your own. With cake anything is possible.
Related cakes:
 12+ Coolest Frozen Birthday Cake Ideas for the Ultimate Frozen Theme Party
  12+ Coolest Peppa Pig Cake Ideas
  12+ Coolest Minnie Mouse Cake Ideas
  Classic Homemade Victorian Doll Cake
  Coolest Ice Cream Tiana Doll 4th Birthday Cake
  Beautiful Mermaid Birthday Cake Tutorial | Ariel and Friends Cake
  Coolest Tinkerbell Dress Cake
  12+ Coolest Mickey Mouse Cake Ideas
Your comment has been sent successfully.