
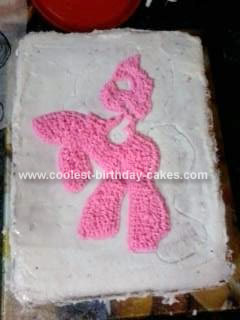
I baked two rectangular cakes. I spread strawberry jam and buttercream icing in between the two layers. I then spread a thin layer of butter cream icing (white) over the entire cake. I covered the cake with foil, and froze it. I divided my icing into 3 batches: white, pink and purple.
I Googled my little pony and chose a picture that I liked (my little girl happens to have a Pinkie Pie pony). I printed it, went over the lines with a thick felt tipped pen, and traced it over onto wax paper (used to cover sandwiches, etc). The next night I took the cake out the freezer, put the wax paper onto the cake (ink side up), and traced over the main lines with a dull plastic knife. Once the lines were on the cake, I took the paper off, and made the lines a bit deeper.
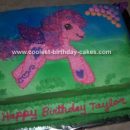
I then put pink icing in a pastry bag with a writing tip, and went over the lines of the body and head. I changed to a small star tip and made little stars to fill in the body. While I had the pink icing in the bag, I used the star tip to make the pink flowers on the border (after checking on the internet how to do it). I took a bag with purple icing and a writing tip and went over the lines of the hair. I was going to fill it in with stars, but decided against it. Then I thought about filling it in with greens, blues, etc, but thought it would be too much. I then just took some of the pink to fill in between the lines of the hair (I just looked at the picture and tried to copy it since I didn’t draw the lines on when I was transferring the picture). I filled the eye, eyebrow, nostrils and mouth in with melted dark chocolate. Lastly I made the purple flowers on the border.
This homemade Pinkie Pie Pony cake was such an easy cake, considering it was the first time I used a pastry bag, or attempted to create a picture on a cake. My little girl just loved it!


Your comment has been sent successfully.