For this Homemade Sonic the Hedgehog Cake you will need: 3 cake mixes, 1 box of waffle cones, 1 box of flat bottomed ice cream cones, a soft taco shell, 3 or 4 tubs of frosting, a tube of black decorating gel, toothpicks. A bundt cake pan and a muffin pan are used as well.
I should mention here that this cake takes planning ahead of time for the snout and spike placement. You need to use the bulges in the bundt cakes to your advantage for placement of these so don’t rush.
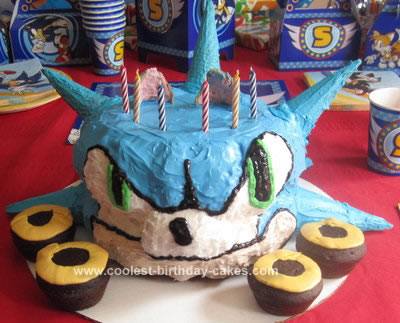
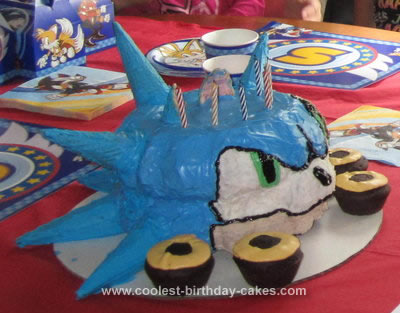
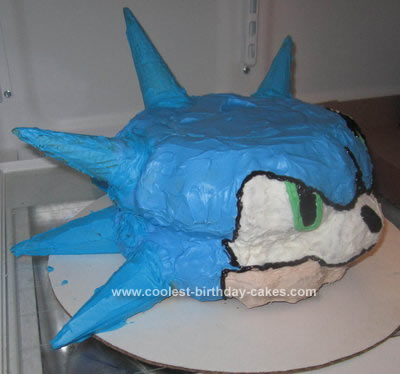
I wanted a 3-D style cake so I had to come up with this on my own. I did ask my 6 year old son if he wanted a friendly Sonic or an angry Sonic and he said “ANGRY!” So that’s why he looks that way. I made 2 bundt cakes and put the flattest sides together to make the head shape. I used a stack of flat bottomed ice cream cones (solid side up) to fill the middle hole of the bundts. I tore a soft taco shell to be smaller around and placed that on top of the stack of ice cream cones to cover the hole.
I made a batch of cupcakes and used one for the snout area (it fits well in between the 2 bundts) held together with some frosting and toothpicks.
I frosted the light colors on first with my petal tip. The cream for the mouth and white for the eyes. I used the petal tip to do the green for his eyes. Then I used my petal tip to apply the blue from around the lighter areas outward. I used 7 waffle cones for the spikes. This is the hardest part of the cake. I put a cone on every other bundt cake bulge. The 4 on the bottom are the easiest because they actually rest on the board. I could only take my finger and rub the blue frosting as thinly as possible on the top 3 cones because they get heavy and tear the cake otherwise. So, as you get them frosted shove them lightly into the head and support as needed with toothpicks. I only had to pick 2 of the 3 but one of those needed 4 alone. I broke apart an extra waffle cone into 2 small triangles for the ears and frosted them pink for the inside and blue on the outside. (Another note here: I put these on the head and placed the whole thing in the fridge over-night but the ears got soft on me so I had to place them on a plate in the freezer for a while before assembly the next day.)
Last I used a deco. tube of black gel and outlined all of the features and gave him his nose and pupils. Overall I enjoyed making this cake. My son along with everyone else was impressed at the party!


Your comment has been sent successfully.