A friend of mine asked me to make a ladybug cake for her daughter who was about to turn one. Her directions were simple, that the cake have a ladybug theme. They call their little girl “Bug” so it seemed appropriate.
I started brainstorming and with many stops by this website for inspiration and ideas, I came up with this cake.
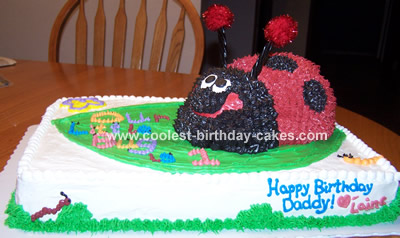
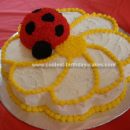
I baked an 11×13 cake in the flavor she requested and also a sport ball pan for the actual ladybug. Once the cakes were cool, I sculpted half of the ball cake to form the ladybug’s head. I then started on the base of the cake by drawing a leaf pattern on the cake and frosting it smooth. I then carefully frosted the rest of the base cake white.
Once I had that frosting on, I used a cookie cutter (flower shaped) to add a flower to the upper left corner and frosted it with a little color. I star tipped the ladybug with a #16 or #18 tip. I used a small circle object to give me the exact shape for the black spots on the ladybug. I gently pushed it around the cake in different spots to make the marks I wanted.
I attached the ladybug’s head with toothpicks and filled in any wide spots left from trimming with cake scraps. I then frosted the head adding licorice antennae with pom poms on top. I supported the licorice with wooden skewers run up the center of them. Once the ladybug was decorated, I lowered it onto the cake and secured it with lollipop sticks cut to the length needed to help support it and hopefully prevent it from moving when being transported.
Positioning the ladybug after it was frosted was a bit tricky. I would almost recommend decorating it while already on the cake. The ladybug was not sitting directly on the base cake. My friend wanted the ladybug to be able to be removed for her daughter, Laine, to have for her own special cake.
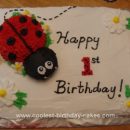
The ladybug was sitting on a layer of Oreo cookies and a cake board cut to the size and shape of the ladybug itself. My friend wanted the cake to say “Our Little Bug is One” so I piped that on the top with dots to resemble caterpillars in the shape of each letter. Not sure if you can see it in the picture but each letter then has antennas and a little face.
I finished the cake by using the Wilton grass tip along the bottom edge (I believe it is # 233). I added a little extra in spots and then I also added a few caterpillars crawling in various spots. Laine shares her birthday with her Dad so I added (by request) a birthday message from Laine to her Dad along the front side.
This cake was fairly simple and one of my favorites. It was also one of the first little girl cakes that I have ever done so that was fun!

She is right… this was truly an amazing cake for both myself and my daughter. Not only did the cake look wonderful but it was absolutely scrumptious! Penny, you are so talented! We could never thank you enough for making our “Little Bug’s” First Birthday so memorable and special. :)