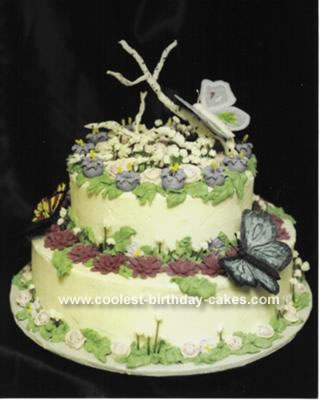
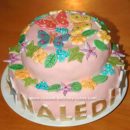
I baked this flower cake for a friend of mine’s niece. It was her 16th birthday. At first my friend had asked me to bake her a butterfly cake (one from a butterfly pan) and I said I would, but after I thought a little more on it, I asked her if I could do something a little different; something more interesting, but I would keep the same butterfly theme – she said okay.
A few days in advance, I used a royal icing recipe to make the different types of flowers shown on the cake. The baby breaths are being help by green florist wire cut at different lengths.
The branch was created by using 22 gauge florist wire that I bent to resemble a branch (I grouped three wires together to make the branch thicker). I then covered the wires with shortening, then with white fondant (the shortening is used to help the fondant stick to the smooth wire. I saw this on a cake show and it really does work). I then used a small paint brush and black food coloring to make a few marks on the tree so it looked more life-like (be careful, it is very easy to go over-board with the black marks as I did and then had to start over with an entirely new branch. You just want enough to give it definition).
I found some butterflies on the internet and printed them on paper, so I could use them as a template for making my butterfly wings (cut the butterfly template in half, so you have two separate wings, and then disregard the body piece). I used a thick royal icing to out line the wings, then used thinned royal icing to fill in the center. I allowed the wings to dry, then used food coloring gels and a small paint brush to decorate the wing tops. Once the wings were dry, I turned them over and painted the bottom side a solid color to cover the white royal icing, and then let them dry completely. For the body, I used thick royal icing to make about a 2 1/2 inch long thick butterfly body on wax paper. I inserted the wings into the body and used paper towels to hold the wings in an upward position. After I inserted the wings, I inserted two small stamens in the top part of the body for antennas. Only after the body is completely dry did I paint the stamens with black food coloring gel (use care when removing the butterfly from the wax paper so you don’t break the wings).
I baked 2- 8×2 inch cakes and 2- 10×2 inch cakes.
I stacked the two 8×2 and 10×2 cakes together with butter cream in the center. I placed a cake separator between the 8x2inch cake and 2- 10×2 inch cake. I covered the cake with white butter cream frosting and made it as smooth as I could.
I placed the tree branch on top of the cake, and then added the flowers. Lastly, I glued the butterflies on the cake and branch with royal icing.
I want you to know that this was the first time I’ve every made and painted butterflies. It wasn’t as hard as I thought it would be, besides, unless you show everyone the original butterfly template nobody will know what the original really look like, so you have a lot of room for differences. This is one of my favorite cakes I’ve made.

That is an absolutely beautiful cake. I wish I could make something that special. Great work
Being a fellow cake decorator, I can appreciate the hard work that went into the little details on this cake. Fantastic!
Your cake is beautiful. I’m a beginner decorator and plan on trying this cake. It is absolutely beautiful.
WOW…That is a masterpiece. You’re a genius:)I can only dream of eattempting something like this. I’m looking for an easy flower cake for my daughter’s 5th birthday party. Any ideas? salomy.perumal@absa.co.za