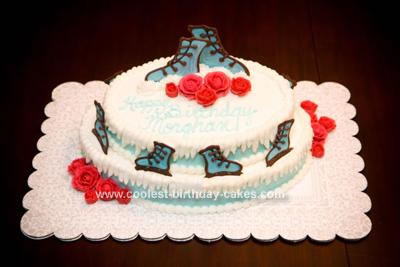
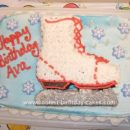
I made this Belle Princess Cake for the daughter of my very good friend. Her daughter was having a winter ice skating birthday party and wanted a cake to go along with the theme. I searched the internet for a cake idea and only found pictures of cakes shaped like ice skates. I wasn’t very optimistic about my ability to “carve” an ice skate shape out of cake so I came up with a completely different idea that was easier for me to execute.
I baked two oval cakes since ice skating rinks are ovals. I iced between the cake layers with chocolate fudge icing. I iced the tops of the cakes with white buttercream icing and the sides with light blue for a wintry look. I used a tip 12 to pipe small “snowballs” around the bottom edges of both cakes. I used the same tip to pipe icicles around the top edges of the cake. When piping the icicles, I made sure that the first 1/4 inch of each icicle laid flat on the top of the cake to prevent the weight of the icicles from make them fall right off the sides of the cake.
I searched the internet for clipart pictures of ice skates and found one that I slightly simplified. I drew it on a piece of paper and used my photocopier to scale it to the right size for my cake (used large ice skates for the top of the cake and smaller ones to go around the side). I bought brown and blue melting chocolate from Michael’s craft store and found it really easy to use. I put my drawing of an ice skate onto a cookie sheet and laid a piece of wax paper over it. I melted the dark chocolate wafers in the microwave and then put it in a piping bag with a number 4 tip. I used it to ice the outline and bottom skate of each ice skate. After outlining all the skates with the brown, I put the melted blue chocolate in another piping bag and filled them in. After filling each ice skate, I gently tapped the cookie sheet it was resting on to help the chocolate flatten evenly. I just kept moving my paper pattern under the wax paper and made about 1 1/2 times the number of ice skates I actually needed in case I messed anything up. I was extremely happy that none of the skates broke when I peeled them off the paper after being refrigerated for about 2 hours. I sent all the extra ice skates over to the party in a Ziploc bag, and every child at the party was able to get a chocolate ice skate with their slice of cake. FUN!!
(Tip: If you use melted chocolate in a piping bag, it is sometimes hard if you have to stop work and the chocolate begins to solidify in the piping tip. To fix this, I heated up a cup of hot water in a medium-sized measuring cup. When I needed to stop working for any reason, I put my chocolate piping bag inside a large Ziploc bag and then put the Ziploc bag into the cup of warm water. This water bath kept the chocolate from hardening in the tip of the bag.)
I made the roses out of the same buttercream as the white and blue icing. I actually made the white, blue, and dark pink icings the day before I put the cake together and just refrigerated them. When I was ready to use them, I microwaved the icing at 10% power for about 2 minutes to soften it up just enough so it wasn’t too cold and stiff to work with. Having the icing made ahead of time saved me a lot of time to put the cake together. The chocolate ice skates keep very well in the refrigerator, so next time, I think I could make the ice skates up to a week ahead of time so there isn’t quite so much to do all in one day.
I am looking forward to other opportunities to work with chocolate decorations. They tasted really good too.

Is the cake for sell?