Take a look at these cool homemade Halloween cake ideas shared with us by cake decorators from around the world. Along with the birthday cakes here, you’ll also find loads DIY birthday cake-making ideas and how-to tips to inspire your next birthday cake project. Enjoy!
And don’t forget… if you end up with a cool cake, have great tips to share or pictures of awesome birthday cakes you’ve made in the past, share them here and be a part of our coolest birthday cake community.
Latest Halloween Scene Cakes
- Mummy Baby Shower Cake
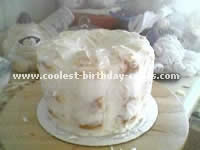
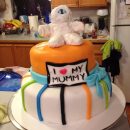 This is one of my first cakes. I was asked by a friend to make a baby shower cake. She wanted … Read more
 - Head on a Platter Halloween Cake Idea
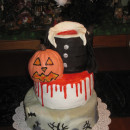
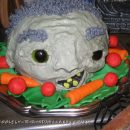 This head on a platter Halloween cake idea is fun and easy to make. I am by no means a professional … Read more
 - Halloween Anniversary Cake
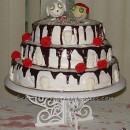 My husband and I were married on October 13th in Vegas by Count Dracula in a Halloween wedding ceremony. For … Read more
 - Halloween Strawberry Shortcake Cake for a 6th Birthday
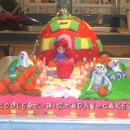 When you’re dealing with an almost six year old with a very large and colorful imagination who loves Halloween as … Read more
 - Last Minute Pumpkin Man Halloween Cake
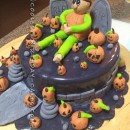 Over a few cups of coffee I made 31 different size pumpkins out of fondant for this last minute Halloween … Read more
 - Coolest Stitched Skin and Eyeball Halloween Cake
 I made this stitched skin and eyeball Halloween cake for my son’s 11th birthday party. He was born in October and … Read more
 - RIP Halloween Skeleton Cake
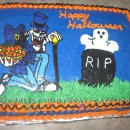 I made this skeleton cake for my 9 year old grandson for Halloween. The skeleton is made using the frozen … Read more
 - Cool Homemade Halloween Cake
 I loved making this Halloween cake! I love Halloween and everything it brings with it! From the candy corn to … Read more
 - Coolest Headless Halloween Cake
 We made this headless Halloween cake for a friend’s Halloween Party. We used vanilla boxed cake and mixed it with … Read more
 - Coolest 3 Tier Halloween Party Cake
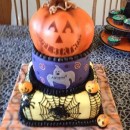
 This Halloween party cake is a three tier cake. Each layer has a different flavor. Bottom Tier The bottom layer … Read more
 - Awesome 3D Werewolf Cake
 I’m not even sure where to begin… This 3D Werewolf cake is very time consuming, but the result is worth … Read more
 - My Dearest Mummy Halloween Birthday Cake
 I made this cake for my husband’s birthday. He is almost a Halloween baby, so I decided to surprise him … Read more
Featured Halloween Cake Ideas
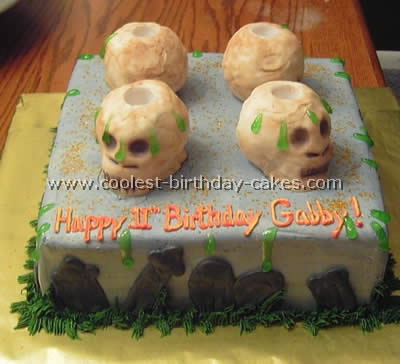
Cake by Eileen V., Clifton Park, NY
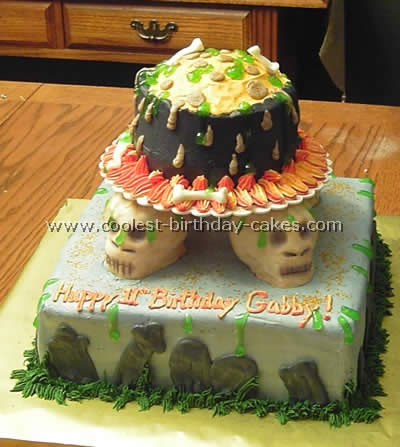
Most 11 year old girls want cakes that are flowery dainty and pink. Well this 11 year old wanted Halloween party cakes as her birthday was on Halloween. So I did a witch’s cauldron on skeletons with a graveyard below.
I started with a 12″ square double layer cake frosted in gray buttercream. Then using a #10 writing tip with black icing, outlined grave stones in freehand making some fall and lean. The bottom border is green icing done with the grass tip. I then sprinkled orange edible glitter on the cake. The separator pillars are Wilton Pearl/Ball pillars covered in a large amount of white fondant using piping gel as glue.
Using my hands and a basic fondant molding tool I molded a skull and brushed on cocoa powder to make it tan and the powder gets in all of the nooks and crannies that a skull would have. I then used navy blue dusting powder to highlight the eyes, nose and mouth. The green ‘goo’ is piping gel colored green and dripped randomly around the cake.
Now for the cauldron. This was a 6″ round double layer prepared on a 10″ separator plate to ensure there is room for the fire. Instead of leveling off the top of the top layer I kept the rounded top using that as the bubbling middle. I frosted it black buttercream on the sides and orange for the cauldron contents and I used fondant molded bones to place in and around the cauldron. More green ‘goo’ drizzled as well as tan icing for more drippings. The fire was orange and red icing in a pastry bag done with a large star tip.
Sprinkle the entire cake with orange edible glitter and you’re ready for Happy Haunting! Our Halloween party cakes were a great success and our daughter loved it!

This cake was prepared using three boxes of cake mix, two French vanilla and one box of chocolate cake mix. Each box of French vanilla cake mix was dyed, one purple and the other orange and to the chocolate cake mix I added a little black color to it. Color gel is found at any cake supply store, the brand is CK product color gel.
This cake was for decorating only with the idea I had in mind with the colors. It was very high and heavy, 9inch cake with thick slices. I think this would go down well for Halloween party cakes because it is so big. I recommend using Duncan Hines cake mix adding just one cup of water instead of 11/4 cup. Used buttercream frosting from, the local store.
Cake by Gretchen W., Lexington, KY
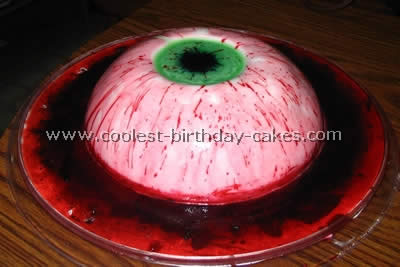
I used a soccer ball cake pan for this Halloween cake. After the cake cools cut out a hole in the top of the cake. Try to make the hole as perfectly round as possible. Cover the cake in white fondant icing making sure that the icing goes smoothly down into the hole and over the rest of the cake to form a smooth eyeball look. Pour red (non hardened) jello over the outer part of the cake and let it collect in the plate. This will give you the red glossy look. Pour green jello (or whatever color you would like the eye color to be) into the hole in the top of the eye. The fondant icing will keep the jello from soaking into the cake. When the eye color is almost hardened drop a few drops of black food coloring into the center for the pupil. You can use a toothpick to pull some small lines of black into the colored part of the eye to give it a neater look.
I took a small brush with red food coloring to make red lines on the eye to give it the bloodshot look. Then I took some black food coloring to give the collected ‘blood’ in the tray that older look. You will have to keep the cake cool or the jello will turn back into a liquid. I made this Halloween cake for my son’s ‘gross’ eighth birthday and a Halloween party. It really doesn’t take much time at all to prepare but you will have to give yourself time for the jello to set. Everyone at both parties went wild over this cake.
Cake by Tabatha L., Willow Grove, PA
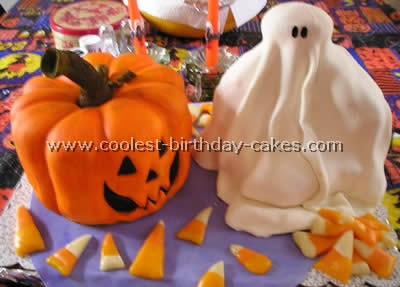
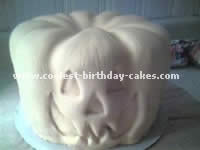
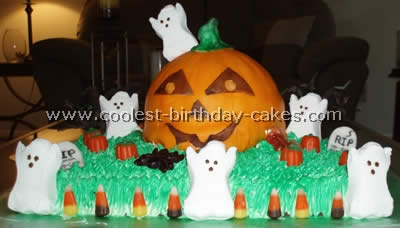
I made this Halloween cake for Halloween. I started with making three round pound cakes. I put them together and frosted them in middle then I placed them in freezer to get hard.
Once they were ready I carved out a pumpkin shape and frosted outside and placed in fridge to chill. While cake was chilling I made up my fondant. I then tinted it a yellow color. I rolled out fondant and placed over cake and molded it around my carvings. Once that was done I used a toothpick and fondant tools to carve face out of fondant.
Once I was done I painted orange colors using color gel in the creases and used Wilton color spray (orange) to color pumpkin. I then used black gel to color in face. I made a stalk out of fondant two days before hand. I had placed a dowel through stalk when it was wet so I could attach it to pumpkin later. I painted it with food color gels to get the effect of a real stalk. Once cake was done I put stalk into middle.
For the ghost I baked a square cake and one cupcake (large.) I placed it in fridge to chill. The next morning I cut off the two top corners (not big) and the two bottom corners (much bigger then top). I stood cake up and wedged corners around cake to hold it up. I attached cupcake to top for the head. I also put dowels through the top and through the pieces so cake wouldn’t move.
I then iced it. Put in fridge to chill. I then made fondant. I left it white. I then rolled out a nice piece. I placed fondant over cake and kind of just let it fold within itself to get the draping effect. I then painted on eyes with color gel.
I also made homemade candy corn to decorate the Halloween cake. I made them fairly big. I placed a piece of colored fondant on cake board and then put cakes on. Everyone was thrilled.
Cake by Jamie V., Cutler Bay, FL
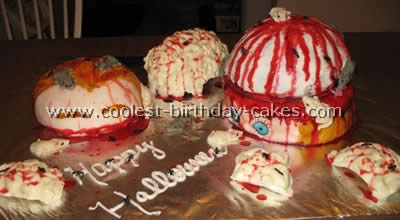
I always make a Halloween cake for my husband’s work each Halloween holiday. I was at the dollar store one day and “bingo!” I found some gummy rats and that is when my mission began. I wanted to make something gory for Halloween and to incorporate the rats. I wanted to make something with a brain and the mice eating the brain or anything of that nature. The rats were rather cute and I didn’t want them to be cute so I had to create some type of gore.
I used a boxed red velvet cake to add to the illusion once the cakes were cut. I had a brain jello mold and didn’t want to put gelatin in it because it would not be able to be refrigerated all day and didn’t want to create any more of a mess. Instead I made a red velvet cake using a Pyrex bowl and once the cake came out of the oven and was extremely hot I inverted the cake and pushed it into the mold of the brain so that it would cool and take the shape of the brain. It worked better than I thought and then all else slowly began to unravel. I then continued with making two more red velvet cakes using two 8” round cakes and another one in the Pyrex bowl. I used the one in the Pyrex bowl to create the top of the head and the two round cakes filled with buttercream to create the face cake.
I then covered each Halloween cake with fondant. The “brain” shaped cake I did cover with fondant also but only after I rolled out the fondant and placed it onto of the mold to try to get the brain design on the fondant before placing it on the cake.
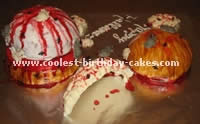
Then I thinned some gel paste with vodka and painted it on the fondant to create the skin color and hair. In order to make it more realistic I created a widow’s peak and some eyebrows. I also took a toothpick and scraped the hair and eyebrows to create the look of actual hair being there. I then cut out two fondant eyes, painted the details and then stuck them on the face. I took the brain cake and set it on top of the head as if someone had cut the head open to look at the brain. I then put the top portion of the head off to the side.
I thinned some gel paste and used red to paint the blood around the bottom of the head and around the base of the brain and top of the head. The white brain chunks that are placed around the cake are made of some melted white chocolate. I put it in the brain mold hoping to be able to get a whole brain shape out but couldn’t get it out in one whole piece so I decided to place the broken pieces around the cake to add to the “dissection look.” Lastly I added the gummy rats to the cake and around the board along with some plastic ants.
Not fully satisfied with the outcome of the Halloween cake I had the bright idea to add some more blood! I know that when you generally use red for coloring purposes that the color tends to be bitter so to keep this from happening I used strawberry jello. Instead of using two cups of water I used only one cup of cold water to the package of jello mix. I then used a medicine dropper to suck up the blood and drip it all over. I like the effect that it added to the cakes. Not only did it look great but it had a great aroma! Best of all, after a little time the jello ingredients started to kick in and it then became thick and gooey as you would expect blood to do before drying.
I love the way that this cake turned out being that it was for Halloween but my husband’s coworkers were thinking that I’ve got issues! Although my two teenage kids loved the Halloween cake!
Cake by Marisa N., Lake Grove, NY
It was my fiancés sister’s birthday and we wanted to bake a Halloween cake because her birthday was around Halloween time. we figured that we would attempt to make it a pumpkin cake. We tried it and I think it came out great. It was a carrot cake so it was a little difficult to control. I recommend using plain white cake next time around. The icing used was a cream cheese icing, again plain white frosting would work better. Wiltons round cake pan for the pumpkin and a plain glass dish for the bottom portion. Both used a box of cake.
Ghost peeps added the cute effects. I make some spooky trees by molding fondant. It was my first time but it’s sort of like play dough so it was great!
Cake by Harriet P., La Marque, TX
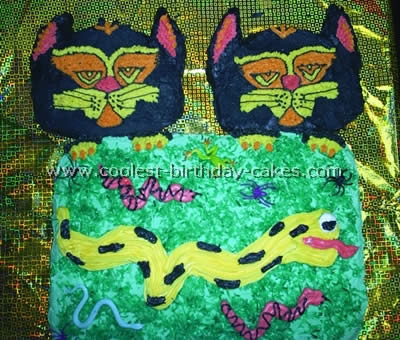
I made this Halloween cake for my boys. I made a traditional vanilla cake from Joy of Cooking cookbook and classic buttercream frosting. The cats were made out of circular cake pans and I just used cake corners for their ears. I got the cat faces from some Halloween Decorations with a little of my own inspiration.
The Snake was created on 11×17 cake pan. I was inspired by some of the snakes created on this site.
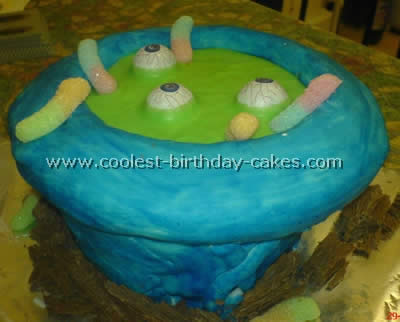
For this cake I made a sponge cake in a pudding bowl plus a round sponge which is at least 1” wider in diameter (to make the cauldron lip). I cut a circle out of the centre of the round cake and fitted it on top of the pudding bowl cake to make a cauldron shape. I covered it with buttercream icing then royal icing.
I made the goo inside by mixing up some fondant icing but you could use jelly if you wish! I then added snakes, eyeballs and other Halloween sweets available in the shops! Very Spooky indeed!
Cake by Valerie G., L’Epiphanie, Quebec
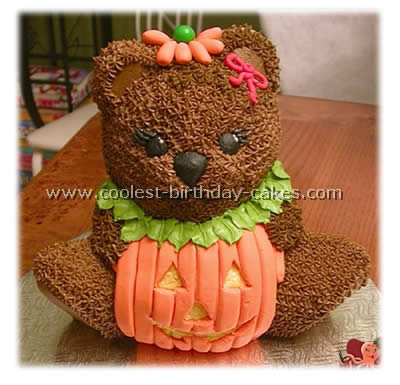
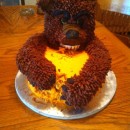
I found the idea for this Halloween cake on this site for pumpkin cakes and for Teddy bear cakes, put the two together and came up with this cake. The pumpkin is made of rolled fondant and the bear is covered with Tip 16 stars. My son ate one ear off this cake… I was so mad! I finally carved another ear with a part of a cake I cut the bottom to flip it (the “bombed” part of a cake when you bake one). There you go!
Cake by Julie S., Tunnel Hill, GA
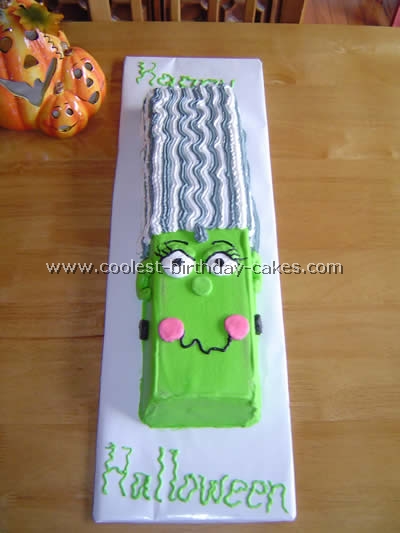
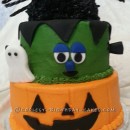
For this Frankengirl Halloween cake, I used two loaf pans and “glued” them together with buttercream icing. I then decorated with the right colors. This is a fun and easy Halloween cake.
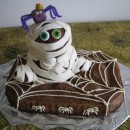
Cake by Jamie R., Cave City, AR
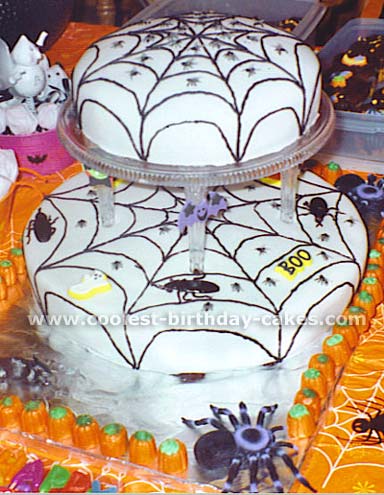
I used two different sized pans for this Halloween cake – one large round pan and then a smaller round pan. I used red velvet cake and the frosting is Pure White Rolled Fondant.
I bought some plastic flies and rubbery cockroaches that looked very real and put them on top of the Halloween cake in the fondant. I also bought the ghost and the little boo word you see in yellow and black from Walmart (they are just candy cake decorations).
I freehanded the spider web with black icing and just piped it on. I placed little Halloween stickers (from Walmart) on the crystal-look spike pillar legs holding the top cake up. The top Halloween cake is sitting on a crystal-look Plate.
I lined around the cake with little candy pumpkins. I put rubbery mice and spiders around the Halloween cake as well.
Related cakes:
 75+ Coolest DIY Sculpted Pumpkin Cakes
  1000+ Coolest Homemade Animated Character Cakes
  350+ Spooky, Gruesome and Fun Halloween Cake Ideas
  1000+ Birthday Cake Decorating Ideas and How-To Tips
  40+ Coolest Homemade Graveyard Cake Ideas
  75+ Coolest Graduation Cake Ideas for the DIY Cake Enthusiast
 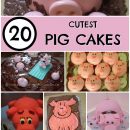 55+ Coolest DIY Pig Birthday Cake Ideas
 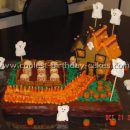 Coolest Haunted House Cake Ideas – Perfect for Halloween