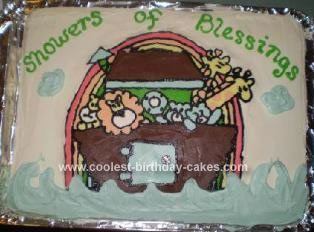
I used two box cake mixes for this Noah’s Ark cake and prepared according to the package directions in 9×13 pans. After the cakes cooled I put them side by side on a cookie sheet to make one large cake, trimmed off any uneveness, and put the cake in the freezer. After the cake was frozen I did a crumb coat with canned white icing.
I found a picture of the ark that I liked and taped the picture to the back of a clear plastic clip board (with the picture facing up) and put clear plastic wrap on the other side of the clip board. I outlined the entire picture with black icing using a round tip. After outlining was finished I put the clipboard in the freezer for a few minutes for it to set. I then filled in all of the colored areas w/white icing tinted with gel food coloring. For the actual ark I used canned chocolate icing.
I then placed the clipboard back in the freezer for about 30 minutes. Finally I covered the entire ark with white frosting extending about 1 inch over the outlines making the icing all about the same depth and put in the freezer for an hour. I took the cake out of the freezer and gave it another coat of white frosting, I then took the ark out of the freezer, took the plastic wrap off of the clip board, and “flipped” the ark onto the cake (leaving room for me to add “water” to the bottom edge), peeling the plastic wrap away from the ark decoration.
After the decoration was applied to the cake I took a small spatula and blended the white border of the decoration into the white frosting on the cake. I then used some blue tinted icing to create waves under and over the ark and some puffy clouds in the sky. I used Wilton green for the “Showers of Blessings” at the top.
Related cakes:
 Coolest Naoh’s Ark Birthday Cake
  12+ Coolest Disney Princess Cake Ideas – Awesome DIY Cake Decorating!
  Coolest Noahs Ark Cake
  Coolest Noah’s Ark Cake
  12+ Coolest Castle Cake Ideas – Awesome Homemade Castle Cake Designs!
  12+ Pretty Homemade Princess Cakes
  Cutest Noah’s Ark Baptism Cake
 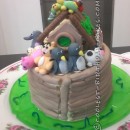 Coolest Noah’s Ark Birthday Cake
Your comment has been sent successfully.